
SentMa
-
Posts
180 -
Joined
-
Last visited
Content Type
Profiles
Forums
Gallery
Events
Downloads
Posts posted by SentMa
-
-
 Citation
-
 3
3
-
-
-
-
-
-
-
-
-
-
-
-
-
-
Il y a 3 heures, Arzok a dit :
Je l'ai retrouvé, c'est dans "naviger"
D'ailleurs, une partie des titres des menus est en anglais, une autre en francais !
Parce-que tu as mis le forum en français, effectivement, je dois terminer de traduire certaines fonction.
si tu passe en anglais, tu as bien tout en anglais.
-
 1
1
-
-
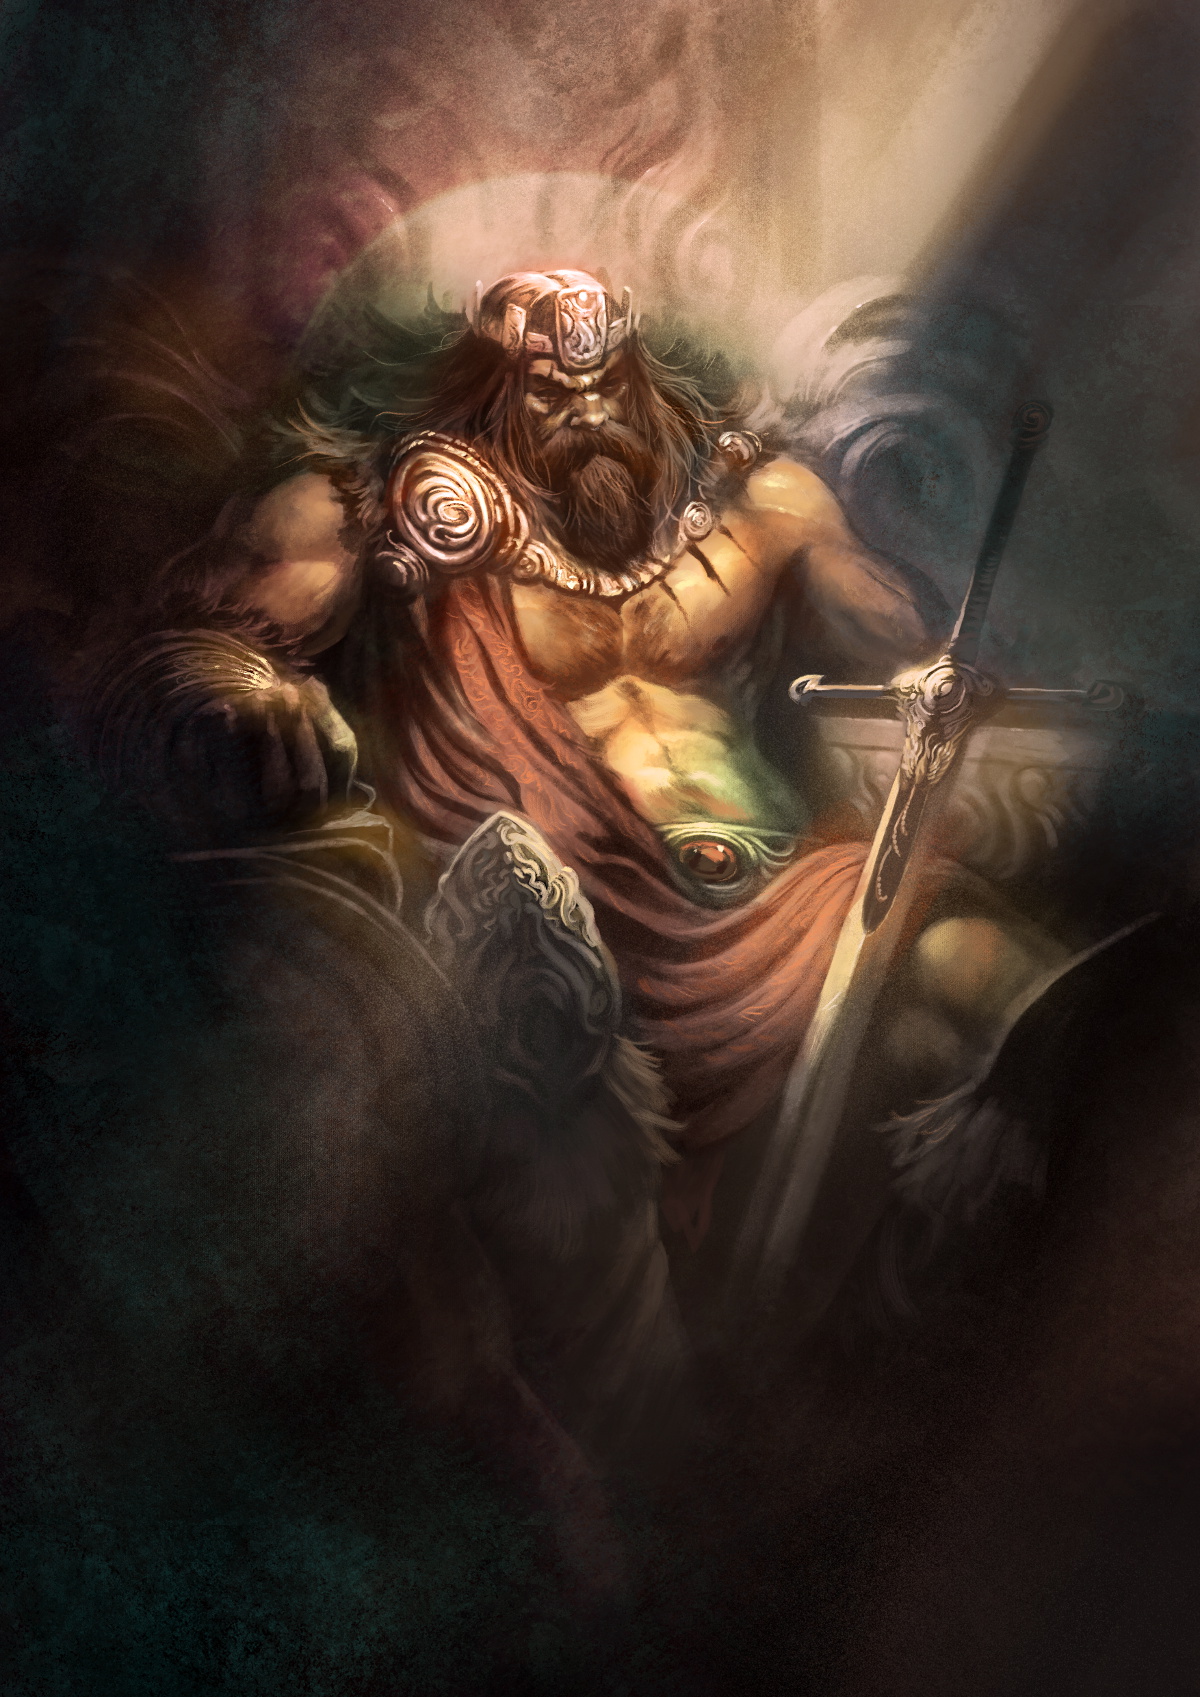
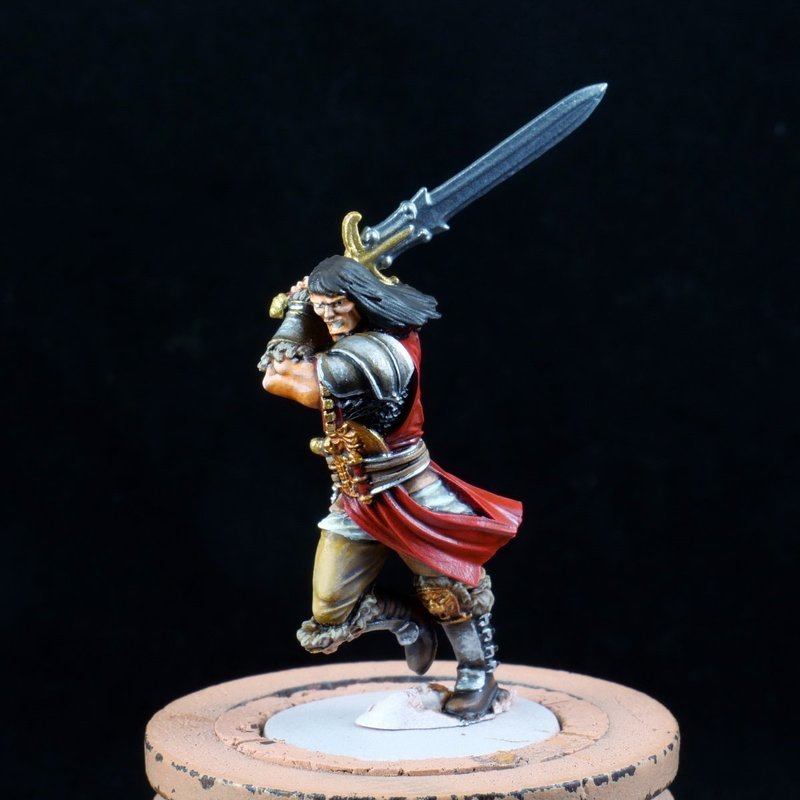
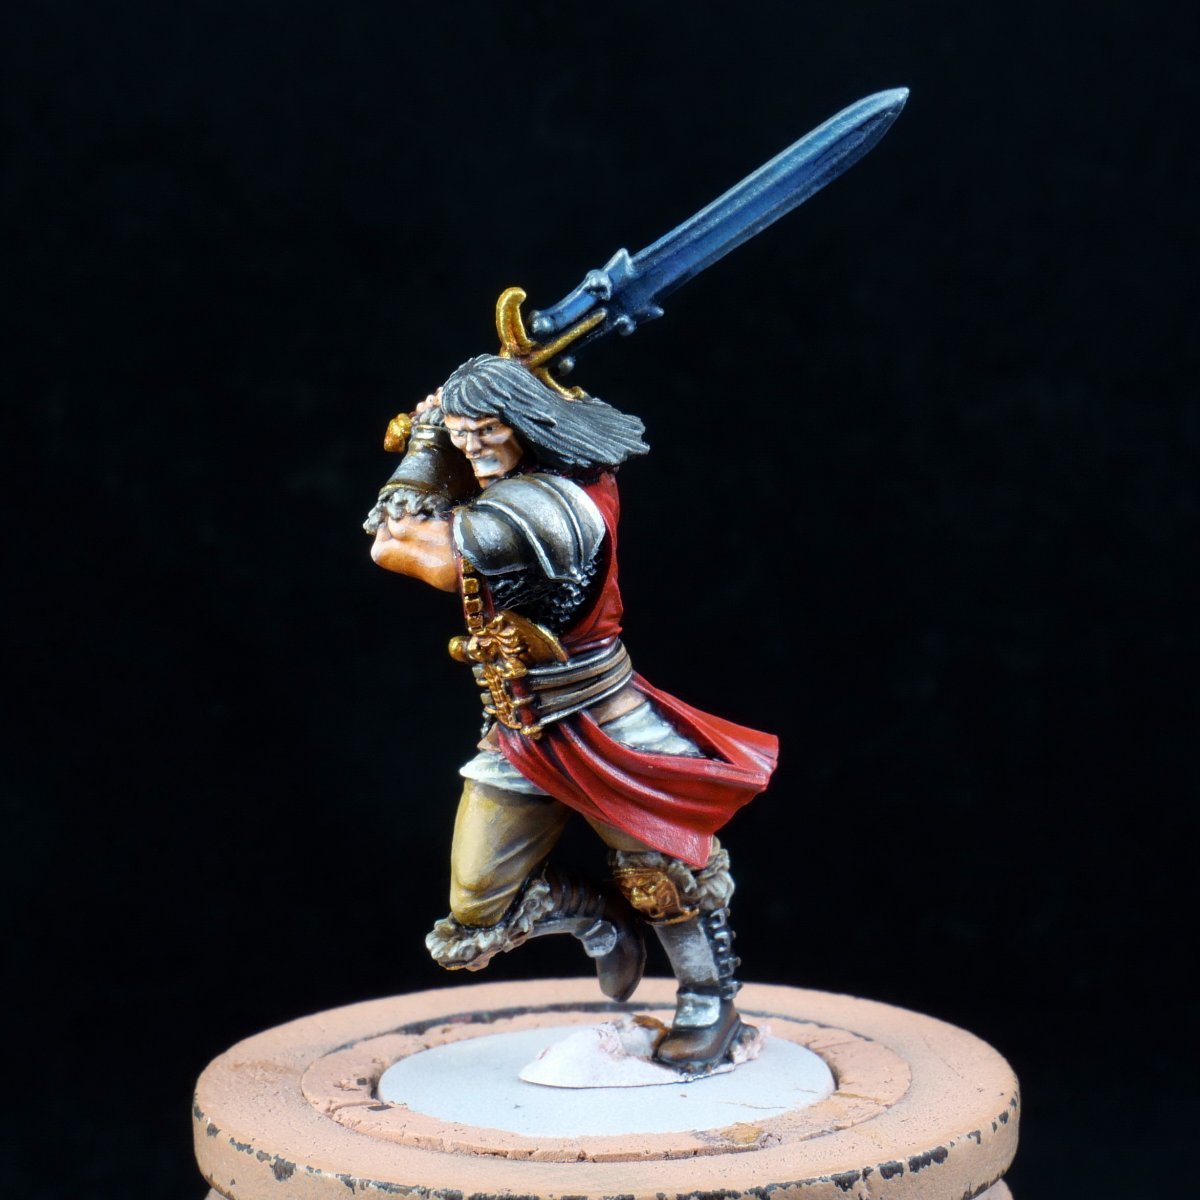
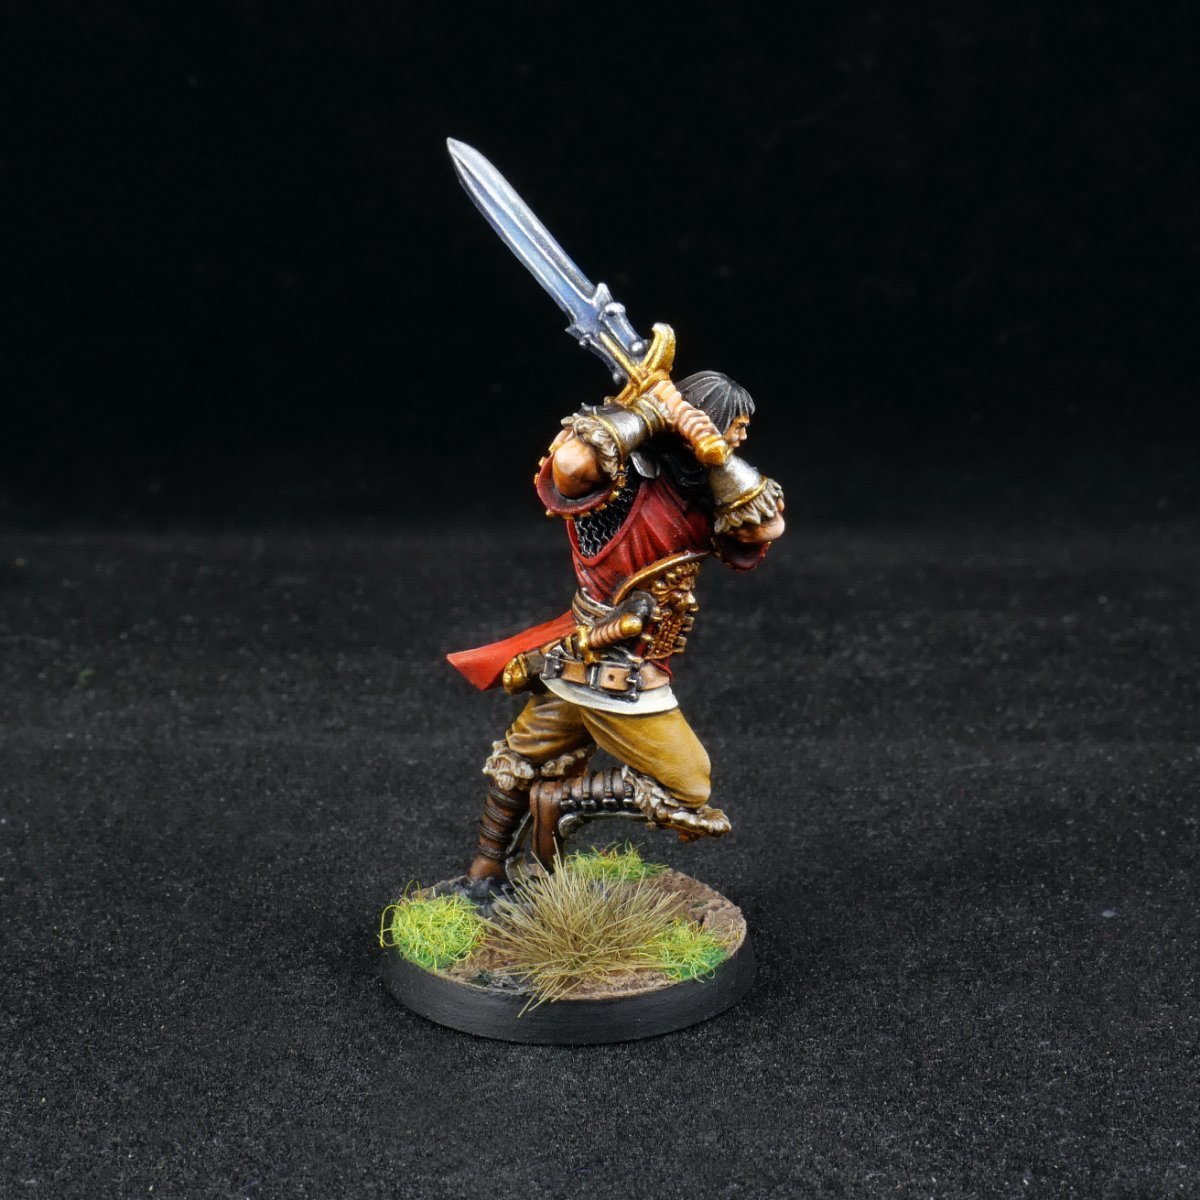
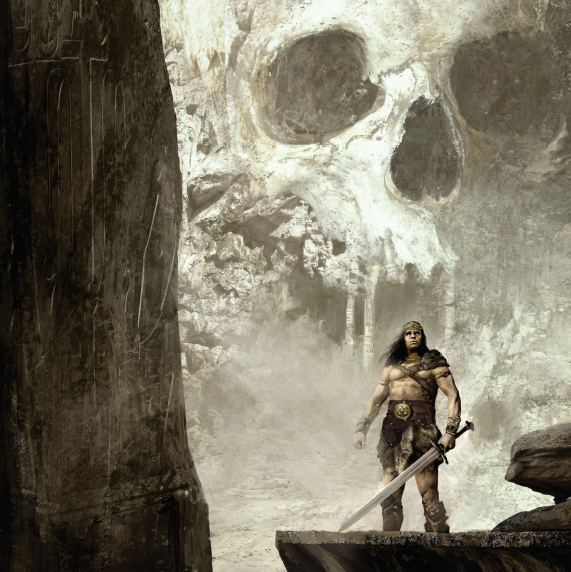
Painting Guide: Conan the Conqueror
By: @Roolz - Proofreading: Jay Adan
Foreword
The goal of this tutorial is to paint Conan the Conqueror to a fairly high level. As one of the main protagonists of the Conqueror expansion, he deserves more care than the rabble, so that he can tread the jeweled thrones of the Earth under his sandaled feet. Nevertheless, we don’t want to spend a century on it either, it’s not a display piece: One will not postpone the conquest of Aquilonia until Stygia freezes over.
I decided to use the color scheme of the game’s illustration, to ease the identification between the hero sheet and the miniature. One of the difficulties will be to keep the general mood of the illustration, while having a good in-game readability of the miniature: what works visually in 2D does not always work in 3D, and vice versa.

A little bit of technique
The main techniques I’ll use are washing, blending, and glazing. And some anecdotal drybrushing.
For more details on washing, blending, and glazing techniques, I invite you, friendly reader, to refer to Martin Grandbarbe's article in the TO Mag Vol. 2. Concerning drybrushing, it is described by yours truly in the TO Mag Vol. 4.
Paint ranges
On this mini, I will use Army Painter (AP), Games Workshop (GW), Vallejo Model (VM), Vallejo Game (VG), Vallejo Model Air (VMAir). I’ll specify the exact references and designations, but also the "normal" names (for example "Red" for "Hot chili baboon ass"...), because any equivalent paint will do. And I will avoid mixing colors to optimize the painting time, even though we are not talking speed-painting here, as mentioned before.
Sequence
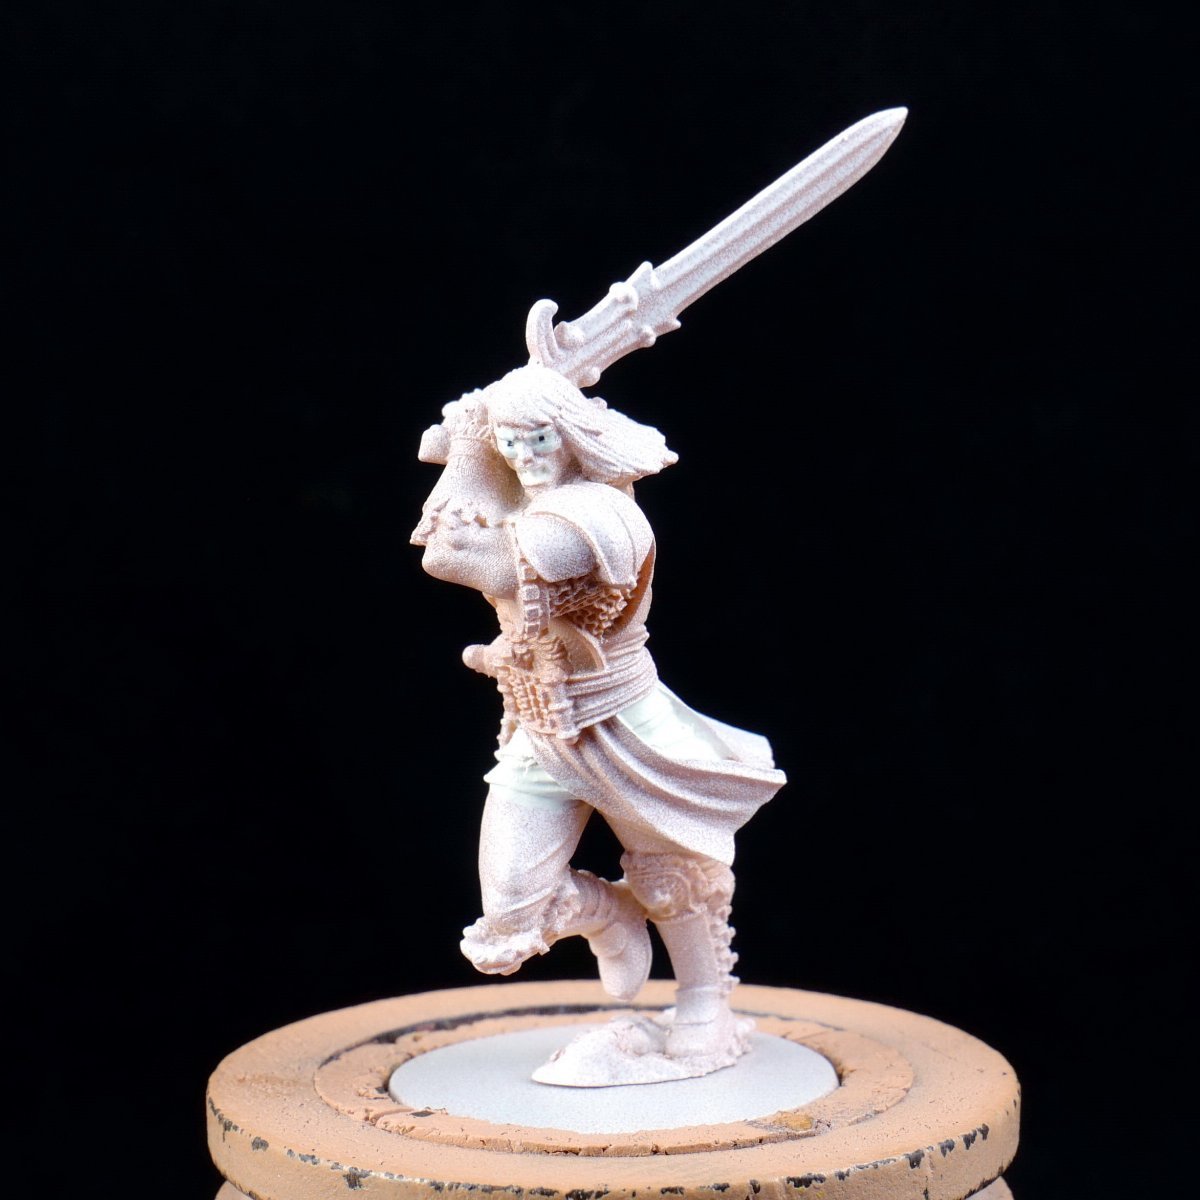
1- Deburring, washing, priming, and eyes.
For more details on deburring, washing, and priming, please refer to my article in the TO Mag Vol. 4.
Concerning deburring, in this case the mini in my possession is a resin prototype with almost no mold lines. The injected plastic figure has a bit more, the manufacturing process being different.
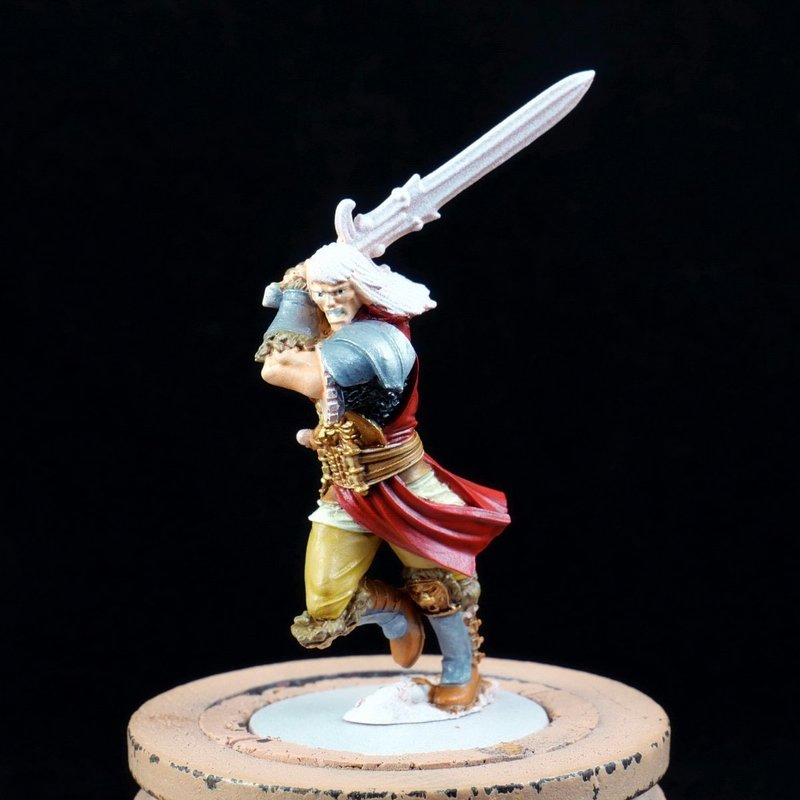
I prime this mini with a salmon flesh colored spray can (Barbarian flesh AP), then I do a little zenithal lighting with a white spray can (Matt white AP). The zenithal (also called pre-shading) consists of applying a veil of lighter color on the top of the mini, at about 70° from the horizontal, in order to bring out the reliefs and recesses before painting. Here, the difference in brightness between the salmon and white colors is small, so the zenithal is mostly to make the details more visible on the first pictures (since I intend to shoot the model at this stage already).
Once the mini is primed, I basecoat with off-white (Ivory VM 918) on the eyes, the teeth, and the skirt. Then I draw two vertical lines of dark grey (Dark grey VM 994) on the eyes to make the pupils, without being afraid to go over the edges above and below. Finally, I cover above and below the eyes with the off-white, because a clown’s stare doesn't really suit the mighty Cimmerian.

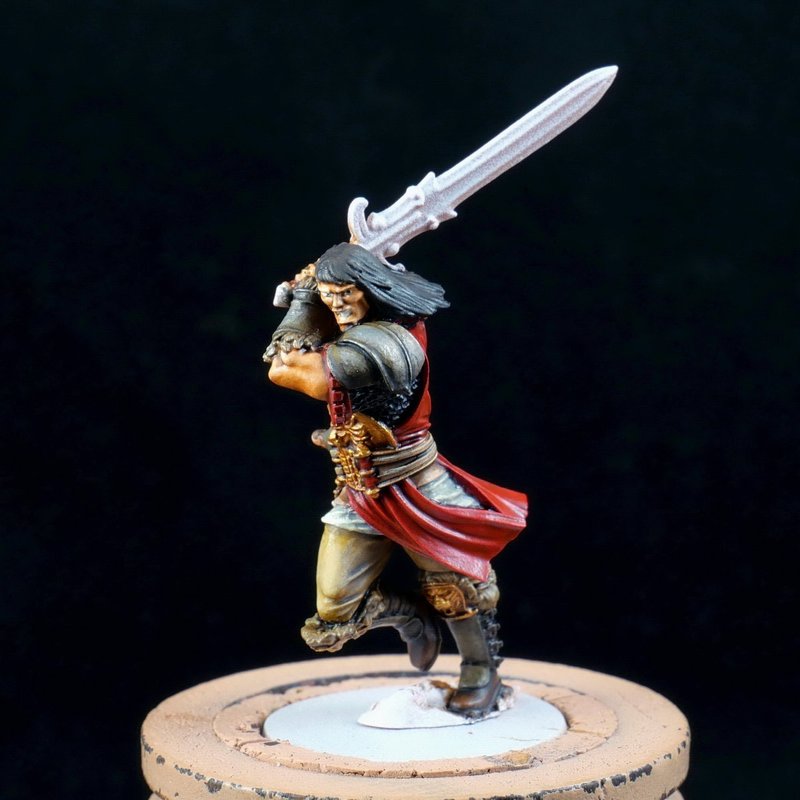
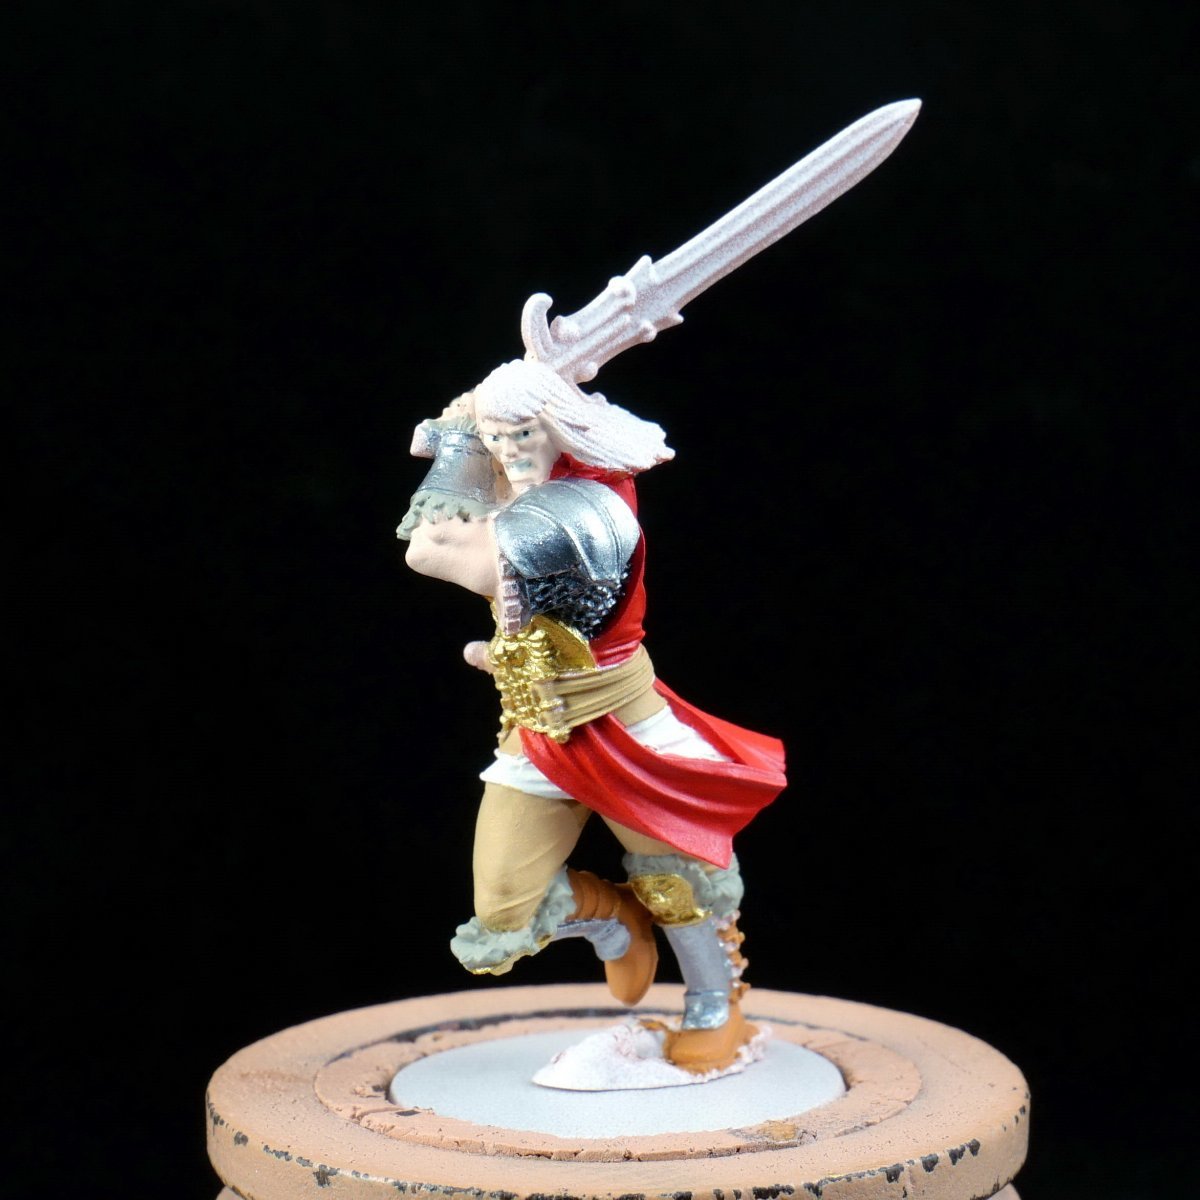
2- Main basecoats
Rather than working on each area successively in a more advanced way (shadows, highlights, etc.), I decide to do the main basecoats first, painting block colours with fairly light hues. Why? On the one hand, to have a general idea of the harmony of the hues. On the other hand, to be able to adjust the hues more easily later on (it is always easier to darken than to lighten). So I look at the illustration and try to choose the lightest color in each area.
I paint in the following order, so that I can cover more easily if I've gone over the edges of a previously painted area. If necessary, I apply several thin coats to increase the opacity.
The skin is painted in light flesh (Flesh tone VM 815). The boots, in orange brown (Orange brown VM 981). The pants, the belt, and the strap of the dagger, in yellowish brown (Tan yellow VM 912). The tunic in bright red (Pure red AP). The furs on the boots and forearms, in greenish light grey (Stone grey VM 884). The chain mail in dark metal grey (Gun grey VMA 072). The armor plates on the arms, shoulders, and legs, in medium metal grey (Chainmail silver VG 053). Knee pads, belt buckle, and “abs protector”, in gold (Polished gold VG 055).
And now you'll say to me: "So, what about the hair and the sword?" “So, zilch." The bulk of the surfaces are covered, it's time to work more on them to see how it goes. And I'm still a little doubtful about the hues I'll use for the hair and sword. Because at the end of the day the top of the mini will have to be eye-catching, but not too much. Also, doing solid color basecoating is a pain, after a while.

3- Main shadows and hues correction
I start to shade, and I begin to correct the hues to get closer to those of the illustration, by applying washes and glazes, in thin layers, on the previously basecoated areas.
These are either ready-made washes, or homemade with normal paint diluted quite heavily. I dilute with water and/or matte medium (Lahmian medium GW). I adjust the dilution if necessary (for ready-made and for homemade washes), so that the color underneath is not altered too brutally. I repeat the wash and glaze steps if necessary, covering smaller and smaller areas and insisting on the deepest recesses, and on the shadow areas located under the volumes. It looks fast on paper, but in real life it's a wee bit longer. But don't worry, friendly reader, the next steps will be the same or worse! Heheheh [sly laugh].
On the skin, washes in salmon flesh (Barbarian flesh AP). The pants, in greenish brown (Japanese uniform VM 923). The skirt in greenish light grey (Stone grey VM 884). The boots, furs, belt, and dagger strap in medium brown (Flat earth VM 983). The tunic in red brown (Cavalry brown VM 982). The chain mail in black (Black ink VG 094). Knee pads, belt buckle, and abs protector, in reddish brown (Reikland fleshshade GW). The armor plates, in medium grey (Neutral grey VM 992).
4- More shadows and hues correction...
And we continue the work on shadows and hues, with washes and glazes, either ready-made or home-made. Still trying to get closer to the illustration. Same as before.
On the skin and the armor plates, yellowish brown (Medium fleshtone VM 860, very close to Tan yellow VM 912 but a tad darker). The pants, in greenish brown (English uniform VM 921). The skirt in slightly greenish medium grey (75/25 mixture of Neutral grey VM 992 / Stone grey VM 884). The boots and the belt in dark brown (Burnt umber VM 941). The tunic, in dark red (Carroburg crimson GW). The kneepads, the belt buckle, and the abs protector, in hazelnut brown (Brown ink VG 092).

5 - Shadows, hues correction, and that...
Still the same as before, but adding a few basecoats and touch ups ; in order to get a little closer to the illustration, increase the contrast and unify the hues a little.
First, some washes and glazes. At this stage, we're working on darker things, so we have to go light-handed and progressively, to prevent the mini from looking too dark or dirty.
The tunic is still “too red”, a red brown glaze (Cavalry brown VM 982) will help. On the skin, reddish brown (Reikland fleshshade GW). On the pants, boots, armor plates, furs, and golden parts, very dark brown (Agrax earthshade GW). This brown is very dark indeed, so we go easy on it, and focus on the shadow areas. On the skirt, medium grey (Neutral grey VM 992). Again, the skirt has to look white at the end of the day, so we don't spread a gallon of gray. No sir. Just don't overload the brush, put the wash in the hollows and the outlines with the surrounding areas, aim well, and capillarity does the rest.
Now, the overall brownish looks of the illustration starts to appear.
It's time to put solid color basecoats on some areas not painted yet. With undiluted paints or almost: opacity is needed.
On the hair, boot straps, and dagger scabbard, dark brown (Burnt umber VM 941). On the handles of the dagger and sword, salmon flesh (Barbarian flesh AP). On the handles and the 4 cylinders in front of the belt, red brown (Cavalry brown VM 982). And on the 4 little square things stuck on the 4 cylinders, a shot of yellowish brown (Tan yellow VM 912).

6 - And shadows, for a change. There's never enough of them
With washes again, we push the shadows on certain areas, on even smaller surfaces. And let’s put some washes on the basecoats from the previous step, because we're not going to leave them like that, poor things.
On the hair, boot straps, dagger scabbard, and armor plates, black (Black ink VG 094). Note that on the armor plates, only the outlines are shaded, it brings out the previous shading. The tunic is still too red and not contrasted enough for my taste, so I put dark red in the hollows (Carroburg crimson GW). Same dark red on the sleeves and the 4 cylinders in front of the belt. For the skin and the 4 small square things in front of the belt, very dark brown (Agrax earthshade GW). On the skin, this very dark brown is applied only in the last shadow areas (edges of the nose, around the eyes, under the arms, the neck, etc.).
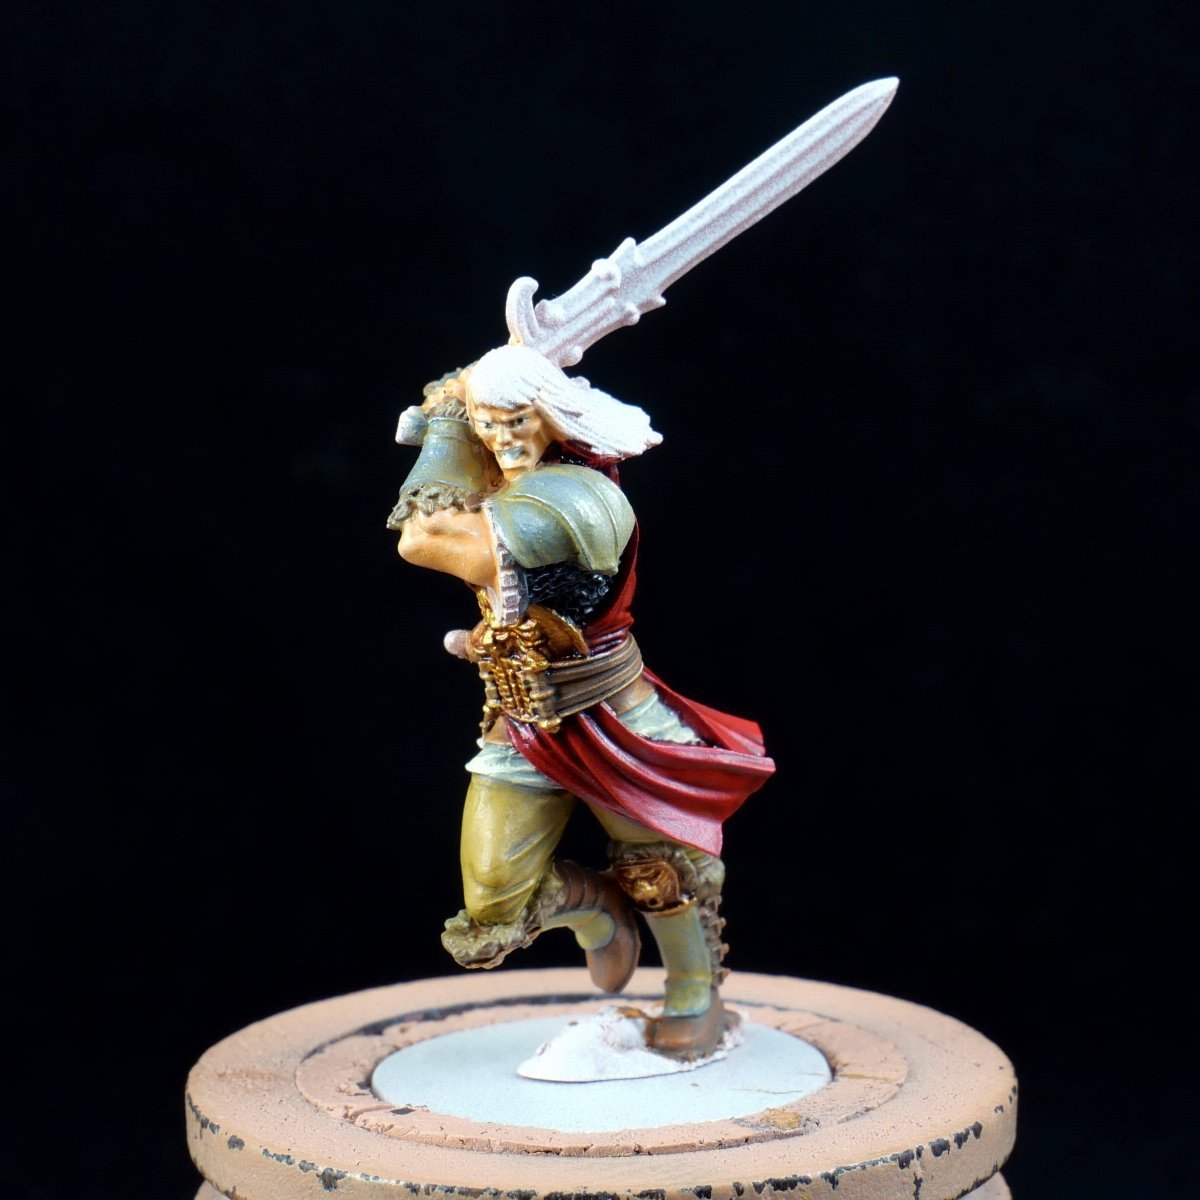
7- Let there be light!
And we start to highlight, mostly via blends for the biggest surfaces, and undiluted paint for the smallest ones. Focusing on the edges and surfaces above the volumes. Basically the opposite of shading. In most cases, I use the same paints as for the basecoats.
On the skin, blends of light flesh (Flesh tone VM 815). On the pants and the brown areas of the belt, yellowish brown (Tan yellow VM 912). The skirt, off-white (Ivory VM 918). The boots, orange brown (Orange brown VM 981). The dagger's scabbard in medium brown (Flat earth VM 983). The strap of the dagger in salmon flesh (Barbarian flesh AP), to differentiate it from the belt which had the same hues until now. The tunic and all the red areas are highlighted in bright red (Pure red AP). The furs in greenish light grey (Stone grey VM 884).
The armor plates and chain mail are highlighted with light metal grey (Chrome VMA 064). I take a bit more care of the blends on the shoulder plates, and for the chain mail I drybrush with a small brush. With the same light metal grey, I paint the cables on the belt, the buckles of the boots and the loop of the dagger strap.
It's also time to get to grips with the weapons, with some solid color basecoats. I paint the sword’s blade in dark metal grey (Gun grey VMA 072). And I bring out the gold (Polished gold VG 055) to paint the missing gold elements: hilt and pommel of the sword and dagger, metal parts of the dagger scabbard, edges of the armor plates on the arms, square things on the sleeves. And I highlight the golden parts previously shaded (kneepads, belt, abs protector) with some small dots of gold.
Phew, that took a while.
8 - And it goes on and on...
A shot of off-white (Ivory VM 918) is put back on the teeth, to cover the previous mistakes and overflows. The skin receives last highlights of very light flesh (Light flesh VM 928). Same for the fur, with dots of slightly greenish very light grey (75/25 mix of Ivory VM 918 / Stone grey VM 884). And the handles of the sword and dagger, with dots of beige (Bone white VG034).
I highlight the hair with dark brown (Burnt umber VM 941), gently stroking with the edge of the brush, not too loaded, kind of like drybrushing. Then with the beige above, focusing on the top of the head and the tips of the hair. You don't want to put beige all over the hair, the goal is just to create reflections, or some whitening hair. It's consistent since Conan is already a certain age when he conquers Aquilonia.
I shade the sword guard, the dagger and its scabbard, via washes of reddish brown (Reikland fleshshade GW) then hazelnut brown (Brown ink VG 092). Still with the hazelnut brown, a stroke at the borders of the golden edges of the arms’ plates, and on the golden squares of the sleeves. Then I push the shadows further on all the red parts, with black (Black ink VG 094), applied only in the deepest hollows and the borders with the other areas.
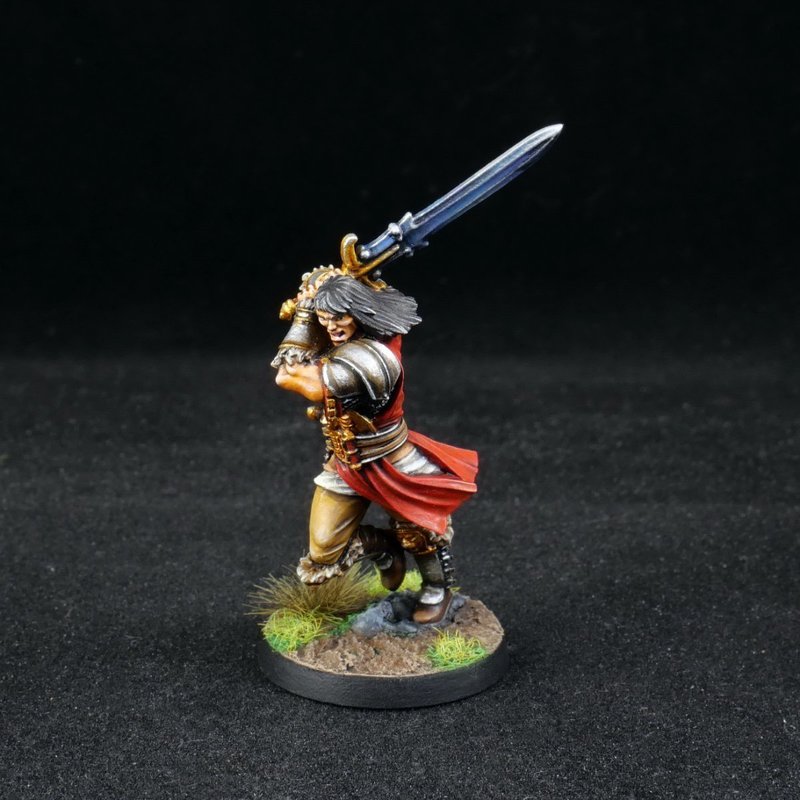
Finally, I work on the blade. I decide to move away from the brown tones of the illustration, and to use blues to give a little variety to the mini. The blues need to be dark enough, otherwise we will only see the sword and not the guy holding it. I work with successive washes of bright blue (Crystal blue AP), then dark purplish blue (Oxford blue VM 807), and finally black, covering smaller areas as I go along. And I reverse the direction of the shadows and lights according to the surfaces of the blade (a bit like NMM technique but that's not the point here). That is to say that on the upper part of the blade the shadows go towards the guard, on the lower part the shadows go towards the tip. And on the middle part... well I don't know so we'll go towards both guard and tip, keeping the metal in the middle. Thank you, Conan's blacksmith, for making a blade with 3 parts.
The same black wash is used to outline the silver details painted before: buckles of the boots, of the strap, and cables of the belt.

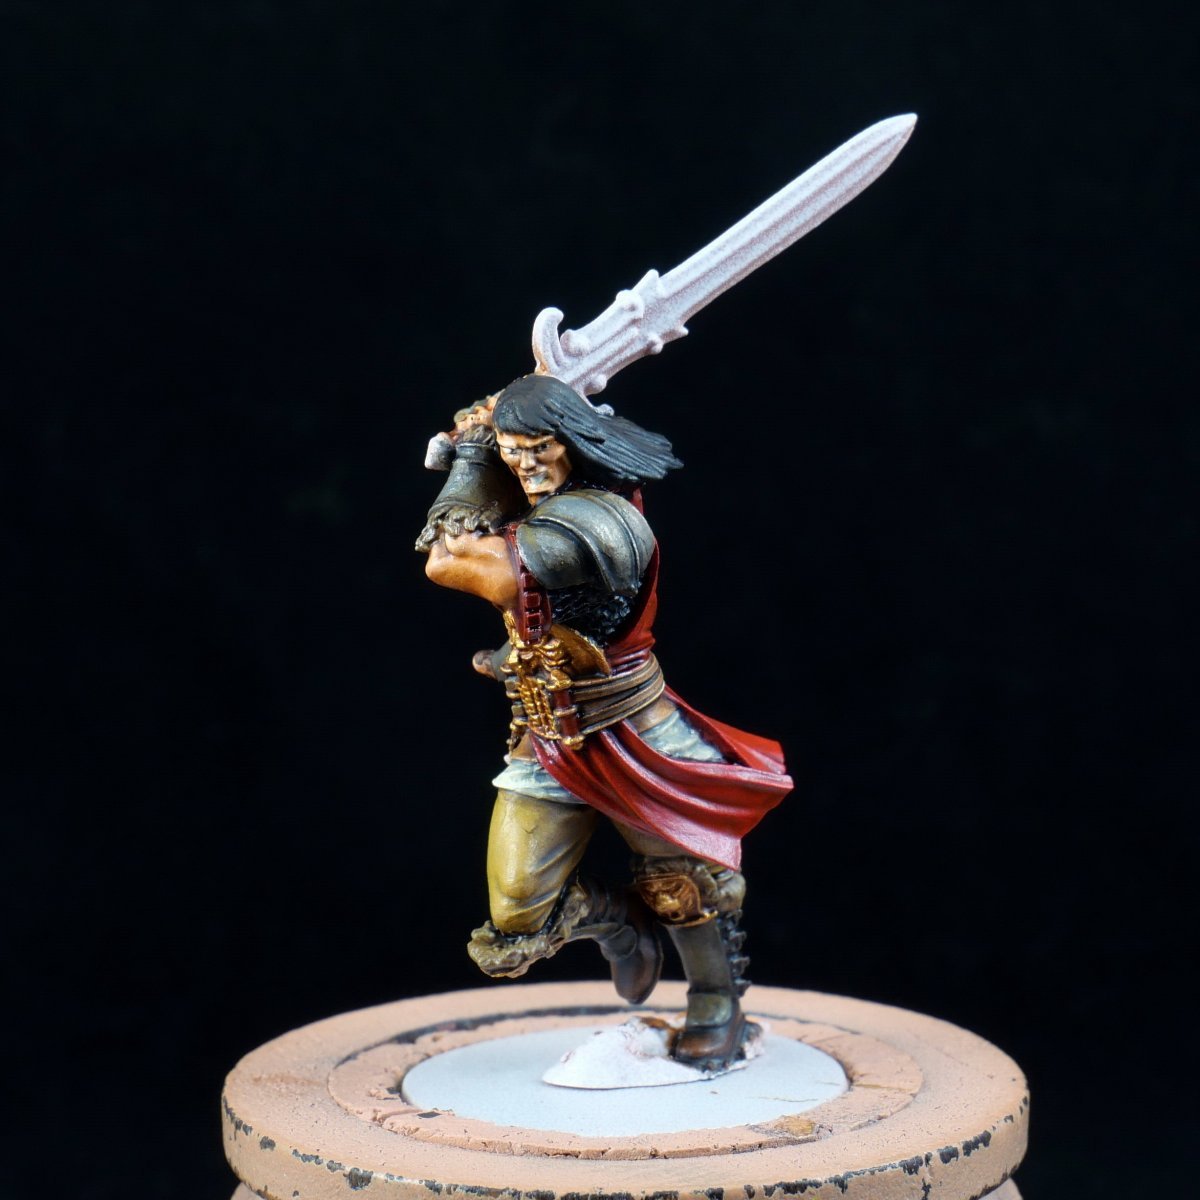
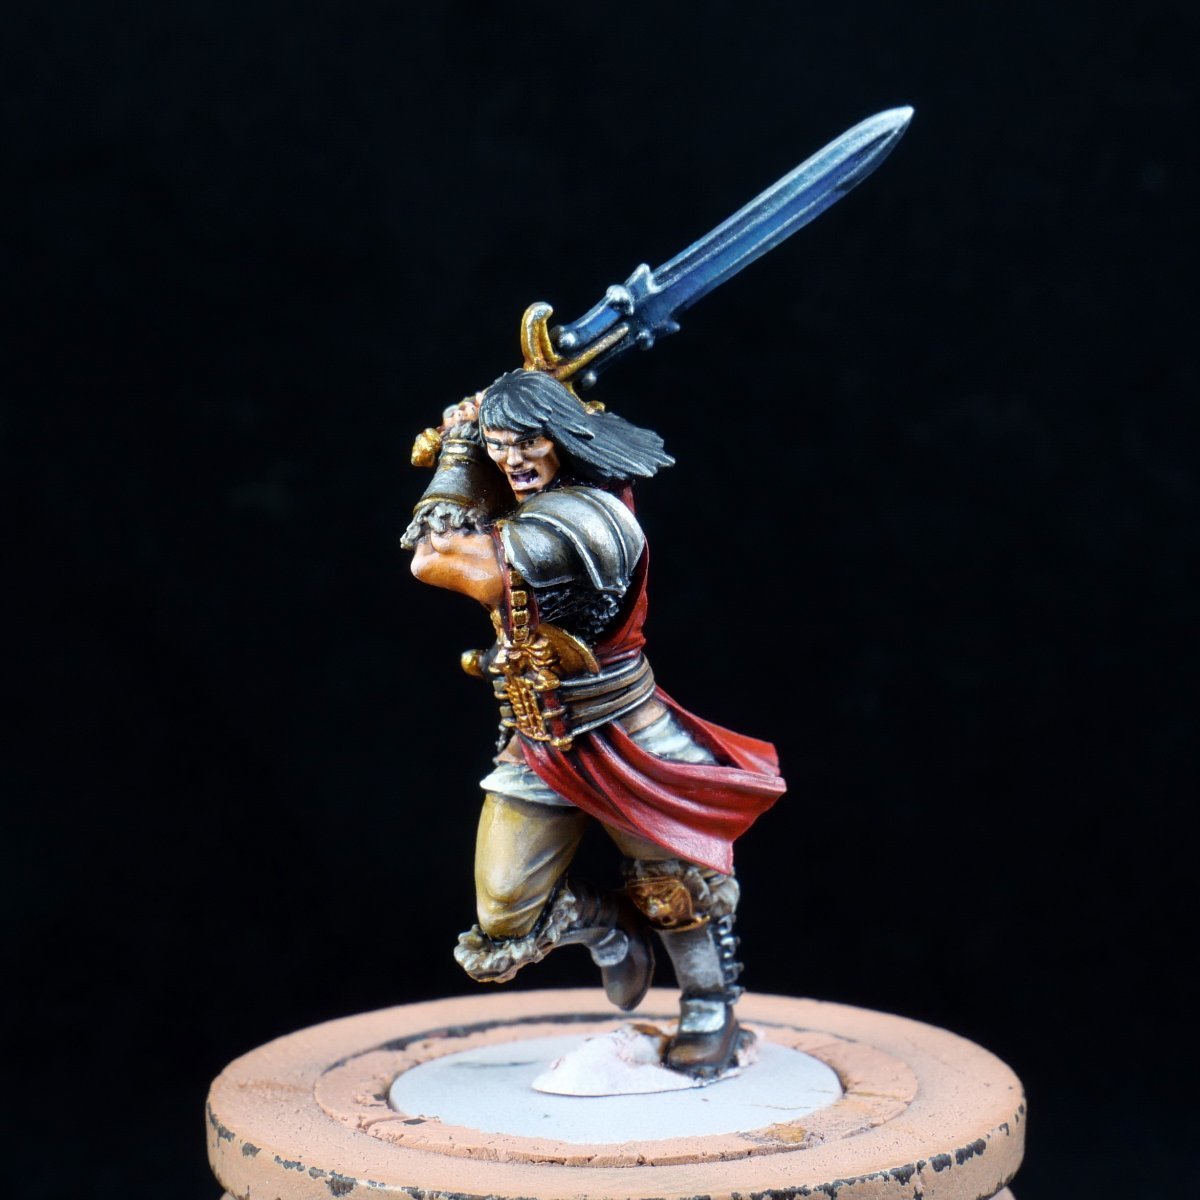
9- Stay on target! Almost there
Shadows first. In the mouth, a dark red wash (Carroburg crimson GW). On the golden parts of the sword, the dagger, the handles, etc, the last shadows with small washes of very dark brown (Agrax earthshade GW). And a thin black wash (Black ink VG 094) on the hair, to unify the colours. Oops, I almost forgot the eyebrows, which I paint in black (Matt black AP). Thou shalt not forget eyebrows.
Then the last highlights. With beige (Bone white VG034) I touch up a few hair tips, and I push a bit the highlights on the pants. Lighty-light-handed. With salmon flesh (Barbarian flesh AP), some edges of the red tunic. All this doesn’t look like much but it helps to harmonize the mini’s hues.
Now I finish the metals. On the golden parts, I push up the lights with gold (Polished gold VG 055), and some small dots of light metal grey (Chrome VMA 064) here and there. The sword blade remains, on which I use dark metal grey (Gun grey VMA 072), then light metal grey on smaller areas, and finally very light metal grey (Silver VM 997) on tiny areas.
Note that there is a not-super-nice-looking piece of resin* between the dagger handle and the abs protector, which is there for unmolding reasons (*only on the resin proto, not on the plastic mini). You can see it on one of the following pictures. I painted it dark brown and put black in the middle, to hide it a bit. I could have removed it with an X-acto in step 1 but no, paint will do the job.
Now there’s only the base to do.

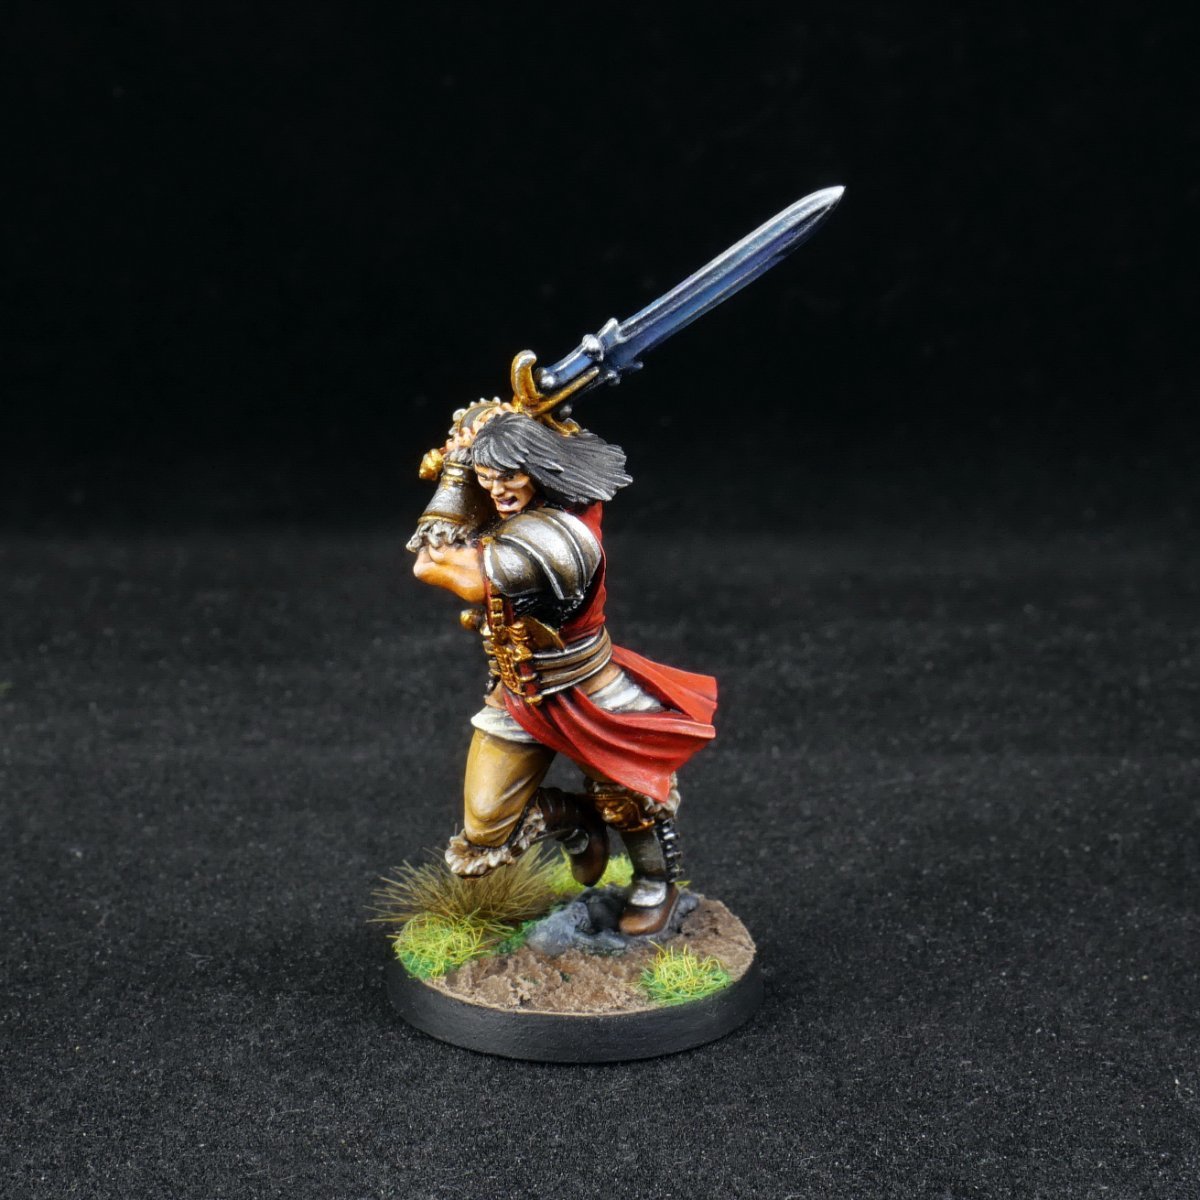
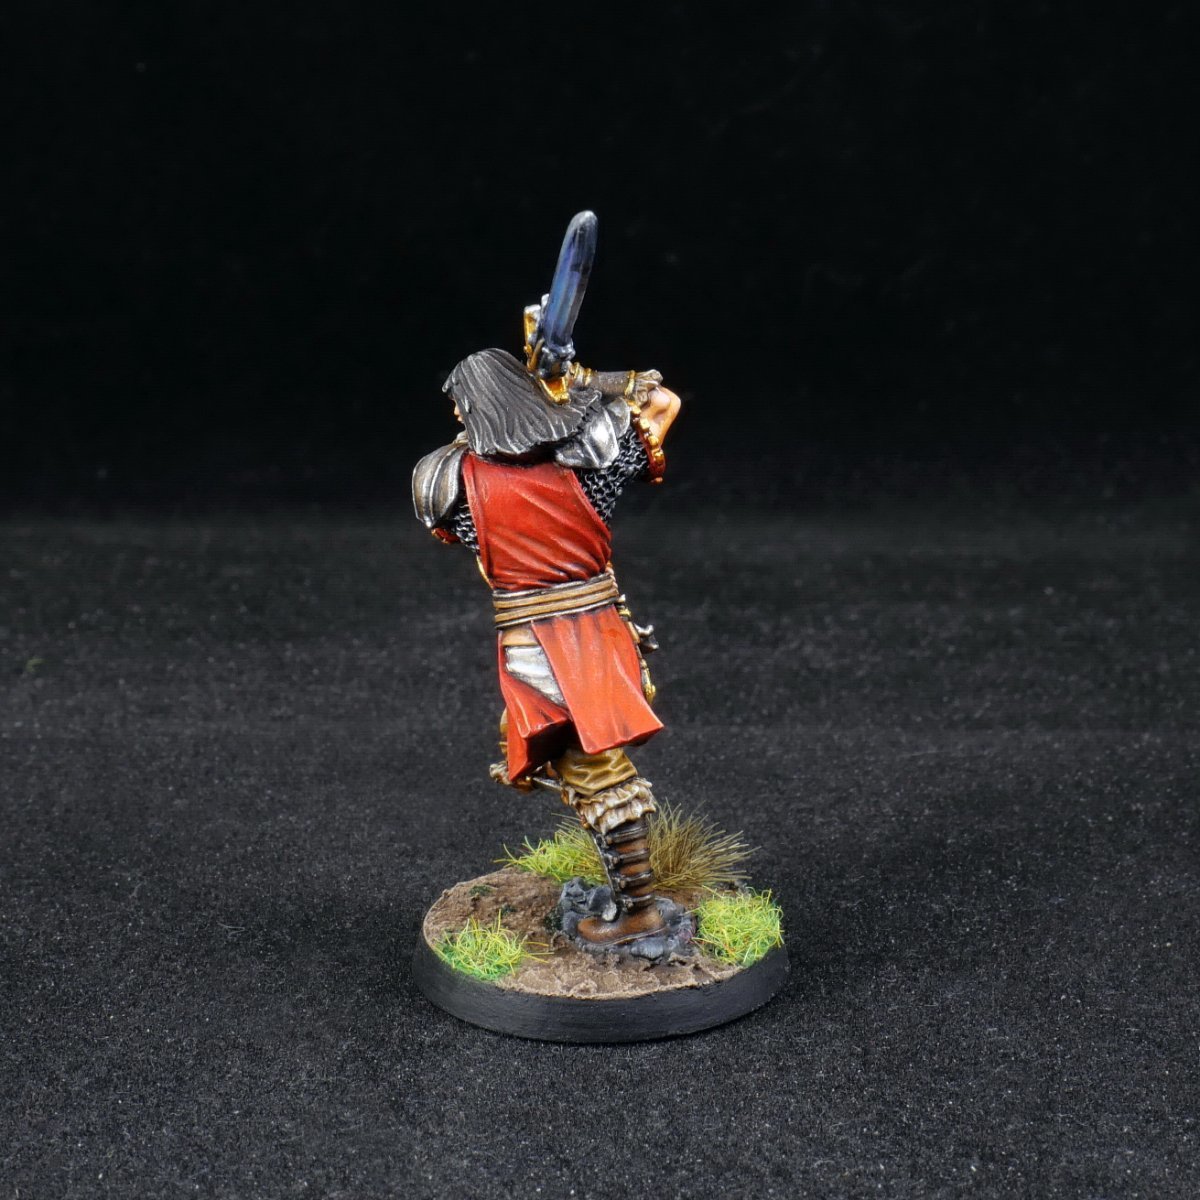
10 - Base & co.
I’ve re-based all my Conan miniatures with transparent acrylic bases, but since this one is made of resin (more fragile than plastic, and a bit taller), I might not actually use it for gaming (I’ll paint the plastic one the same way). So let’s go for a quick "traditional" basing, and no varnish after. In a gaming perspective, it's safer to varnish the whole mini in matte and to put some dots of gloss varnish on the metals and wet areas.
First, I texture the base with a thin layer of quick wall filler (like Polyfilla), spread and tapped on with a small spatula. I have wall filler handy, but most miniature paints manufacturers offer very good dedicated texturing products. Then the paint. A random grey on the pebbles next to the foot, brown elsewhere, and a few patches of green. Shades with black, dark brown, and dark green washes ; then highlight by drybrushing lighter colours. The edge of the base is black. On top of that, a bit of static grass and a tuft are glued on the green spots, because a bit of hair never killed anyone.
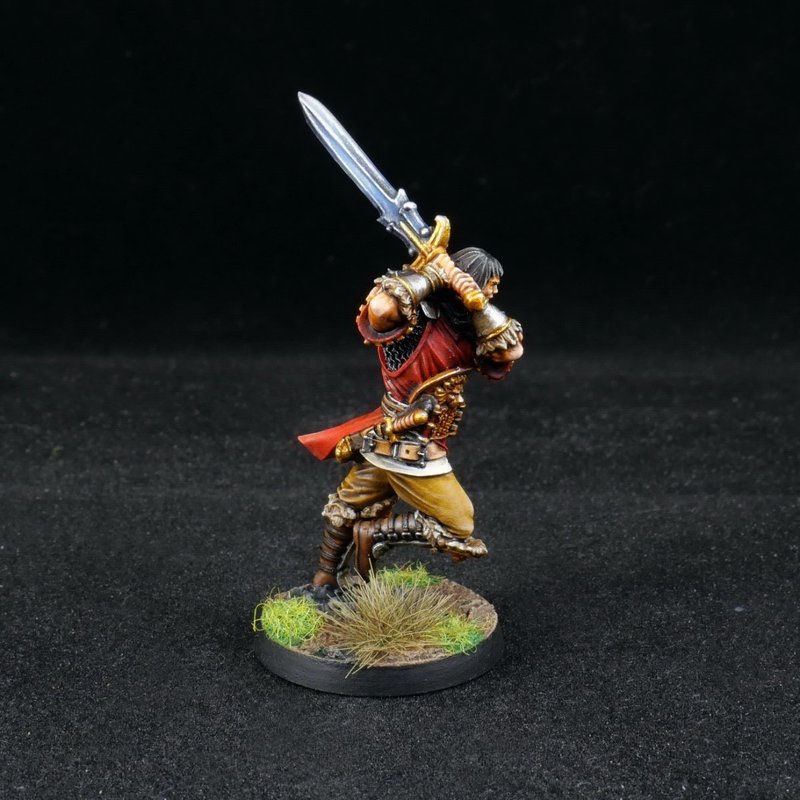
Epilogue
Conan the Conqueror is now ready to crush his enemies, see them driven before him, and hear the lamentations of their women. Same old same old.
Some might object that given the wall of text, it took me a century or so to paint the dude, and whatnot. Of course, there are a few hours of work. But the steps are voluntarily very detailed, it's a lot of words to write, and therefore it's longer to read than a lousy tweet.
Hoping that it helps you, thank you for your attention, friendly reader!

-
5
-
-
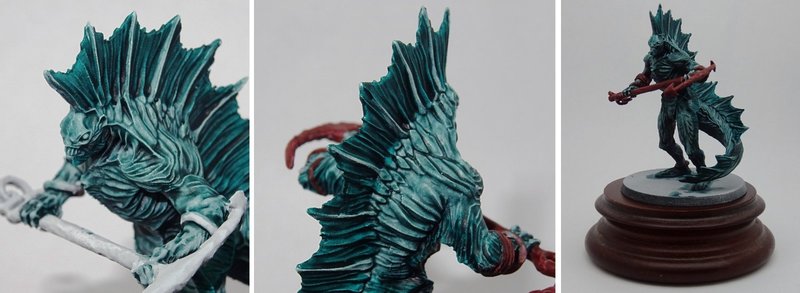
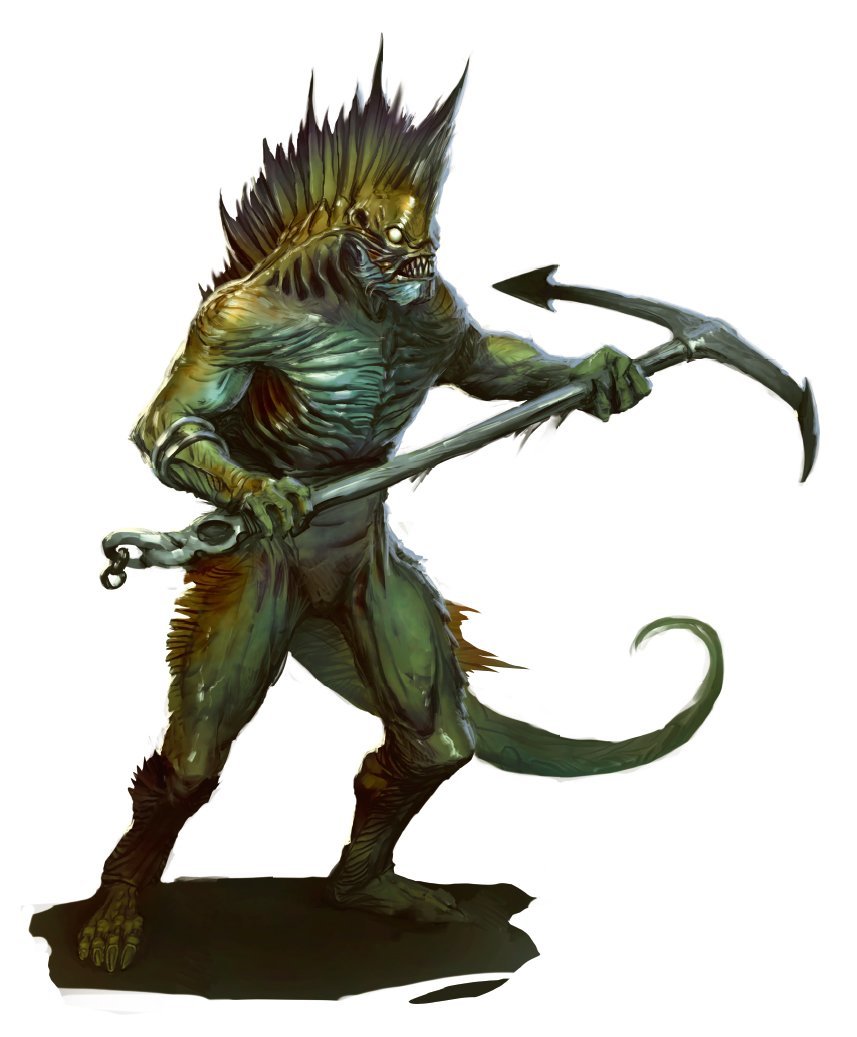
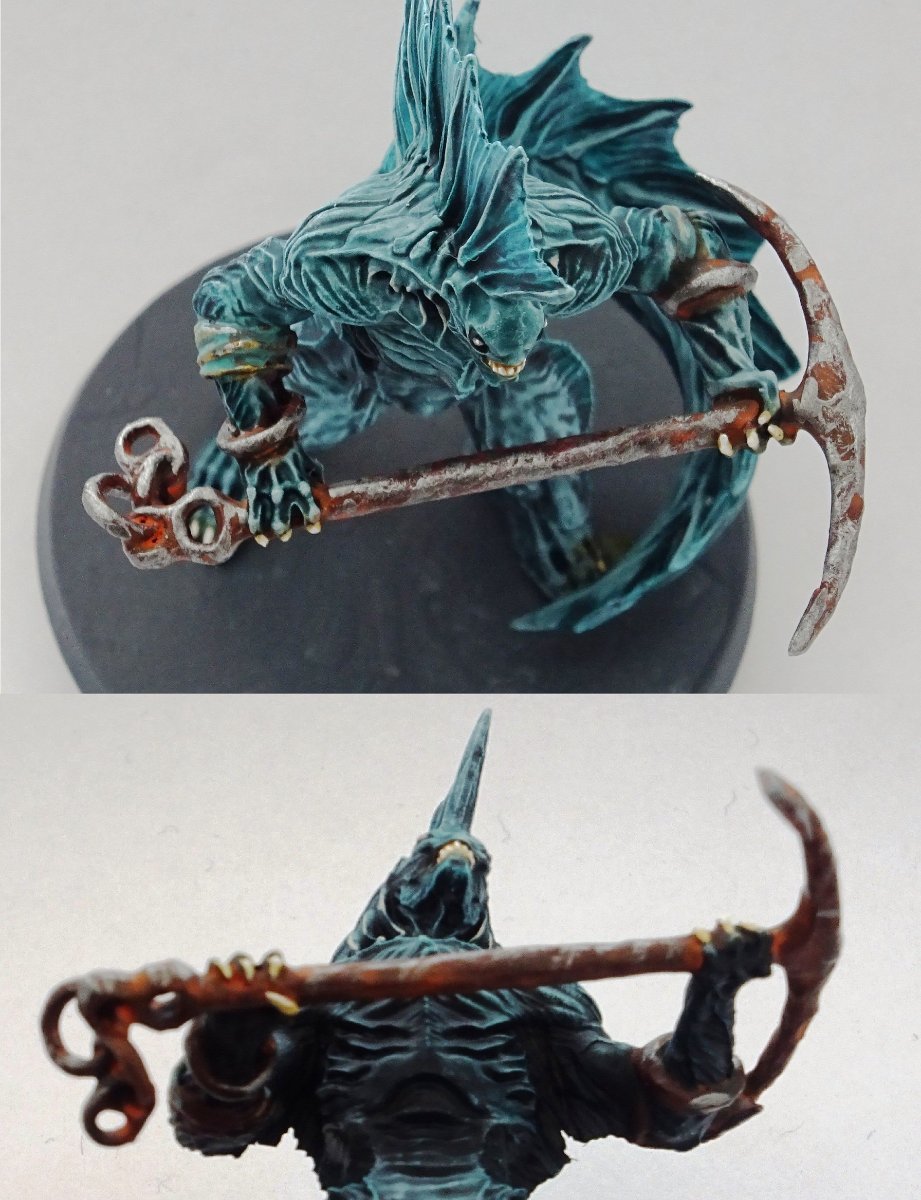
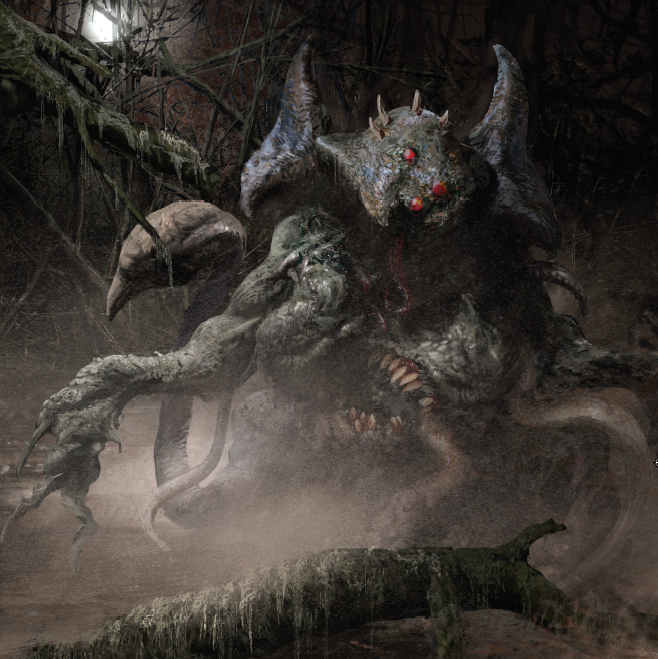
Painting guide: Deep One
By: @razorspoon
Translation & proofreading: @Roolz & Jay Adan
This guide is designed to paint Deep Ones miniatures quickly, with simple techniques, accessible to beginners. I used Citadel Colour (CC), Prince August (PA) and Amsterdam art paints (references in index).
We will discuss pre-shading, inking -a cousin of the successive washes technique-, drybrushing and creating a rust effect.
Before moving on to painting, I researched what a "Deep One" looks like. Lovecraftian mythology gives me a rather appealing image for this painting project. The creature combines, in a humanoid body, attributes of several marine creatures (fish, but also crustaceans, molluscs and reptiles). The painting potential is enormous... Let's move on to the realization.

Preparation
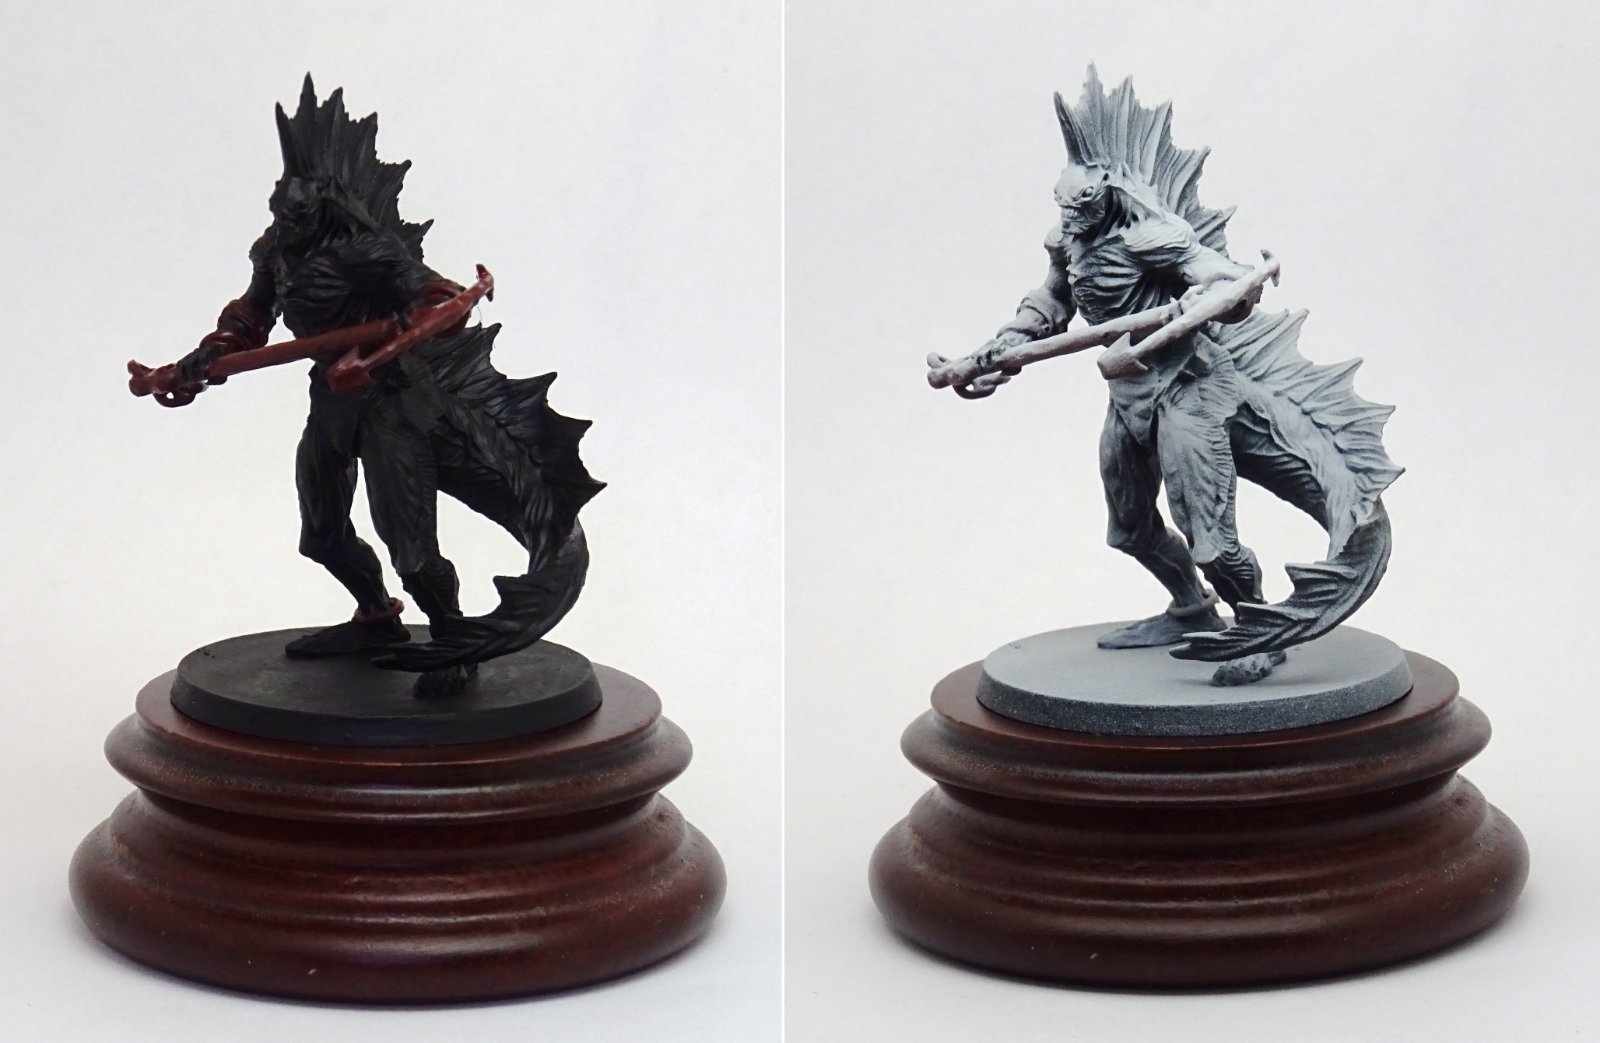
The preparation of the miniature is an important step for painting “by inking”. Indeed, creating a shading or pre-shading scheme at this stage will strongly influence the final result.
First, the entire mini must be painted Black. For this, a spray can or an airbrush are fine. Personally, I do this step with a brush, because I find the method more precise: with sprays, it can happen that the deepest hollows are not reached. With a fluid paint (I add a little fluid medium) applied with a brush, I can guide the paint into the hollows more easily. For this first step I used Ivory Black Amsterdam.
The jewels and the anchor are then painted with Black Red PA to prepare the rust effect.
Finally, I spray an off-white, such as Corax White CC, at a zenithal angle (70 to 80° from the horizontal). The sprays bursts must be short, one does not want to repaint the figure in white but to quickly get a gradient of gray that prefigures the shadow and light areas on the miniature. To accentuate this effect, a light drybrushing of pure Titanium White can be applied to the most prominent edges.


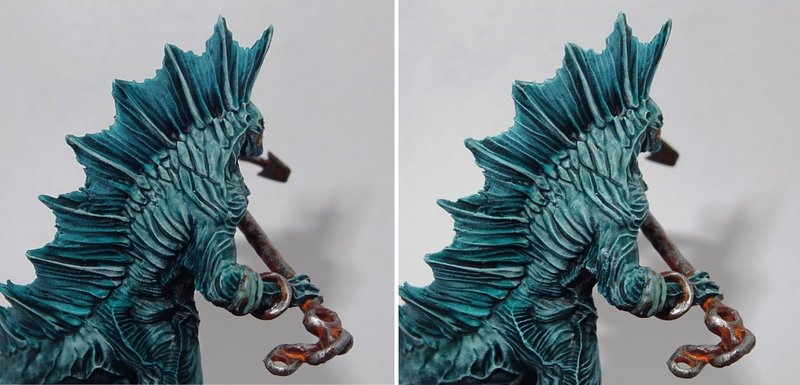
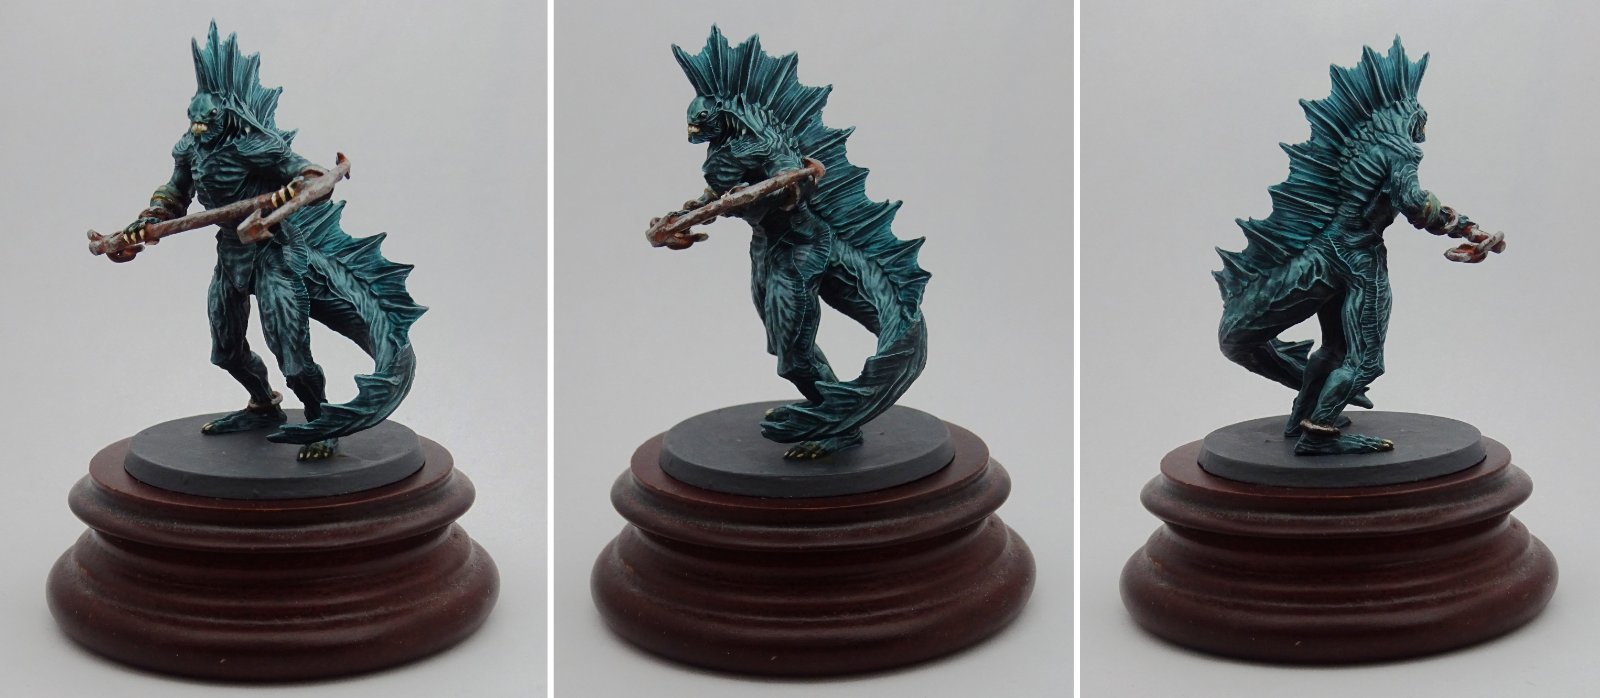
General painting
I’ve chosen to present a method of painting by inking, because it is a technique that is coming back in fashion with the recent popularization of "self-contrasting" paints. Contrary to the classic technique of blending, it is a matter of applying a coat that will outline all the volumes and create an overall shading, in conjunction with the preparation. A finishing highlight touch will bring back the shine to the whole.
Before applying the paint, I define the "skin" and "fins" areas of my mini.
- For the scaly skin, I'll start with a neutral grey slightly tinted with blue, to recall the marine element. For this, I chose Gryph Charger Grey CC, to which I add a drop of Terradon Turquoise CC (one drop of Terradon to 12 drops of Gryph Charger). The coat is applied all over the skin. The paint will build up in the hollows and leave a thinner, tinted layer on the reliefs.
- Once my first coat is dry, I add a second coat of Gryph Charger Grey, slightly diluted with Contrast Medium CC. This second coat will strengthen the shadows without altering too much the blue component of the previous mix.
- The fins are then painted with pure Terradon Turquoise. The turquoise blue will match the skin tone, creating a delicate and harmonious contrast with the rest of the mini.
At this stage, without having painted any details, the miniature is already quite readable, in-game.
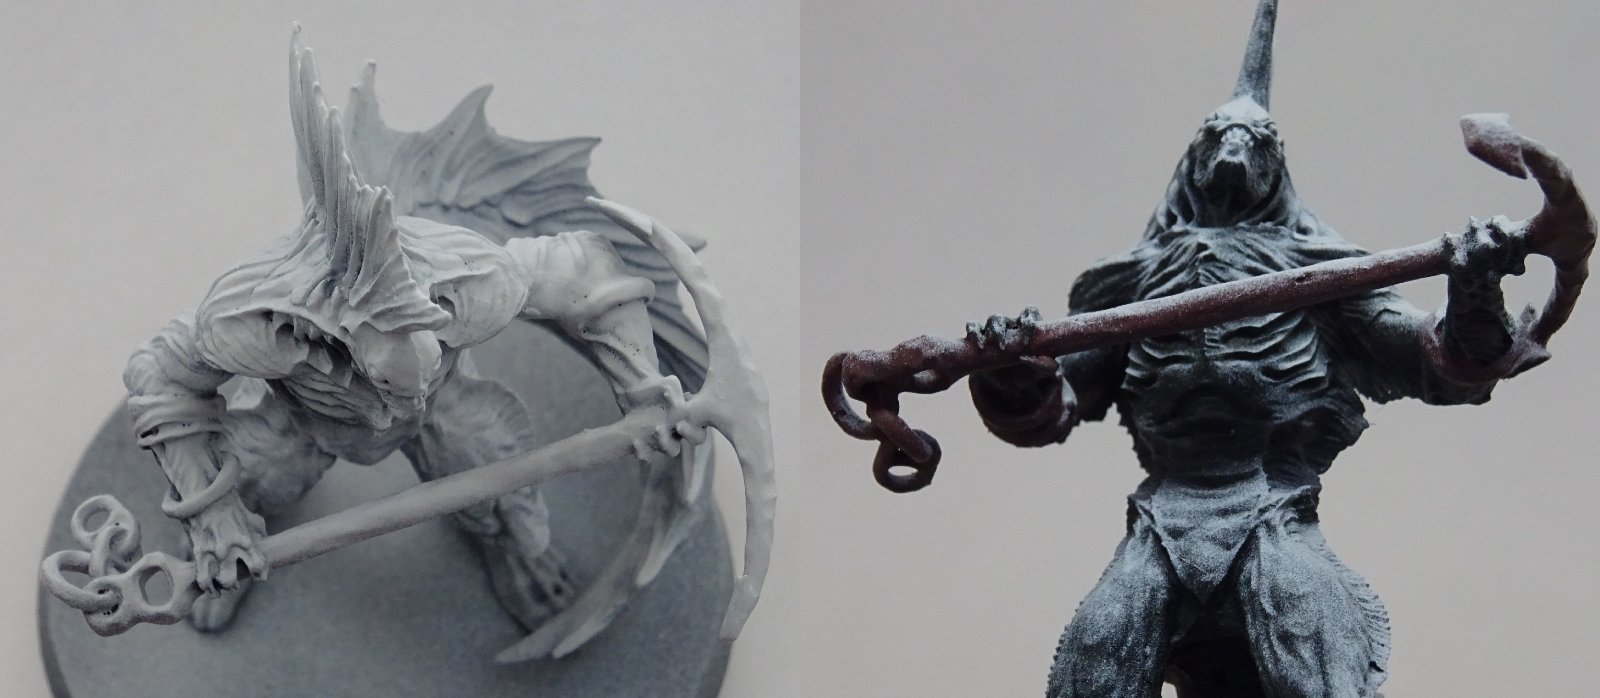
Rust
One of the focal points of the figure is its weapon, that big anchor from the bottom of the abyss. To make it a little more realistic, it needs to be painted as if the metal had spent many years under the sea.
The “jewels” and the anchor are first painted with Black Red PA, then a first wash of Agrax Earthshade CC (which will bring a dull brownish tone) and a second wash of Fuegan Orange CC (which will rekindle the red component of the black red) are applied.
To simulate the rust, I dilute Bright Orange PA, until I get a wash that I put in the hollows.
Then come the metallic paints part. It’s done in 2 steps. First, I have to "roughly" paint the protruding lines of the anchor, leaving the rust effect that has just been achieved. This step is nevertheless delicate, because if the irregular texture of the anchor is present, it is also very fine. So be careful not to repaint the whole surface as a metallic basecoat. For this step I chose IronBreaker CC, but any metallic paint that is not too flashy will do. Then, with Necron Compound CC, which has a brighter tone, I drybrush the Deep One's weapon as gently as possible to deposit bright pigments on the edges only.
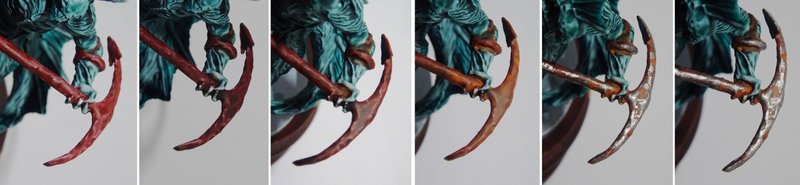
Use the same method on the creature's "jewelry".
This is a convincing rusty metal and a painted miniature that will look great on a gaming table!
Details and to go further
To give "a little more life" to our creature, nothing better than to add some details and highlight the whole paintjob a little.
Regarding the highlight, I did two successive drybrushings.
The first one on the fins only, with Turquoise Blue Amsterdam, is drybrushed from the edge of the fin to the back. This turquoise, stronger than the one of the first coat, will bring back light and saturation.
The second drybrush is done on the whole miniature with light Sky Blue Light Amsterdam, to highlight the volumes. The Sky Blue has a high proportion of white and allows to brighten almost all the blue hues. In order to redefine the fins’ texture, their drybrushing is done perpendicularly to the first one.
Regarding the details... The eyes are first painted black. Then, just add a glow by blending 3 shades of grey (I used the Citadel Colour chart: from darkest to lightest ; Eshin Grey, Dawnstone, Administratum Grey, but any home-made grey scale, based on a mix of white and black, will give a similar result).
The teeth are first painted with ecru white, obtained by mixing Titanium White and Yellow Ochre Amsterdam (1 drop of ochre for every 10 drops of white), then washed with Seraphim Sepia CC, and finally highlighted with Titanium White. The same method is used for the claws.

I also applied some Flesh Tone PA to the "gills" in the neck of the creature. The pink component will naturally contrast with the turquoise blue.
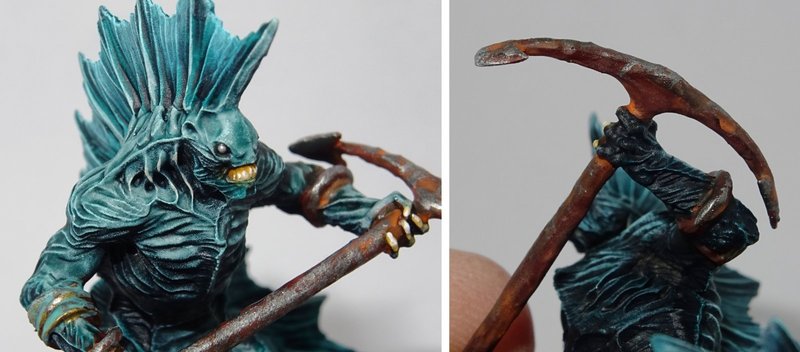
Time saving tip: the zenithal priming technique allows you to avoid painting the areas that are theoretically not exposed to the light. As a consequence, less time is spent working on these details. Once on the table, no one will look at your figures from underneath!
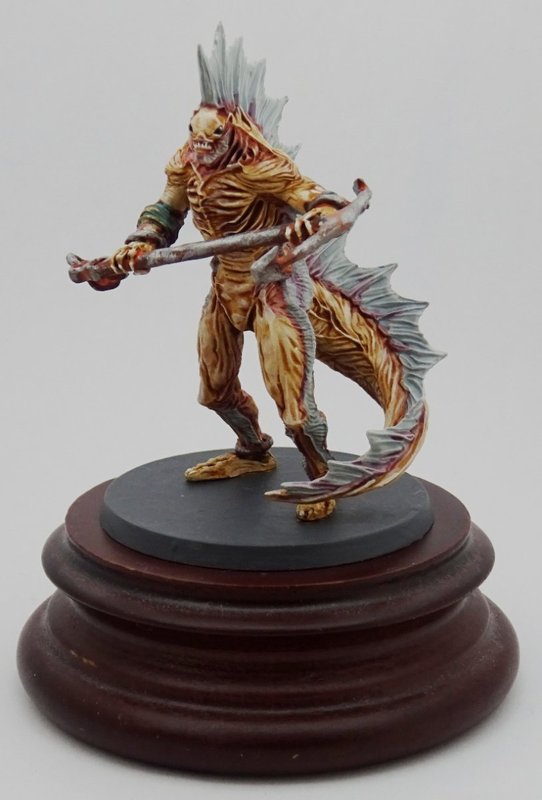
")

Here is my painting proposal for the Deep One.

As written in the introduction, I found the potential of this creature to be enormous, and as Monolith kindly entrusted me with two copies for the purpose of this guide, I also made an alternative version, using more "classic" blending and washing techniques that take a little longer. For this version, I was inspired by marine creatures of the abyss and by shellfish.
I hope you'll like it too.
Paints used
Citadel Colour:
-Gryph Charger Grey (contrast)
-Terradon Turquoise (contrast)
-Ironbreaker (layer)
-Eshin Grey (layer)
-Dawnstone (layer)
-Administratum grey (layer)
-Necron Compound (dry)
-Agrax Earthshade (shade)
-Fuegan Orange (shade)
-Seraphim Sepia (shade)
Prince August/Vallejo:-Black Red (859)
-Bright Orange (851)
-Flesh Tone (815)
Amsterdam:
-Ivory Black (701)
-Titanium White (105)
-Sky Blue Light (551)
-Turquoise Blue (522)
-Yellow Ochre (227)
Additives:
- Contrast Medium Citadel Colour
-Matte Acrylic Medium Liquitex.
-
4
-
-
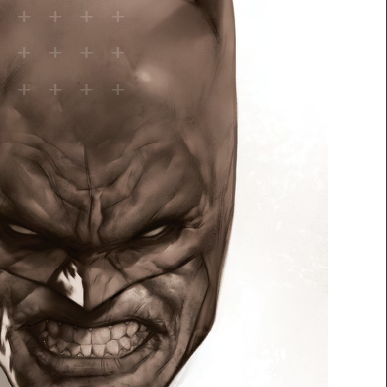
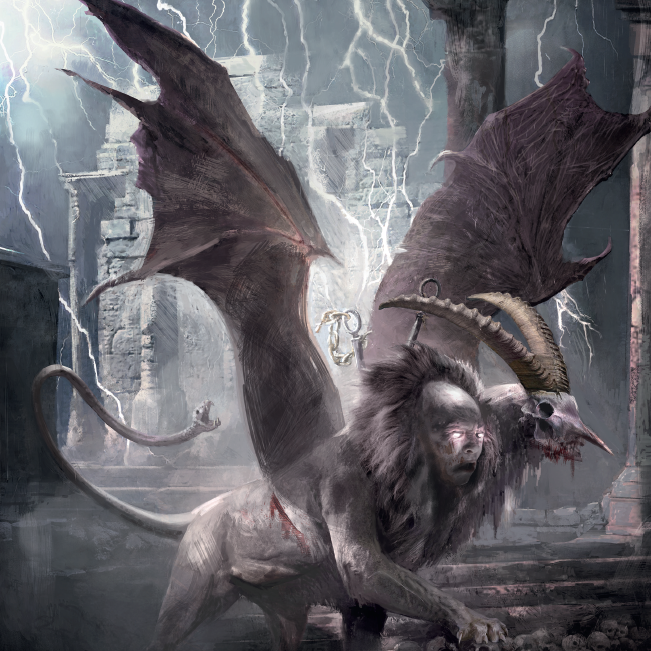
Compendium 4 EN
Here is the fourth compendium in original Gotham language
Content:
- Origins and background of some of Batverse's characters
- Scenarios for Batman, Claustrophobia and Conan
- Paint and sculpture articles
- A Mythic Battle: Pantheon pool
-
Submitter
-
Submitted12/11/2020
-
Category
-
6 hours ago, Xaltotun said:
WIll be available also a printed version for the english compendium 2 and 3? Thanks
This .pdf is now available so that you can print it yourself. 😉
-
Compendium 3 US
-
Submitter
-
Submitted12/04/2020
-
Category
-
1
-
-
Compendium 2 EN
Here is the full pdf of the second compendium, fan base creation
Content :
- A Conan 10 scenarios campaign, by Crom!
- 2 independant Conan scenarios
- Short novels and game related articles.
-
Submitter
-
Submitted12/04/2020
-
Category
-
1
-
1
-
Compendium 1 US
Here's the first Compendium fully dedicated to the mighty Conan
Content:
16 independent fan scenarios, by Crom
-
Submitter
-
Submitted12/04/2020
-
Category
-
1
-
-
8 hours ago, drgnmstr44 said:
so how do we find an english virsion? is there an english version?
No, for the alpha version, we work in French. We will translate for the final version.
-
3 minutes ago, pagoda79 said:
On the subway map, sometimes I'll get an LoS line that's red. What does that indicate?
Red lines are lines that are questionable and waiting to be validated, or invalidated.
-
2
-
-
26 minutes ago, pagoda79 said:
Any possibility to make this an app. Much easier to have a phone or ipad at the table than a computer.
The tool, like the TO site, is responsive.
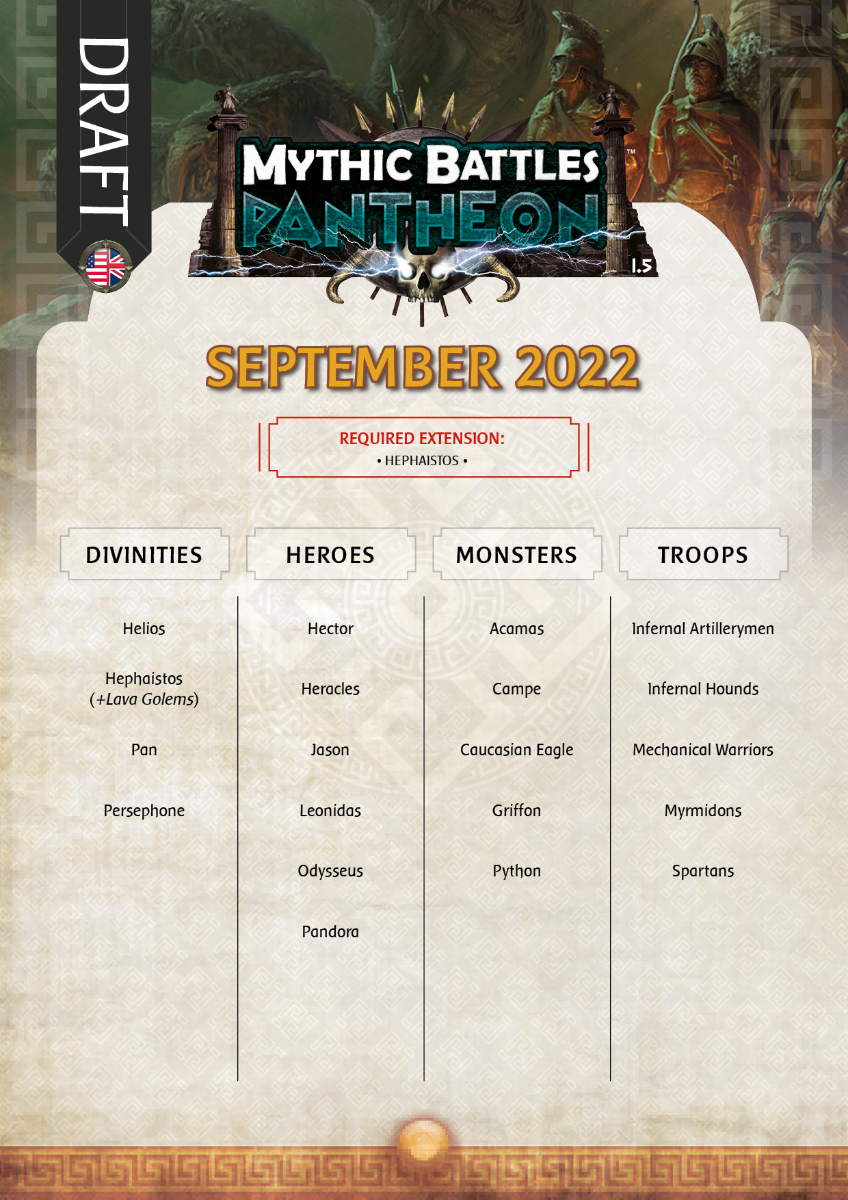
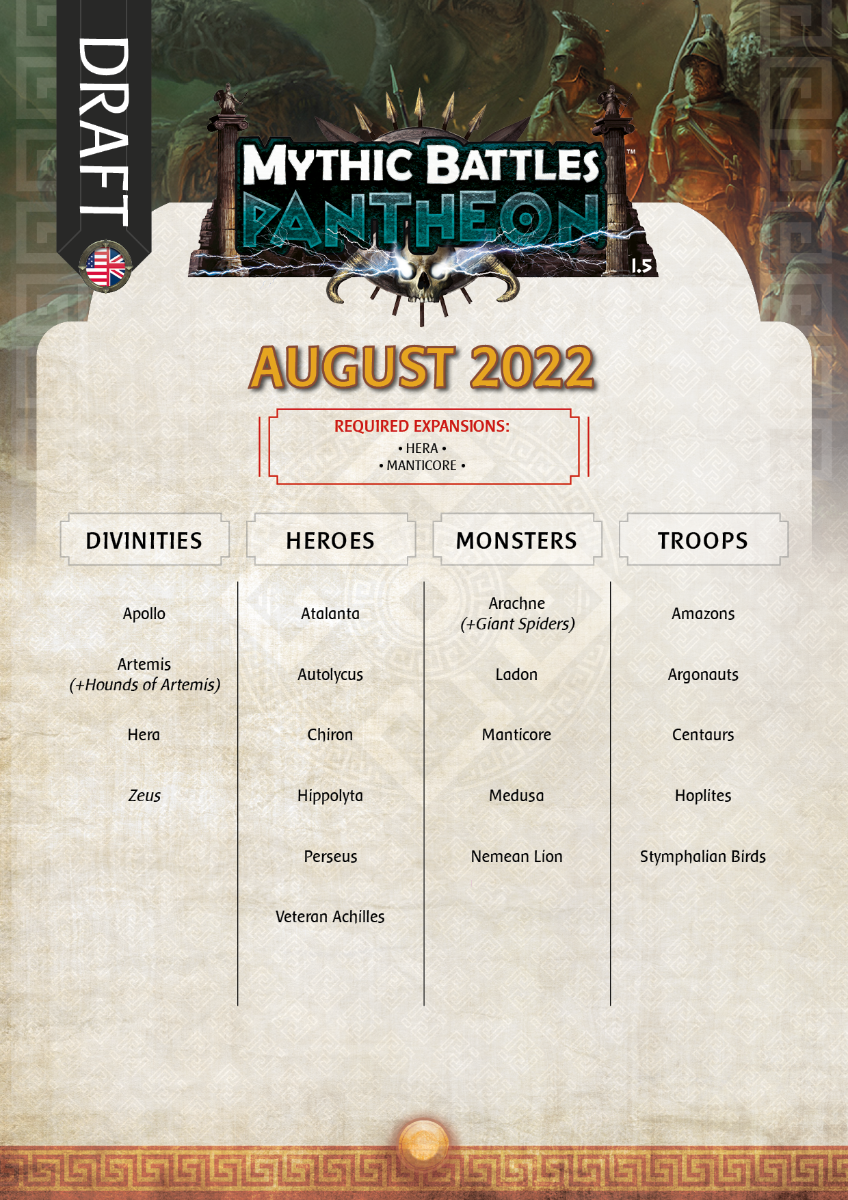
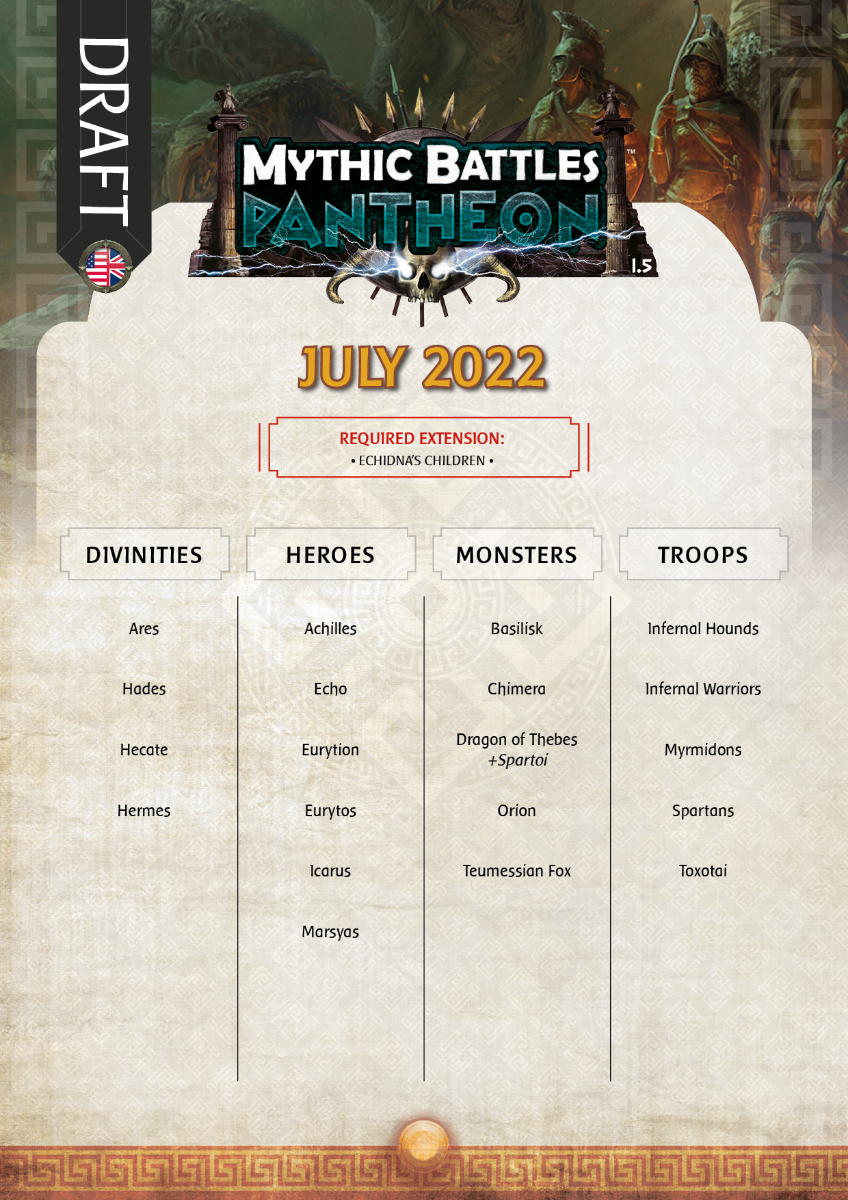
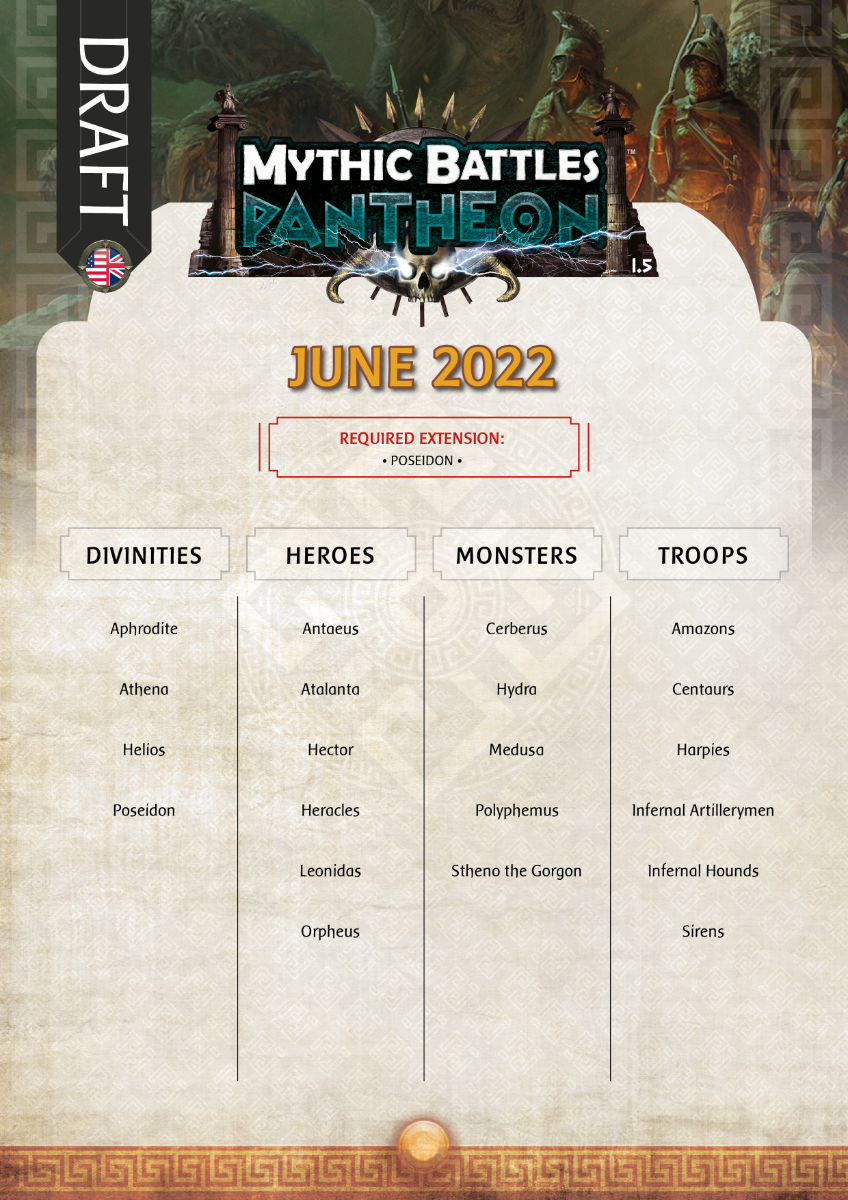
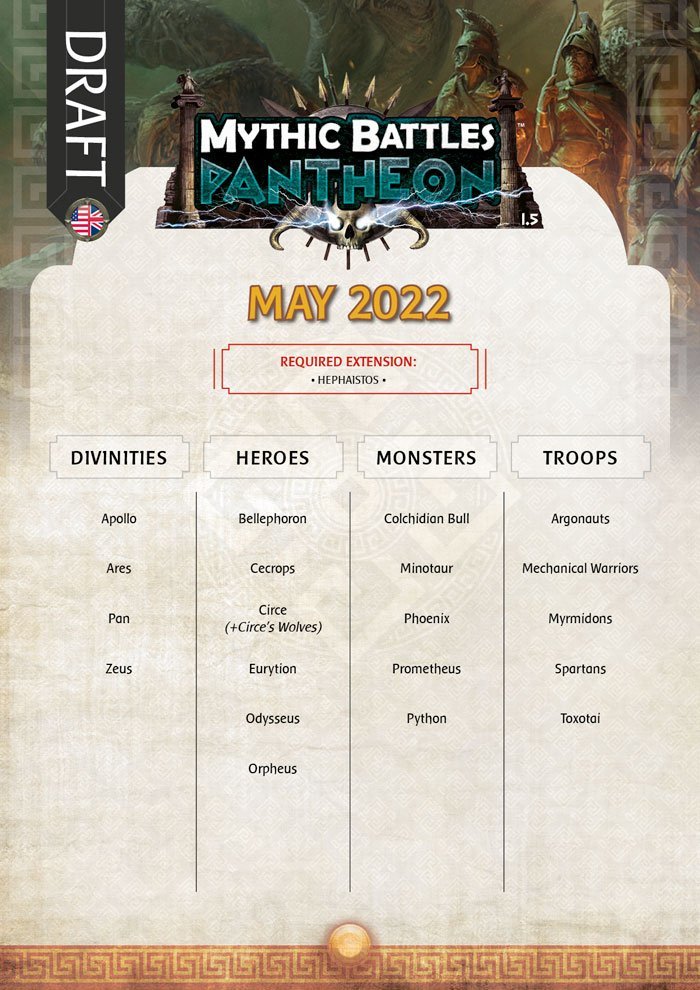
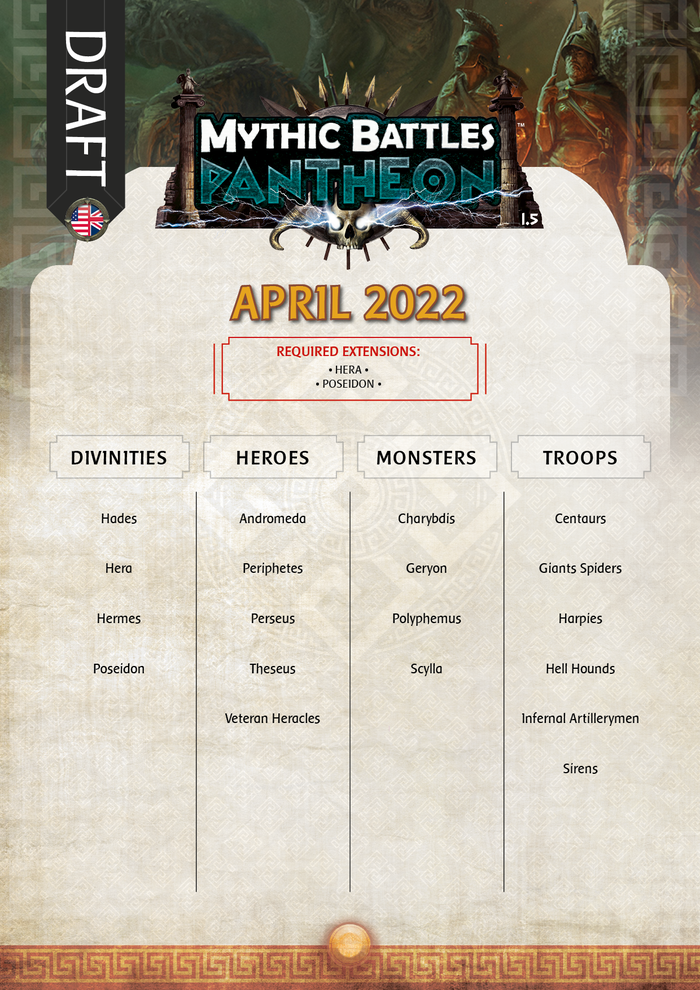
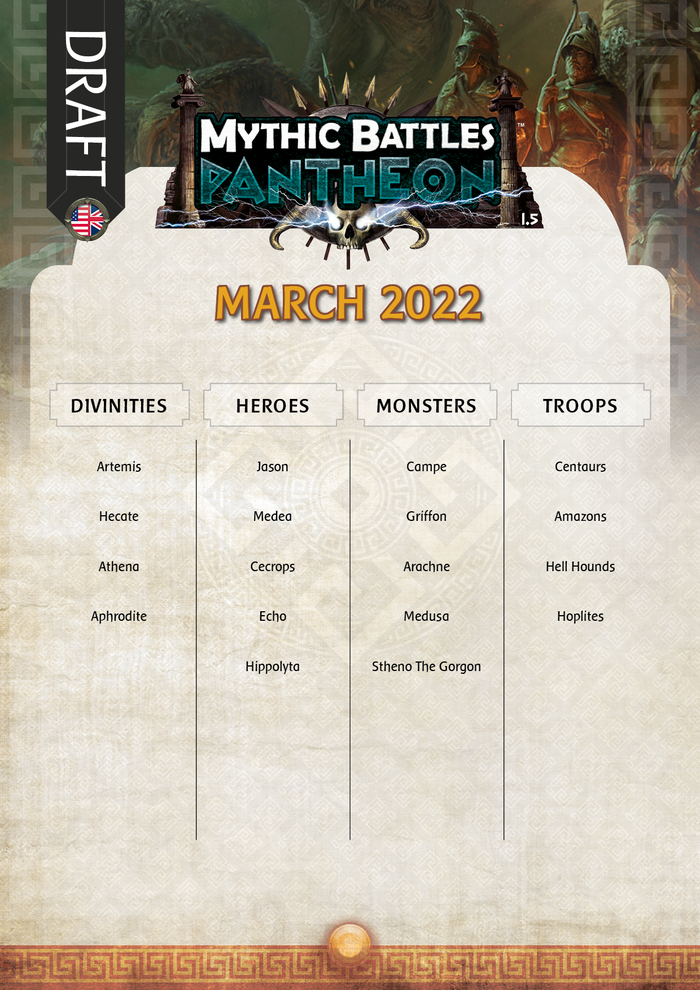
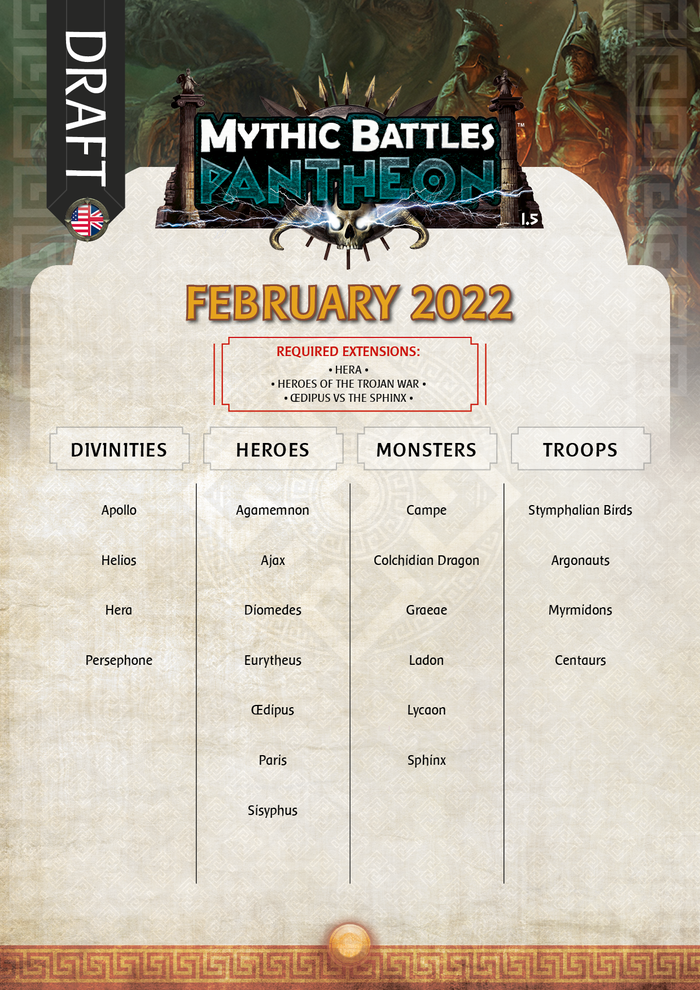
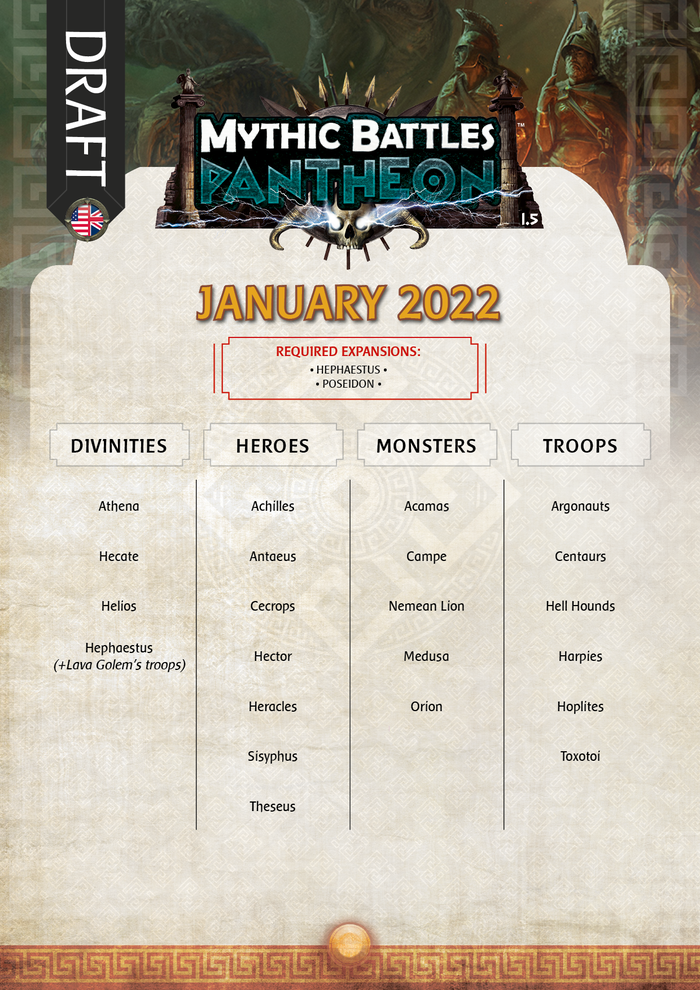
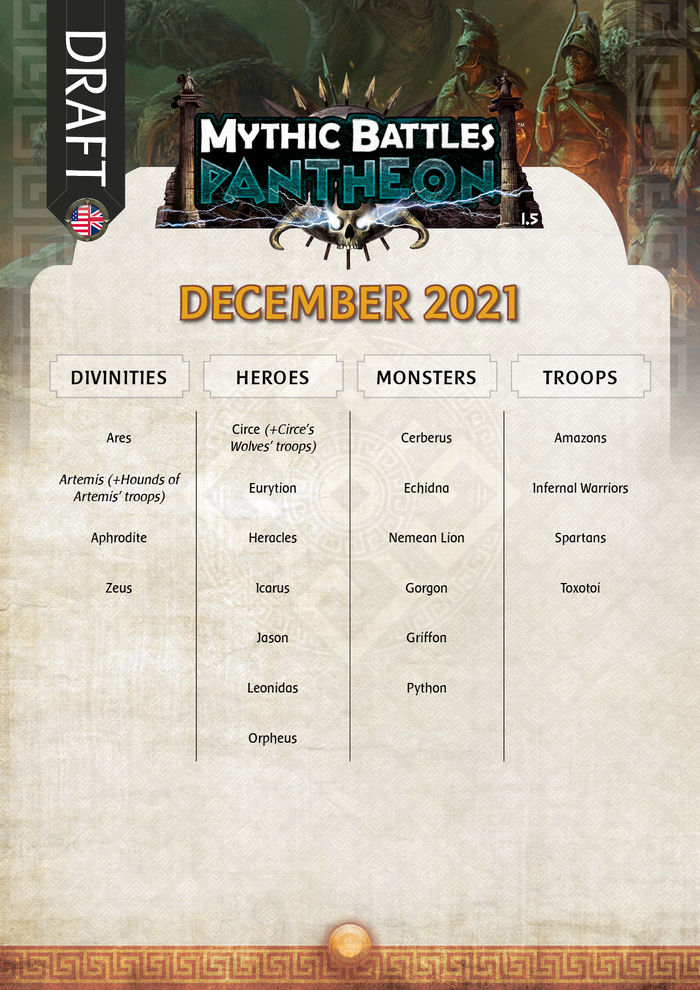
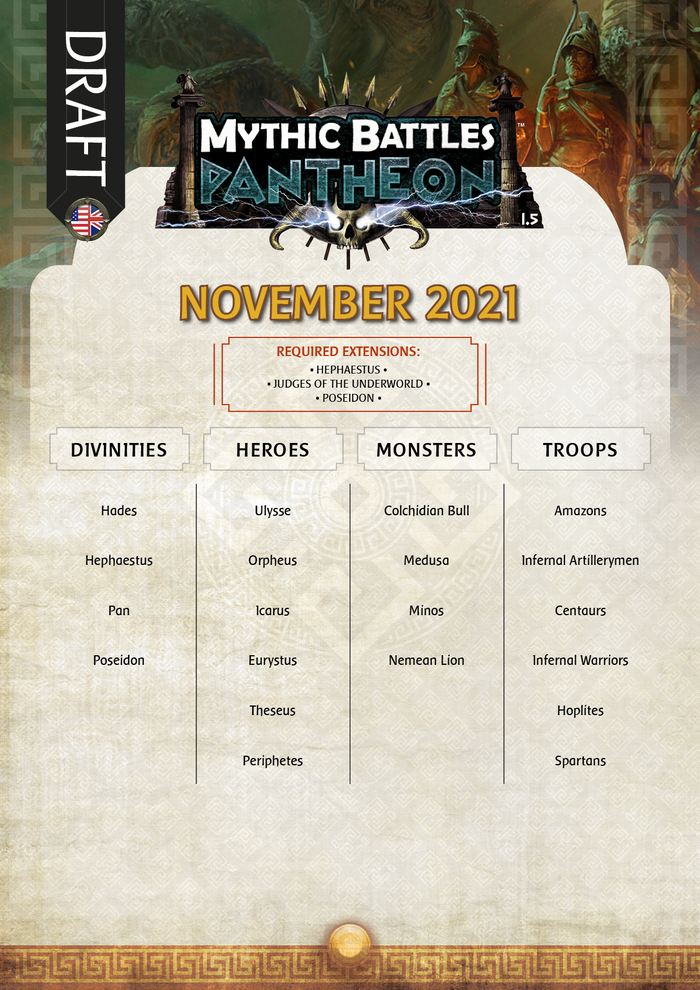
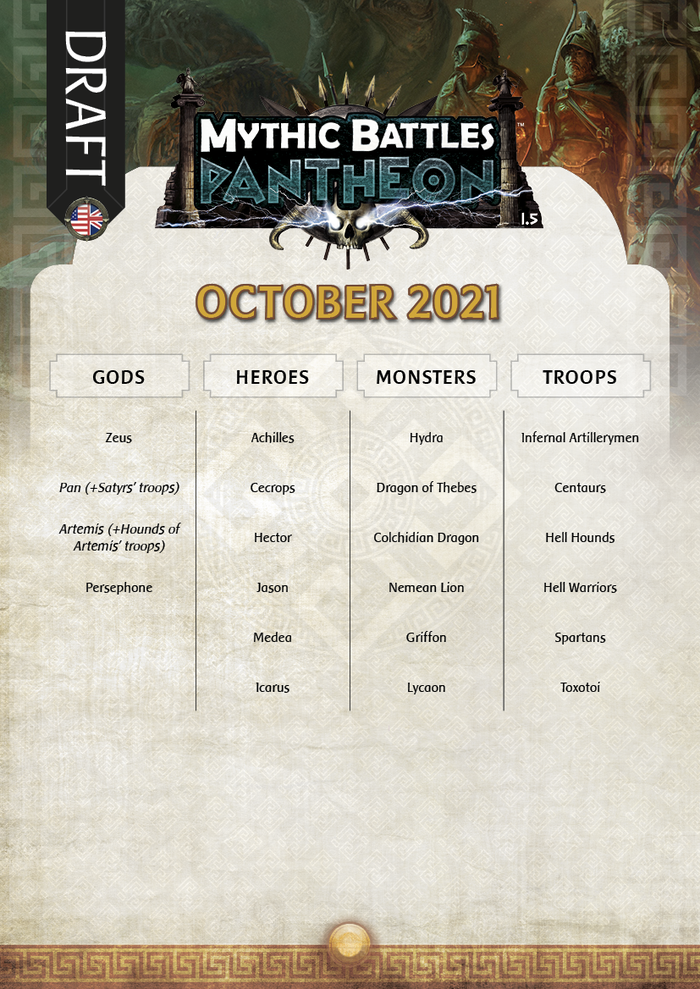


Draft MBP: March 2023
in Draft
Posted