
Roolz
-
Posts
256 -
Joined
-
Last visited
Content Type
Profiles
Forums
Gallery
Events
Downloads
Everything posted by Roolz
-
Roolz-04.thumb.jpg.17dfefc337a038daba13c4e0a1291da2.jpg)
Version 6
326 downloads
Print and cut to add variety to your Batman-esque miniatures and dioramas. Note : Fairly frequent updates -> Follow -
Since I helped debugging and translating this site/companion, I believe I can partially answer: - Once the scenario library will be added, the "filter per product" function will certainly be there too. It already works for the boards (i.e. the boards you see are automatically filtered depending on the products you have selected in the "My expansions" menu). - I might be wrong, but I do not think it is reasonably doable to add each and every fan-made scenario (the official ones might already be a dauting task). But including some of them should not add a tremendous workload. I'm thinking about the fan scenarios of the Compendiums/TO Mags, and the couples of Campaigns like the ones you co-wrote (Whispers from Stygia etc).
-
It was not easy to choose. After some heated debates around half-baked criteria and whatnot, the winner is... @Tim-Mizzet with his commish Gordon : Bravo and thanks to all entrants, the level was definitely there.
-
OK, I'm a bit late regarding this contest. But the winner has been selected, after much brain-burning and a couple of drinks. Result coming very soon ! That being said, hereunder are all the contest entries (no particular order except vaguely alphabetical) : Benrocky : Budala : Carquinyoli : Djimne : Goupil : Helyss : Herkule82 : Madcollector : Madboy One : Not Quite Dead Reju : Renand : SentMa : SmallRealities : Tim-Mizzet : Xantheas :
-
Thanks for the entries!
-
Entry duly registered ! Keep them coming, guys & gals !
-
In reference to a a famous french TV spot from the 80's. It probably never been aired outside french-speaking countries. But a few years later, the actor (Marc de Jonge) played the evil russian in Rambo 3. That being said, I'm running a mini painting contest. - OK, wot's the prize ? - An "Everlasting wet palette" from Redgrass Games. Redgrass Games will graciously provide me the item. Thanks to them! I suppose il will be this one : https://www.redgrassgames.com/everlasting-wet-palette/everlasting-wet-palette-painter/ I could keep it like the fat cheapskate that I am, but since I already bought one a while back, I don't intend to start a collection*. I'll cover the shipping fees to you, since I'm super nice and it's Christmas soon. *it would be appreciated that those who already own this palette do not enter the contest, but I can't send spies everywhere, so do as you wish. - Kay wot do I need to do ? - Just post a photo of one of your painted minis, under this post. A single miniature, painted by yourself (if it's painted by your spouse or kid it's OK, though). Two photos maximum (front/back). The mini must be from a Monolith game (Conan, Batman, Claustrophobia, Mythic Battles). It can be a mini that you painted previously, or one that you'll paint during the coming month. - Yup. When does that run ? - Contest starts : now, 02 december 2019. Contest ends : in one month, 02 january 2020. - And who gets the stuff eventually ? - The winner will be designated by a fair jury, composed of several undisputed international experts (i.e. me and my wife, and maybe one of the cats will chime in). Everybody has a chance to win, be it the seasoned professional or the trowel-painter, since the criteria are not established yet ! To quote a famous french philosopher : "One cannot really bet everything on one's looks. Especially you. So if I can give you any advice, it's : forget you don't have a chance, go for it!"
-
Let me check... Heroes : 1-Nightwing, 2-Batwoman, 3-Gordon Villains : Mr Freeze, Poison Ivy Rank&file : Thugs crowbar, Brutes chains, Carnivorous plants, GCPD cops pistol, 1 civilian That being said, chances are this scenario will be downloadable here, one day or another (just like for Conan).
-
Ah OK. I have no idea if another "big" printed scenario book is in the works (maybe for the next Conan KS?), but that would indeed be interesting for some people (less for me though, I think I own about every printed item ever released). That being said. As I type, about 20 extra official one-shot scenarios have been released (in pdf + printed in the hardcover "Book of Set"). Plus the Compendiums #1, #2, and #4 (now Compensiums are called TO Mag) that included fan-made scenarios for Conan. About 30, altogether. All of these have been playtested before being selected for the Compendiums. Plus there are some fan-made campaigns & booklets (Whispers from Stygia, Tales from the north, etc), not included in any Compendium, which should total about 15 more altogether. Most (if not all) of these scenarios are downloadable in english here on this very website. And there are many other ones which I'm not aware of. So I wouldn't say that there are "not many scenarios", rather the opposite :).
-
That's basically what the fan-made Compendiums are, no ?
-
Black Dragons reprint and (temporary) proxies
Roolz replied to Cheshirekat72's topic in Around Conan
Otherwise you can check Reaper's website, they have lots of models, you might find something to your liking using their "figure finder" tool. -
I second Hasslefree and Heresy. Hasslefree have excellent sculpts, very dynamic and realistic (IMO). Heresy are quite good too, but the style is different. I didn't know IronWind, thanks for the info (I believe they have bought old molds/masters from way back: I spotted a very recognizable druid mini that I purchased and painted about 30 years ago !).
-
1- Monolith has made the King Pledge files (cards, tiles, etc) downloadable in the files section: https://the-overlord.net/index.php?/files/category/1-resources/ 2- Difficult to see. Always in motion is the future. 3- There are many small and medium-sized minis publishers. Reaper is one of the most famous medium-sized, with thousands of models to pick from. But just google and you'll find lots of others. Edit: quickest and cheapest option (less sthematic, though) is simply to use unused minis from the retail box, since no scenario uses all the minis. 4- AFAIK, either people bought one part or all of the 3 large expansions (and get the corresponding extra gameplay in addition to the retail box), or PnP'ed+proxied using the files linked above, or bought a second-hand king pledge and sold/gave-away/used-for-other-stuff their retail copy.
-
Thanks, much appreciated !
-
Question Please Villain Movement
Roolz replied to pitsbrgparatrpr's topic in Batman: Gotham City Chronicles
As kpitaine wrote above. You can attack the hero in your area then move. And you only pay energy cubes if you want to move further than your villain's free/bonus move. Since it's his first movement of the turn (see rules page 20). -
Monolith staff keeps an eye on the-overlord.com/.net, so simply uploading stuff in the appropriate website sections should be enough. At least, it was until now. Otherwise, I believe you can MP @Matt John S who will transmit to the right dudes/dudettes. PS: a pro-printed version of your "whispers from Stygia" campaign would be awesome.
-
Compendium scenarios have always been downloadable for free on this very website. At least for Compendium #1 and #2. This will save you money next time. And don't hesitate to submit content for the next issues. Maybe it will end up printed and some readers will find it worth. Or maybe some others will tell it's utter shit. Difficult to see is the future.
-
Doing a decent tuto takes quite a bit of time :). However... at the time I painted these ones, I also painted the Brutes with Chains & took pics in the process. And recently I used these pics and notes to write a tuto then translate it in english. You'll find it there.
-
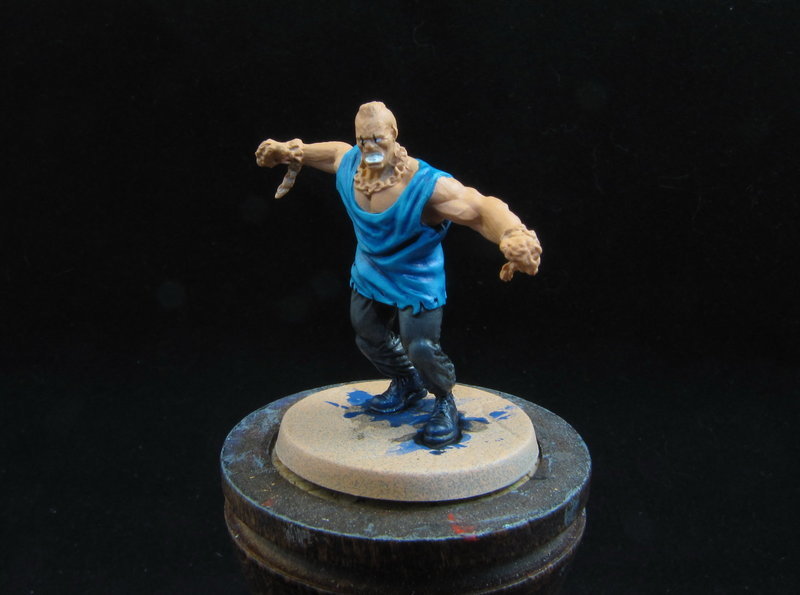
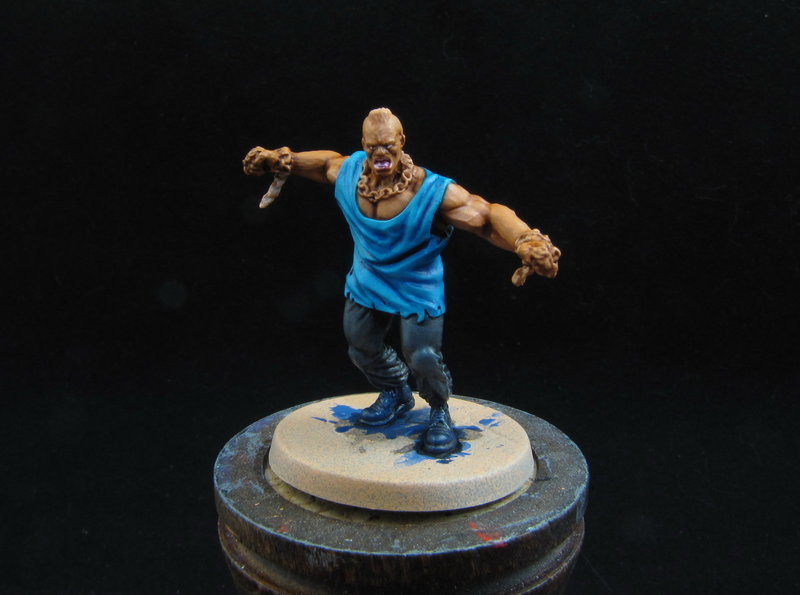
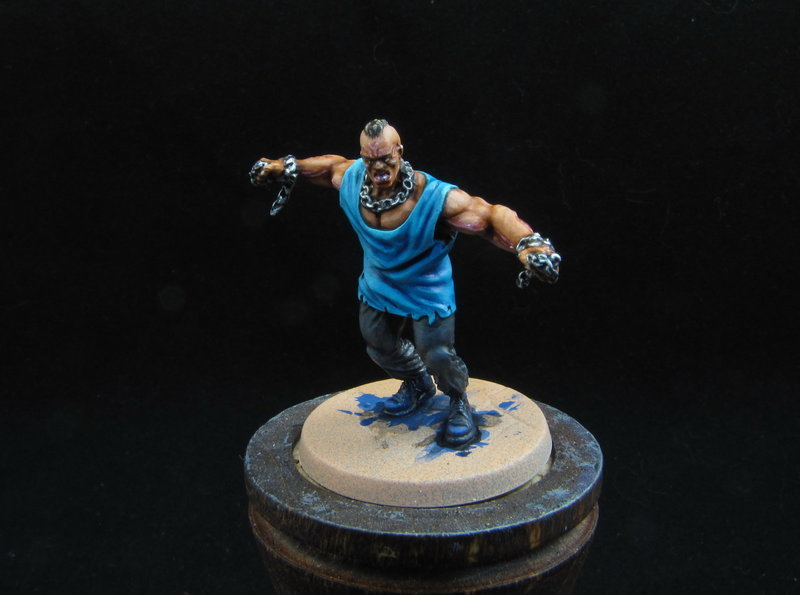
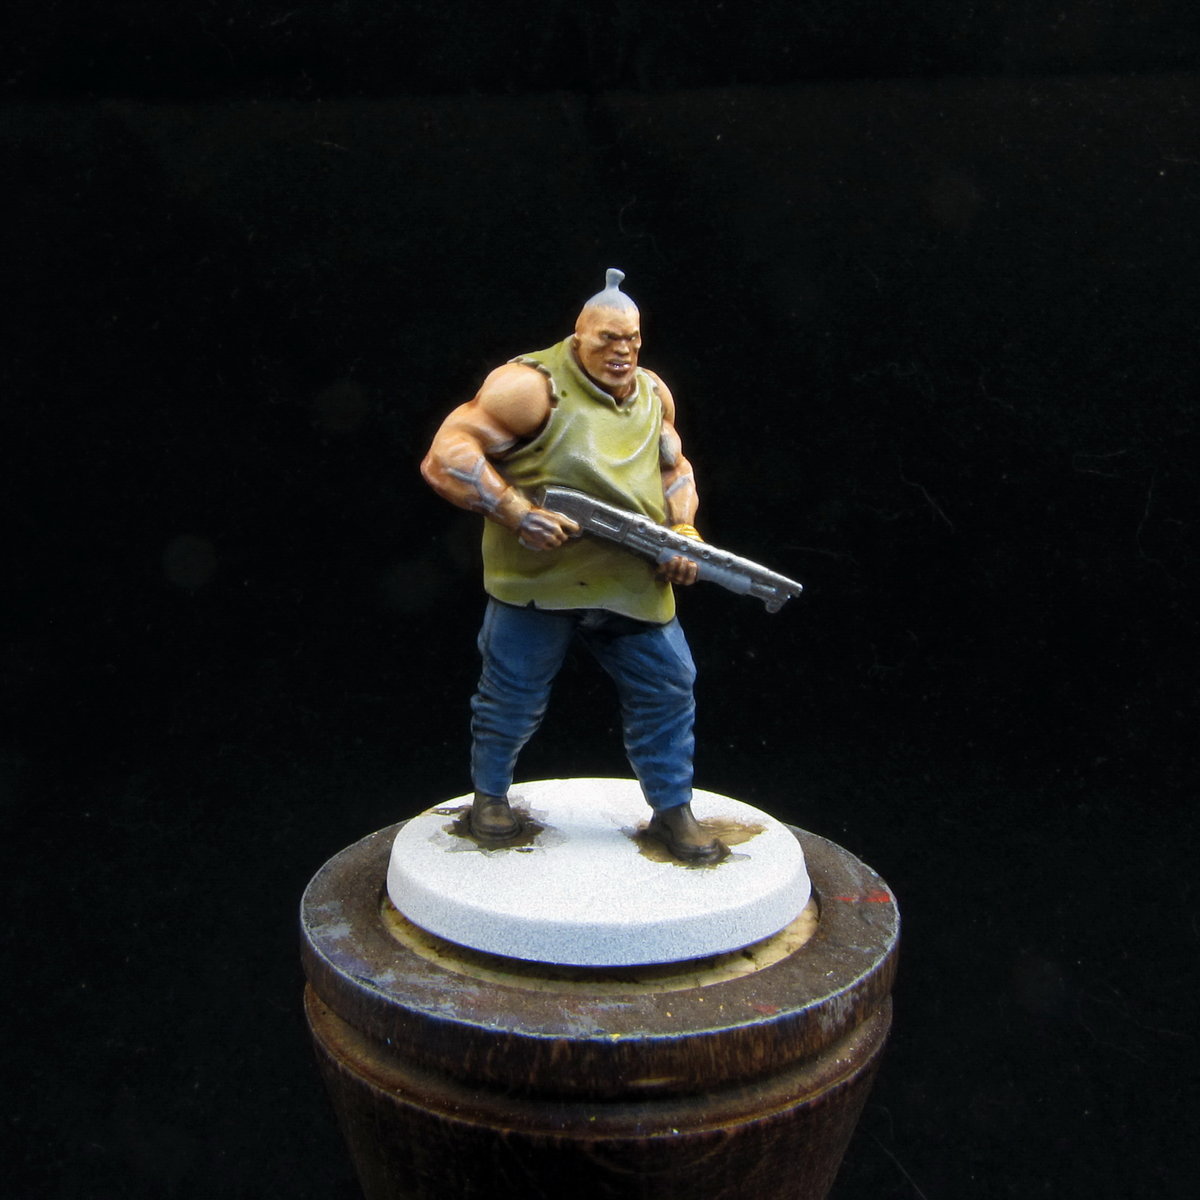
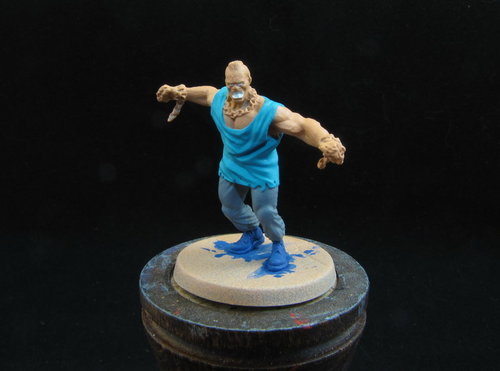
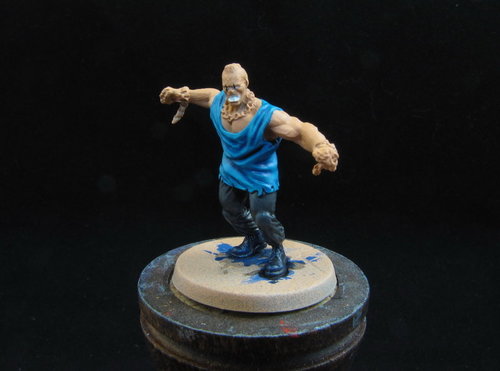
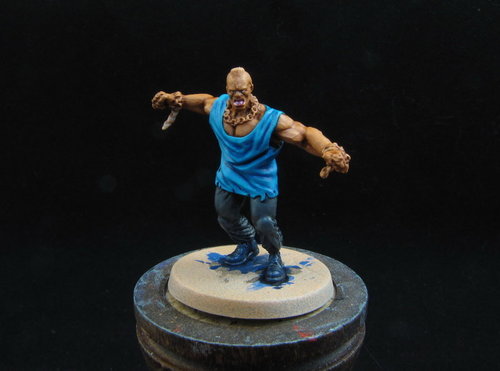
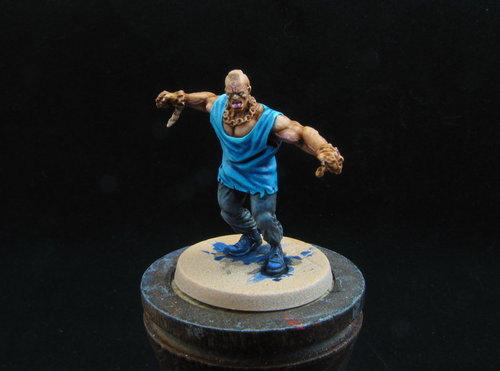
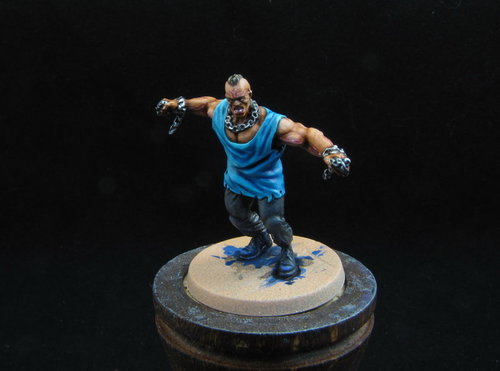
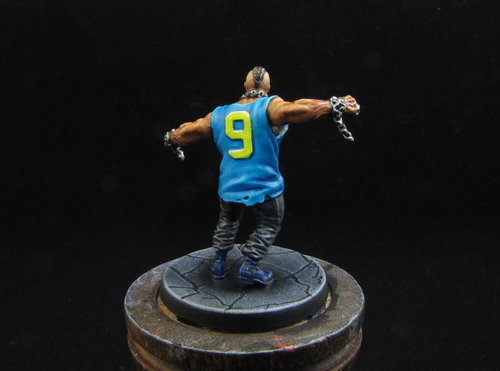
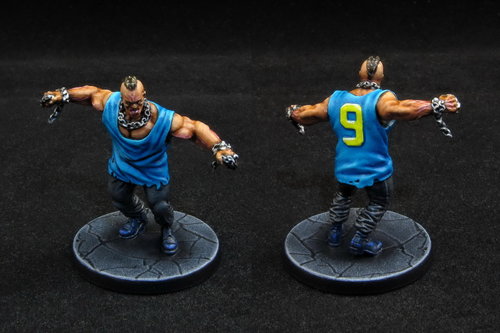
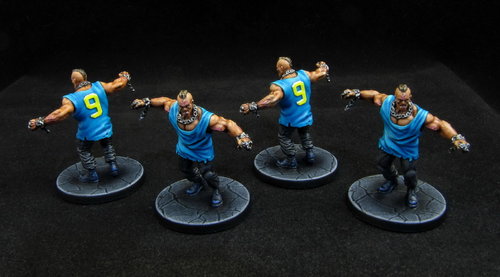
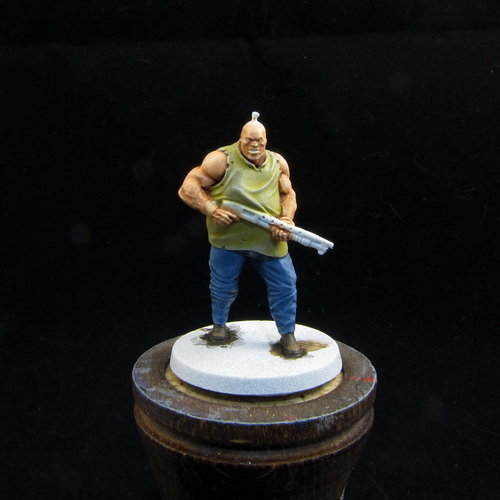
Note : Same principle as the tuto "Glaak!" (brutes with firearm). Crack ! – Painting of Clayface disguised as a Brute with Chains Foreword The goal of this tutorial is to paint Clayface disguised as a "brute with chains" (the deceitful bastard disguises as everyone!) to a decent standard without spending as much time as on superhero or supervillain miniatures. Similarly to the "brutes with firearm", I tried to create an optimized sequence to paint several minis simultaneously, "assembly-line-mode". I decided to use the general colour scheme of the game’s illustration (coloured 3D rendering of the miniature), to ease the identification of the tiles and the miniatures. Note that the mini is inspired by a drawing from Jim Lee (in "All-star Batman and Robin the Boy Wonder"), where a punk gets his teeth broken by Black Canary. Crack! A little bit of technique As for the other brutes, few advanced techniques for these henchmen. For more details, I invite you, friendly reader, to refer to the article by Martin Grandbarbe in Compendium Vol 2, and to my “Glaakk!” tuto (here and in the Compendium Vol 4)… Paint ranges Once again, same-same as for the “brutes with firearm”. Sequence 1- Deburring, washing, then spray-prime. Deburring these miniatures is a bit more tedious than for the brutes with firearm, due to the sculpt (chains, drapery). That’s very doable, still. After deburring, as usual, I smoothen with acetone (see tuto “Glakk!”), then I wash the minis. I prime the minis with tanned flesh spray primer (Barbarian Flesh AP). Since the punks’ skintone is darker than their buddies’ on Jim Lee’s drawing, this coloured primer will save me a bit of time versus a white primer. 2 I basecoat the main surfaces. Firstly, I paint the teeth, mouth and eyes off-white (Ivory VM918). Then, I paint the skin tanned flesh (Barbarian Flesh AP, in bottle), just a thin coat to increase opacity. Finally, I paint the shoes dark blue (Prussian Blue VM965), the pants medium grey (Neutral grey VM992), and the t-shirt blue-green (Blue green VM808). If need be, I apply several thin layers to get a good opacity. Painting in this order makes it easier to correct if I go over the edges on a previously painted surface. 3 I draw vertical black lines (Matt Black AP) to make the pupils. The skin is shaded with a turquoise blue wash (obtained by diluting Turquoise VM966 with matte medium Lahmian Medium GW), the pants and shoes with a black wash (Black Ink VG094 diluted with water). For both colours, I apply a first wash slightly more diluted on the whole surface, then one or more less diluted washes only in the shadow areas and hollows. 4 I touch-up around the eyes with tanned flesh paint (Barbarian Flesh AP). Then I shade the skin with a brownish-red flesh wash, (ready-to-use Reikland Fleshshade GW). I apply it on the whole surface and I repeat several times until obtaining the darker skintone that I want, and finally I apply one or more local washes only in the shadow areas and hollows. The mouth and lower lip are tinted by applying local dark red glazes (ready-to-use Carroburg Crimson GW). I repeat once or twice until I’ve achieved the desired hue. 5 I highlight the shoes by doing blends with ultramarine blue (Ultramarine VM839). For the pants, I drybrush very lightly with medium grey (Neutral grey VM992), to bring out the detail a little bit, then I fine-tune by doing blends with the same colour. To simplify the blending process as much as possible, I apply only one or two very thin and diluted layers, placed locally. Same thing for the skin, with a light drybrush then blends of tanned flesh (Barbarian Flesh AP). Then, I apply a dark red glaze (Carroburg Crimson GW) on the forehead veins and arm veins. The skin gets its last highlights, with blends of lighter flesh paint (Flesh Tone VM815). And I highlight the veins detail using the same flesh paint. Finally, I highlight the t-shirt the same way as the pants and the skin: light drybrush then blends of blue-green (Blue green VM808). And it receives last highlights on the most protruding edges on top (shoulders, collar, etc.), with blends of light blue-green (obtained by mixing Blue green VM808 with Ivory VM918) 6 This step is mostly about working on details… The chains are painted silver (Chrome VMAir 064), and the hair medium brown (Leather Brown AP). The skin gets its last shadows and outlining, via local dark brown washes (Agrax Earthshade GW). The washes are applied only in darker shadows areas, deepest recesses, and junctions between surfaces. The eyebrows are painted black (Matte Black AP). The pants, chains, and hair get one or more black washes (Black Ink VG094). The chains are highlighted with small silver dots (Chrome VMAir 064), only on the links that catch the light. The hair is highlighted by painting yellowish brown lines (Tan Yellow VM 912). And the teeth get some dots of off-white (Ivory VM918). 7 Almost there. Only the t-shirt’s number and the base remain. The t-shirt number gets an off-white basecoat first (Ivory VM918), to cover the blue underneath, and avoid painting 36 layers of yellow after… Anyway, it’s eventually painted yellow (Daemonic Yellow AP). And, to make it pop a bit more, it’s highlighted with off-white blends (Ivory VM918) on the three top/horizontal edges of the number. The base is painted exactly the same way as for the other brutes: dark grey basecoat (Dark Grey VM 994), black wash (Black Ink VG 94), dark grey drybrush everywhere, then a medium grey drybrush (Neutral Grey VM 992) focussed on the periphery, then a light grey drybrush (Light Grey VM 990) even more focussed on the periphery. The edge of the base is painted black (Matt Black AP). 8 A coat of matte varnish spray (Anti-shine AP spray). Then a touch of gloss varnish (Gloss Varnish VM 510) applied selectively in the mouth, on the teeth and the lower lip. And here are the punks ready to have a special dental exam by Black Canary, with their teeth going “Crack!”. Except it's -again- the perfidious Clayface in disguise…

-
Painting Figures Question Please
Roolz replied to pitsbrgparatrpr's topic in Batman: Gotham City Chronicles
This one too. Specific to a Batman mini, but the beginning/prep is identical to the pirates' tuto. -
Thanks, my pleasure!
-
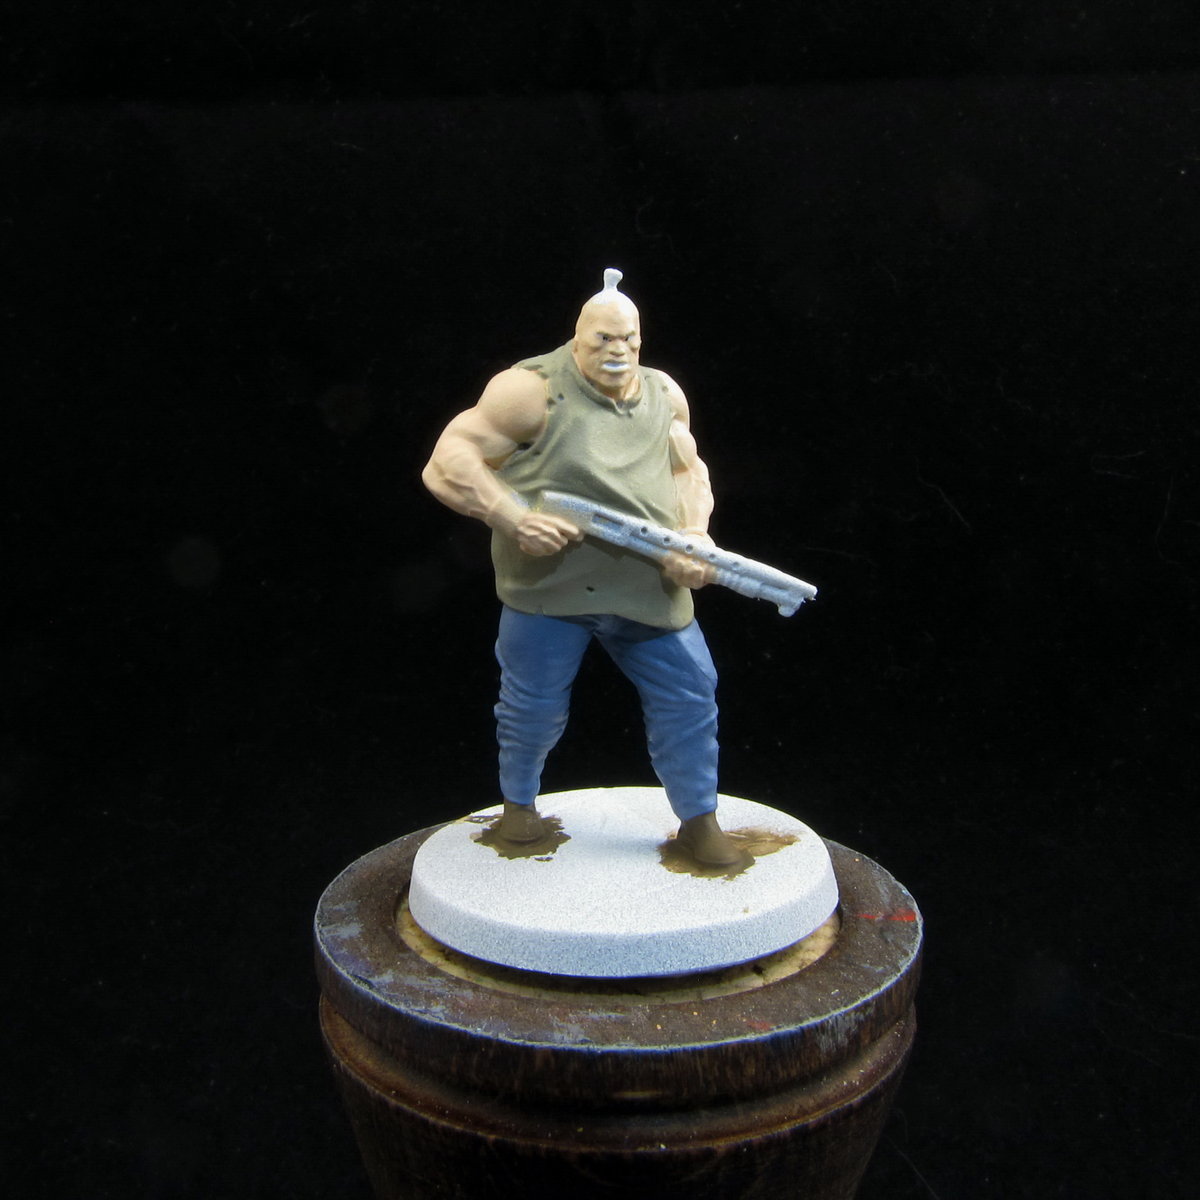
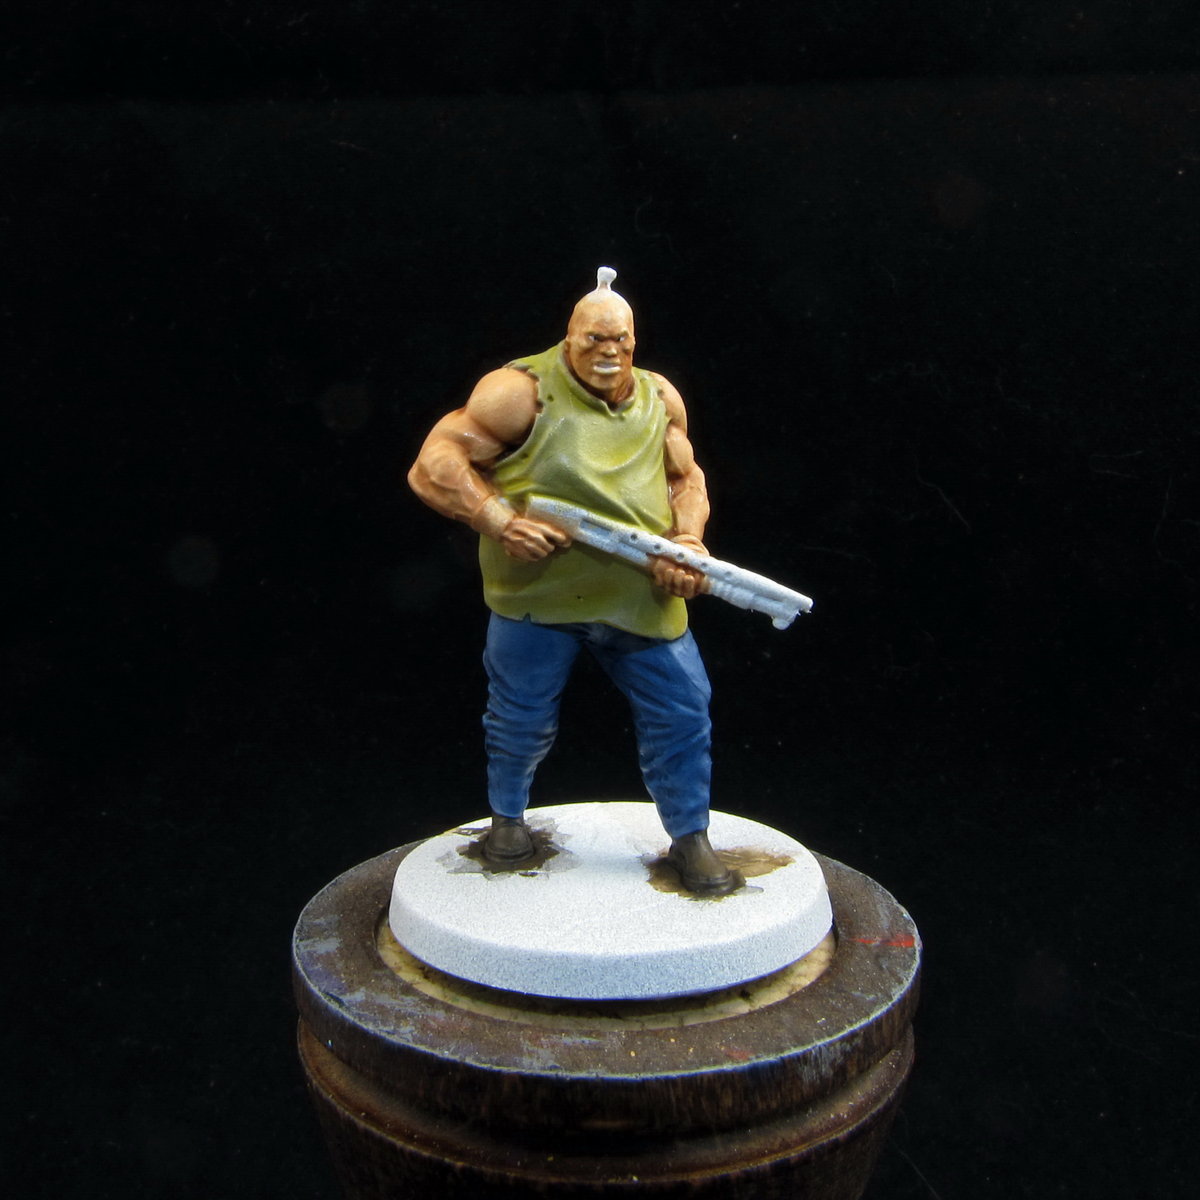
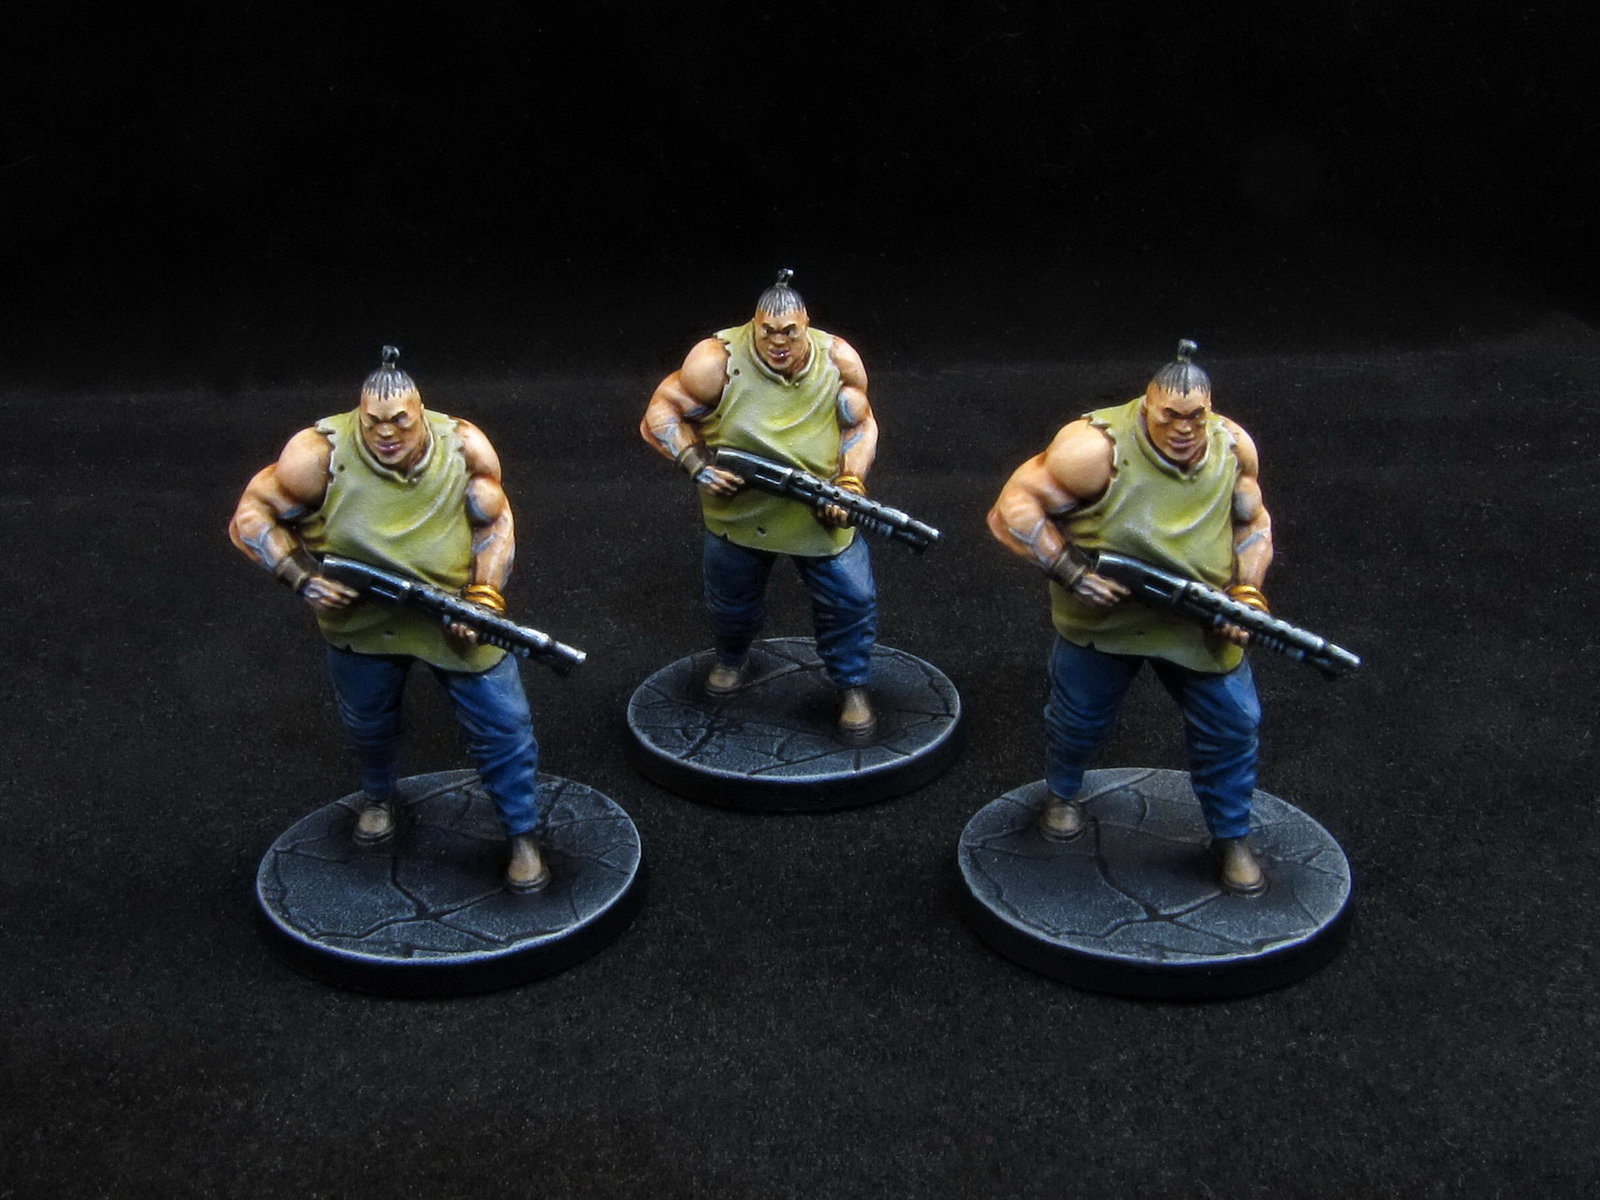
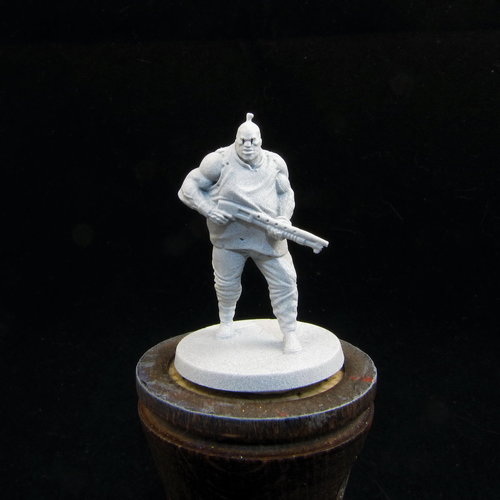
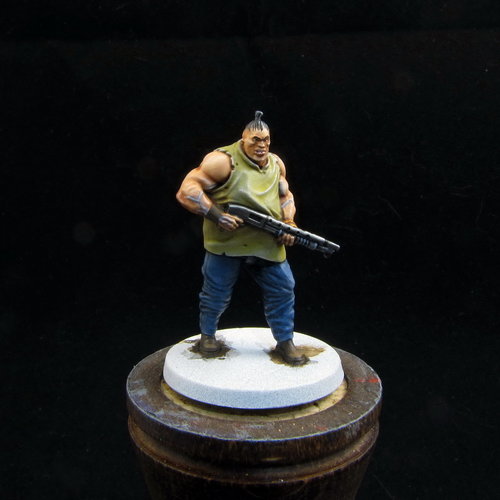
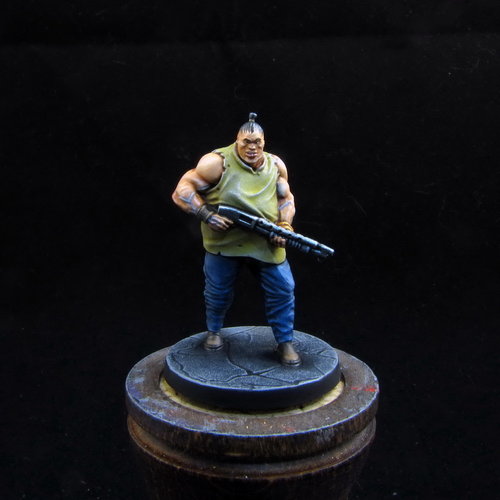
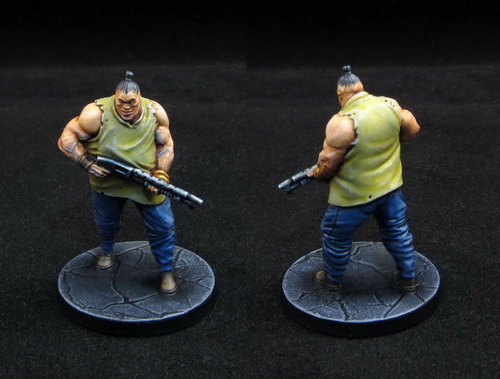
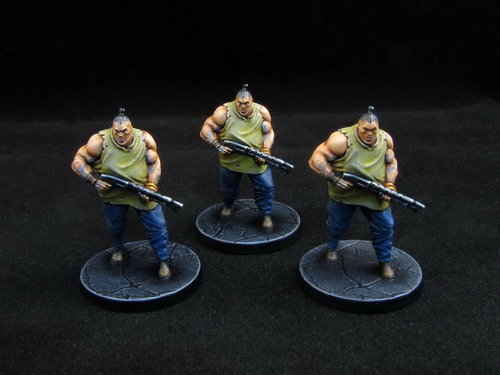
Here's the english version of my brute with shotgun painting tuto, that should be included in one of the future Compendiums. Thanks to Jay Adan for the proofreading. Glakk! - Painting of Clayface disguised as a Brute with Firearm Foreword The goal of this tutorial is to paint Clayface disguised as a "brute with firearm" to a decent standard without spending as much time as on superhero or supervillain miniatures. Especially since there are 4 identical "brutes with firearm" miniatures. So I tried to create an optimized sequence to paint several minis simultaneously, "assembly-line-mode". I decided to use the colour scheme of the game’s illustration (coloured 3D rendering of the miniature), to ease the identification of the tiles and the miniatures. Note that the mini is inspired by a drawing from Jim Lee (in "All-star Batman and Robin the Boy Wonder"), where a fattie is smashed by Black Canary. Glakk! A little bit of technique Few advanced techniques for these henchmen. I’ll mostly use basic techniques: washing, blending, drybrushing, and some glazing here and there. Regarding washing, blending, and glazing, I invite you, friendly reader, to refer to the article by Martin Grandbarbe in Compendium Vol 2. Now to drybrushing... Glossary Drybrushing: This technique consists of using a flat or round brush (anything but a pointed brush) and undiluted paint (or barely diluted). Load the brush with paint, then wipe it by brushing on a clean paper towel until almost no paint remains on the paper. Then, brush the mini, without applying too much pressure. The near-dry paint deposits on the raised edges of the mini. It allows you to highlight very quickly. The look is typically rougher than with blending, although it’s possible to create extremely subtle gradations using drybrushing (requires time and experience, of course). Paint ranges I use a bit of everything, depending on the case. Usually, a lot of Vallejo (Note: Vallejo and Prince August are the same, only the label changes). On these figures I will use Army Painter (AP), Games Workshop (GW), Vallejo Model (VM), Vallejo Game (VG), and Vallejo Model Air (VMAir) products. I’ll specify the exact references and designations, but also the "normal" names (for example "Blue" instead of "Dead arctic hamster vomit"...). And I will try to not mix colors, once again to optimize painting time. Sequence 1- Deburring, washing, then spray-prime with White (Matt White AP spray primer). Deburring (removing mold lines) is a tedious but necessary step: remaining mold lines are an eyesore once the paint-job is complete. After deburring, tiny bits of plastic and roughness often remain on the mini. To correct this and get smooth surfaces, just take a small stiff brush, soak it in acetone and brush it on these areas. It's a trick from the famous Rémy Tremblay, it works quite well on PVC minis (liquid glue for model kits, as used by Martin G., also works very well!). Washing (with soapy water) eliminates any trace of finger grease deposited during deburring and ensures good primer adhesion. I primer the minis with white spray primer (Matt White AP). The primer coat must not be too thick, otherwise it fills the detail and loses its grip: no need to look for 100% opacity, if it’s slightly translucent and one can see the plastic underneath, it’s not a problem. Once the mini is primed, I put a stroke of off-white (Ivory VM 918) on the eyes and teeth to increase the opacity, and then I draw vertical black lines (Matt Black AP) to make the pupils. As with most minis, it's easier to paint the eyes first. It goes over the edges, but it will be corrected on the next step. 2- I basecoat the main surfaces. I paint the skin flesh colour (Flesh Tone VM 815), then the shoes dark brown (Burnt Umber VM 941), then the pants bluish grey (Russ Grey GW), and finally the t-shirt light greenish grey (Stone Grey VM 884). If need be, I apply several thin layers to get a good opacity. Painting in this order makes it easier to correct if I go over the edges on a previously painted surface. It's super easy, just be careful not to put flesh on the eyes and on the teeth (it can be corrected afterwards, but it's harder than being a bit careful on the beginning). 3- I shade the previous basecoats, using washes. The skin is shaded with a ready-to-use Flesh wash, brownish-red (Reikland Fleshshade GW), then the shoes with a black wash (Black Ink VG 94), then the pants with a dark blue wash (Blue Tone AP), finally the t-shirt with a greenish brown wash (obtained by diluting Japanese Uniform VM 923 with Lahmian Medium GW). I apply a first wash slightly diluted with water on the whole surface, then one or more undiluted washes only in the shadow areas and hollows. If everything goes well, the washes dry as you move from one mini to another. It's still easy, and the mini already looks decent. Again, be careful not to splash buckets of wash all over the place. 4- I highlight all that... First, I drybrush very lightly, to bring out the detail a little bit. The skin is drybrushed with flesh (Flesh Tone VM 815), then the pants with bluish grey (Russ Grey GW), finally the t-shirt with light greenish grey (Stone Grey VM 884). Then I finish these highlights by doing blends, with the same colours as before. To simplify the blending process as much as possible, I apply only one or two very thin and diluted layers, placed locally. The t-shirt receives a final highlight on the edges of the collar and cuffs, with very light greenish grey (obtained by mixing Stone Grey VM 884 and Ivory VM 918). Finally I highlight the shoes by doing a blend with medium brown (Leather Brown AP), going to the tip of the shoes. This is progressing… 5- I accentuate the shadows and outline the different surfaces. The skin and the t-shirt get local dark brown washes (Agrax Earthshade GW), the pants black (Black Ink VG 94). Like before, the washes are applied only in shadows areas, deeper recesses, and junctions between surfaces. The shotgun is painted dark metallic grey (Gun Metal VMAir 072), the left bracelets medium gold (Glorious Gold VG 056). The hair and the shotgun’s grip and pump handle are painted light grey (Light Grey VM 990). The lower lip and elbows are tinted by applying local dark red glazes (ready-to-use wash Carroburg Crimson GW). I repeat once or twice until I’ve achieved the desired hue. The arms’ veins are tinted by applying local dark blue glazes (obtained by diluting Prussian Blue VM 965), then highlighting the veins details with flesh (VM 815), and finally unifying the colours with a glaze of flesh (obtained by diluting Flesh Tone VM 815). I repeat each step once or twice if necessary. It is possible to skip the “vein” steps to save some time. But everyone knows that thick blue veins are always impressive. Ahem... In short, our brute begins to look brutal. We can acknowledge that it’s appropriate. 6- I paint the right armband dark brown (Burnt Umber VM 941). I finish the left bracelets: I shade them with a hazelnut brown wash (diluted Brown Ink VG 092), and I highlight the top edges in light gold (Polished Gold VG 055). I finish the shotgun: I shade with a black wash (Black Ink VG94), and I accentuate the shadows with this same black wash applied locally. Then I highlight the metal parts with dark metallic grey blends (Gun Metal VMAir 072), and the grip and pump handle with light grey (Light Grey VM 990). Finally, I do the last metal highlights with chrome (Chrome VMAir 064). I finish the hair: First a diluted black wash (Black Ink VG 94). Then thin lines of black paint (Matt Black AP). Finally I highlight by painting thin lines of light grey (Light Grey VM 990) on the tuft of hair and the top of the head. The eyebrows are simply painted black (Matt Black AP). Almost there… 7- I paint the string of the tuft of hair with yellowish brown paint (Tan Yellow VM 912) And I finish the right armband: First a black wash (Black Ink VG 94). Then I highlight with a blend of medium brown (Leather Brown AP). And I do the last highlight on the edges with yellowish brown (Tan Yellow VM 912). Only the base remains, which has the good taste to already be textured. This allows it to become a nice looking base in two shakes: a dark grey basecoat (Dark Grey VM 994), a black wash (Black Ink VG 94), a dark grey drybrush everywhere, then a medium grey drybrush (Neutral Grey VM 992) focussed on the periphery, then a light grey drybrush (Light Grey VM 990) even more focussed on the periphery. The edge of the base is painted black (Matt Black AP). Et voilà. 8- I spray a coat of matte varnish (Anti-shine AP spray) to protect the minis. Then a few touches of gloss varnish (Gloss Varnish VM 510) applied selectively on the teeth and the lower lip, the end of the shotgun, and the top of the left bracelets. And here are the brutes ready to have their butts kicked by Black Canary and squeal “Glakk!” Except it's Clayface in disguise, so it's Canary who might be going “Glakk!” The poor girl. Hoping that it helps you, thank you for your attention, friendly reader! Edit/PS : a similar tuto for the Brutes with Chains can be found there.


-
I believe that's what you're looking for: https://the-overlord.com/index.php?/files/file/52-campaigns-scenario-sheet/ (It's in the french section of the-overlord). This might also come handy: https://the-overlord.net/index.php?/files/file/79-the-legend-of-the-devil-in-iron-faq_v2pdf/
-
Tet2brick recently posted that he will stop his scenario editors in the near future, du to personnal reasons (new job, server fees, and so on). Edit : However, there are several resources available, such as: Tileset scenario map editor (contains many images): https://the-overlord.com/index.php?/files/file/5-editeur-de-maps-pour-scénarios/ Someone made english language text files for this editor here: https://boardgamegeek.com/filepage/141971/scenario-editor-english-language-files Fonts : https://the-overlord.com/index.php?/files/file/20-polices-decriture-conan/ Editable pdf scenario template : https://the-overlord.com/index.php?/files/file/23-pdf-éditable-mise-en-page-scénarios/ Editable word and publisher scenario templates : https://the-overlord.com/index.php?/files/file/33-fichiers-word-et-publisher-pour-scénarios/ Hero board photoshop template (contains all icons, including skills) : https://the-overlord.com/index.php?/files/file/21-modèle-fiche-héros-hero-board-template/ The same in .xcf, GIMP-friendly : https://the-overlord.com/index.php?/files/file/32-fiche-héros-éditable-pour-gimp/
-
Translation of 6&7 player scenario? French > English
Roolz replied to thrainn's topic in Downloadable scenarios
I just spotted this post, so maybe I come too late. Anyway... I didn't know this scenario. The french version is a bit confusing too. I believe the 1st sentence "The sorcerer uses necromancy and tentacles come out of the water" is basically flavor text (= useless, rule-wise). The OL gets 10 Reinforcement Points that he can use in various ways: - bring back killed tentacles and/or undead (the cost in RPs is indicated on the tiles, as usual) - bring back killed bone golem (1 RP per Life Point) - move tentacles on any water area (1 RP per tentacle) (it also means that the OL cannot use RPs to bring back killed bossonian archers) The rest of the text seems fairly clear to me.