
garbetsp
-
Posts
243 -
Joined
-
Last visited
Content Type
Profiles
Forums
Gallery
Events
Downloads
Everything posted by garbetsp
-
Welcome. It's a wonderful game of unfortunate scarcity at present.
-
Uh, Matt that posted the path on your local computer which we don't have access too. So not an actual download link.
-
"The man who crucified Conan. The lover of Salome the witch." --Monolith Happy Holidays to all.
-
Nice. I don't speak French, but google translate shows nifty rules for negotiating roofs and falling off. Like it!
-
I needed to prime this weekend and live in an old drafty house and it was around 20 degrees outside. I wanted to warm up the can, so I put it under my shirt to use body heat. I was jumping about making yipping noises when my wife said, "Why don't you just use the heating pad?". DOH! 🤣 So I did, and primed in the basement. The heating pad made it really easy to have the primer at a reasonable temp coming out of the can in the winter. Also, multiple short passes with primer are better than one thick pass. Got to come at all the angles quickly. It reduces risk of gooping.
-
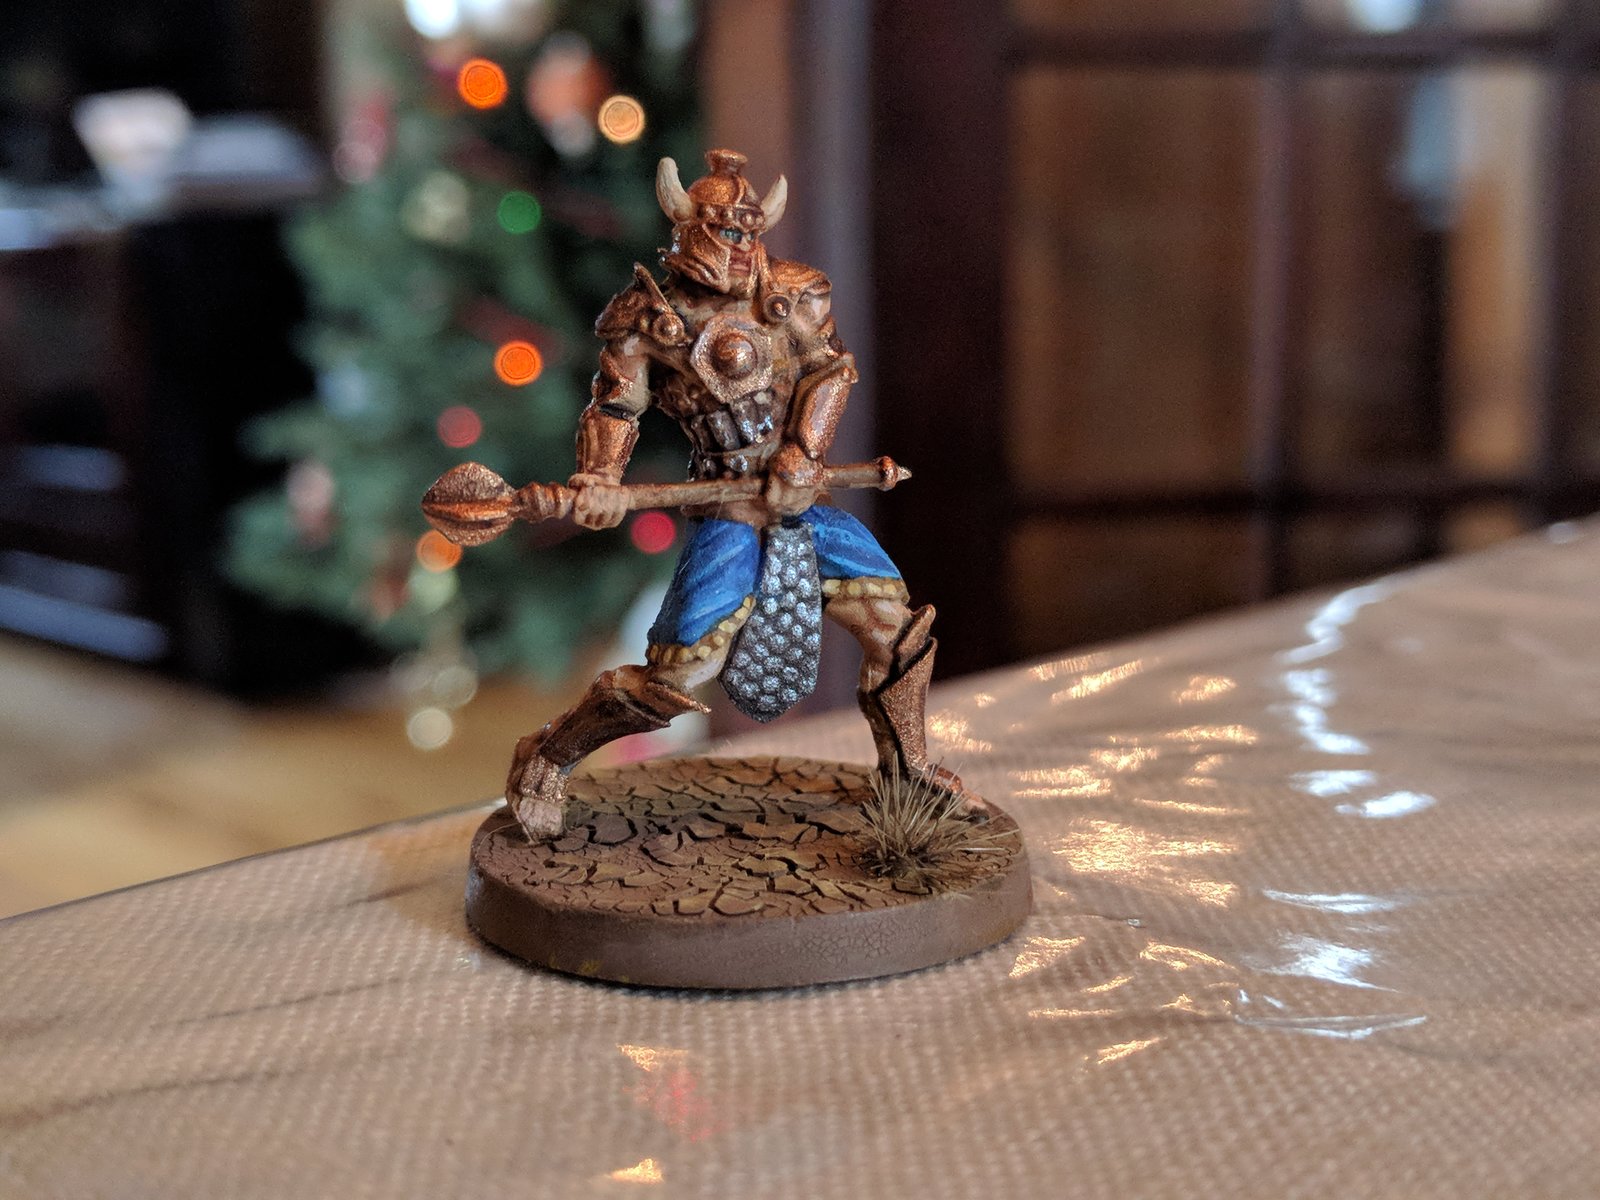
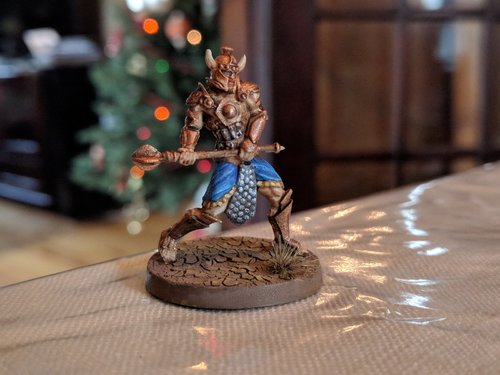
Yellow is a difficult color. It takes a lot of pigment and our eyes pick up any variation in brush stroke or thickness so easily. I saw a presentation on just how difficult yellow was at a medical imaging conference. I don't remember the details, but it focused on the wavelength and energy spectrum properties. It's difficult in a lot of other contexts as well. I find it usually takes several carefully placed brushed coats of yellow to get it look okay. Pure white and pure black are almost non-existent in the real world. You're better using those to tint and shade other colors or really thin white for highlight. For something you think is flat black, tint it a tiny bit with another color it can stay really dark just not pure black. That was the advice from an oil-painting class years ago anyway. One of the more difficult things to do as well, that really stands out on a miniature is eyes. There's a chunk of our brain devoted to facial recognition and it will pick up details on the eyes over everything else. A little off in any way and it pops out. I don't quite know how some of the professionals do it. I generally use a black ink or shade in the eye sockets to darken them. When that's dry I use a 10/0 brush to put a small horizontal oval using an ivory or bone white. Pure white stands out too much; look at peoples eyes in real life and what color do you see? Then using black (yeah I said don't above but it's soooo tiny), try to make a triangle pointing down starting from the middle top of the white oval. I do this by putting my 10/0 brush onto the center of the top of the white oval and then stroking down a tad. If the stroke goes over below, it's not too hard to come back with flesh color and correct it from the bottom of the eye using horizontal strokes. All this said, I mess up eyes about a quarter of the time, paint over it and try again the next day. Doing it immediately is too frustrating, and I usually don't wait for it to dry and it just becomes a bigger mess. Sometimes I just give up and figure it'll just always have that goofy expression and I'm moving on because it's just not going to happen. Aka, don't sweat it too much.
-
I almost forgot, "Brush Cleaner" really works. It extends the life of your brushes and keeps the tips pointy.
-
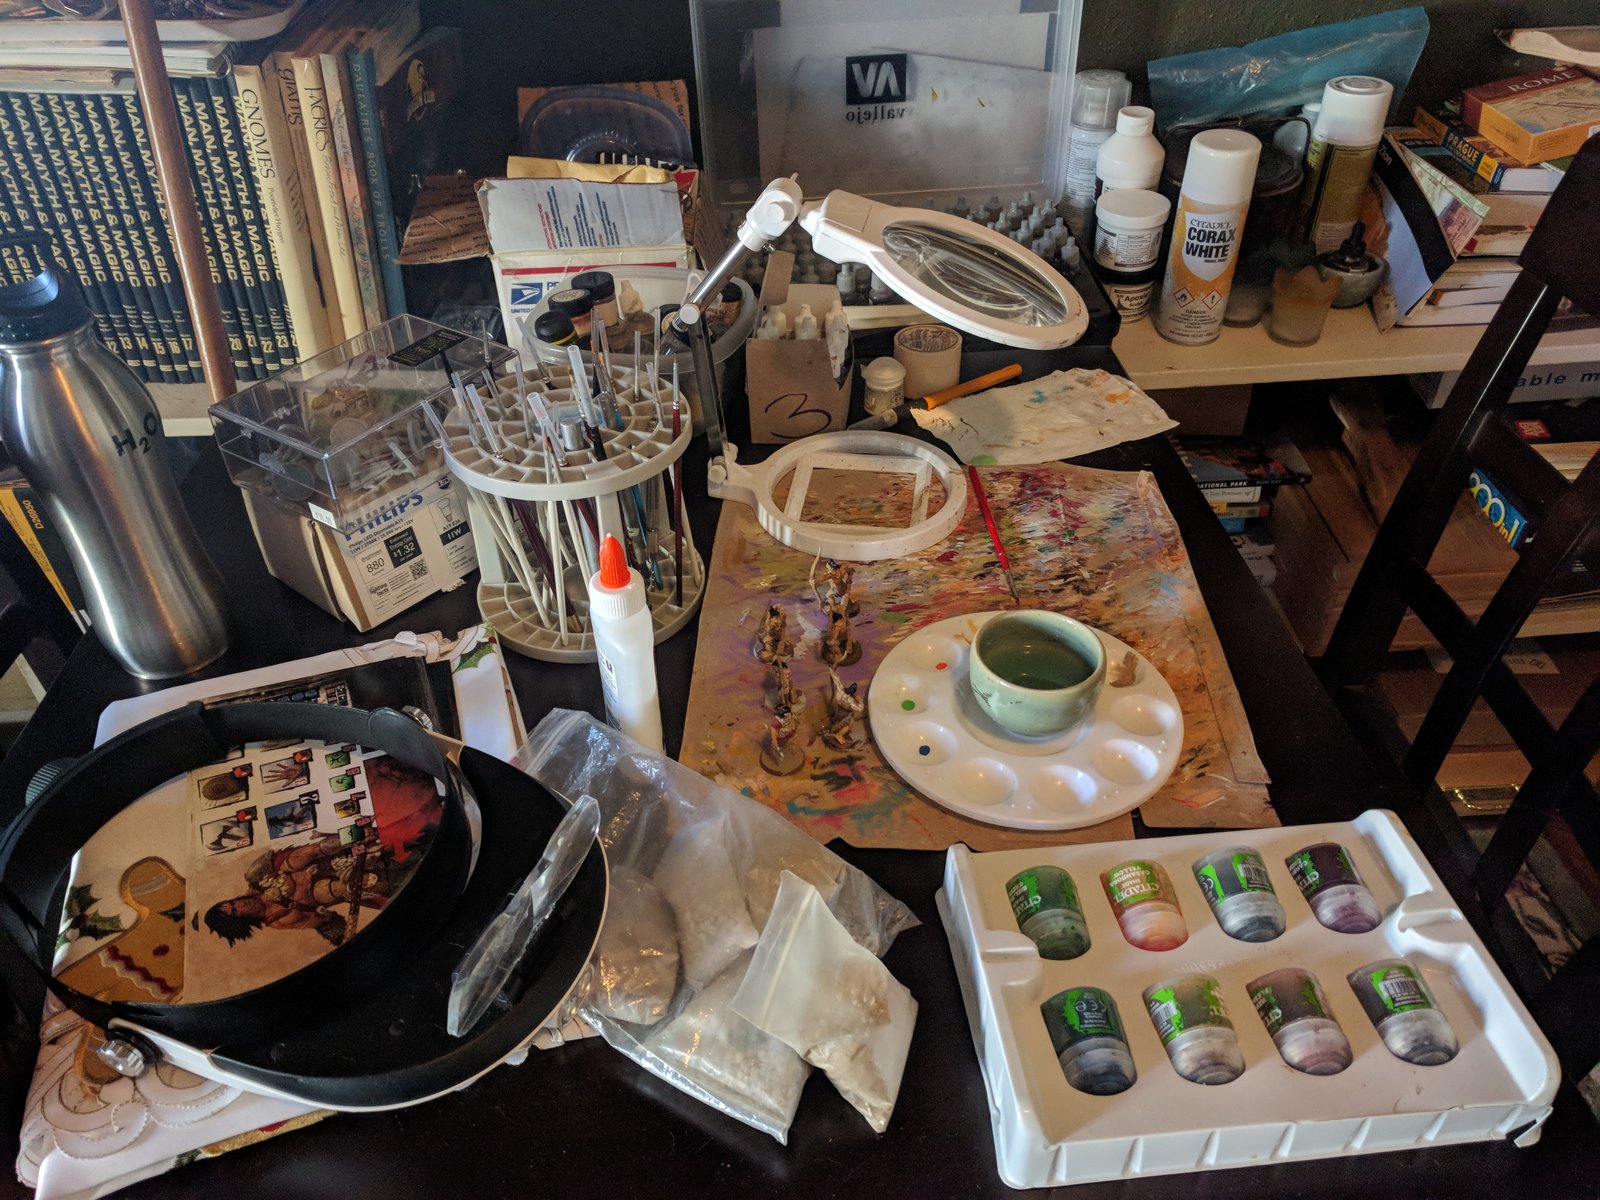
Given the other thread on helping a beginner get started in the hobby of painting minis, so much discussion resulted about what folks used. Sometimes it's better with a picture. So here's where I work at painting.

- 1 reply
-
- 2
-

-
Excellent job on the mini! I've had mixed results with primer. The expensive ones have disappointingly varied in quality from can to can (except for Citadel's which is excellent) and I've bought several of them and ended up throwing them away. The cheaper ones at the local hardware store seem to be more consistent and work just fine. The master mini painters generally use an airbrush to prime. My wife used to work with airbrushing and she doesn't want one in the house due to fumes. 😞 Red sable are the absolute best brushes for this. Otherwise, any cheap set will do. I've got almost all cheap brushes and a few red sables. If I buy any more it will be the red sable ones. Paint however, has a variety lot of grades. Most of the miniature lines are fairly the same (but price varies widely). The big cheap tubes at the craft store are a grade below, they seem rubbery and need a lot of thinning and the color washes out a bit as you thin (i.e. short on pigment, heavy on medium). The art supply stores sell the highest grade, but you have to mix all your own colors and mediums yourself so it's more of DIY of paint making. I prefer miniature lines in the dropper bottles just because they dispense a drop and don't dry out as fast. We just may have to start a "Show your paint station" thread...
-
What happens is the pages get printed on double sized paper. The ordering is worked out such that you can just fold these printed pages down the middle and staple. The digital presses now provide full automation of this. They really love you if you provide in CMYK encoded colour scheme, 300dpi and the left and right text margins for manuscript pages should not be less than 7/8ths (0.875). Page Bleed is usually around 1/8". I think one can have the cover be image that goes over margins--however the requirements for this will vary depending on the printer. The presses today are fairly accurate, but things happen on the way to the folder and cutter and it's a generally safe assumption that any print could be shifted 1/8" of inch on the paper and designing around this.
-
It has a really good article on creating scenarios and balancing as well.
-
It the page count is a multiple of 4, then there are print on demand presses that will print them and staple them together.
-
I grew up in a print shop and used to mix inks for colors. My wife has banned me from discussion on color theory, but since you brought it up... Having more colors is easier to reproduce without mixing some folks get a "wet palette" so they can mix up colors and have them over a few sessions. All you need in a mixing pigments (a subtractive color system) is white, black, cyan, magenta and yellow. Metallics are specials because they actually contain flecks of metal so those have to be bought outside the mixing system. There are greens which we don't have pigments to reproduce but those colors are not common unless you work in a metallic chem lab oxidizing metals. However, to reliably mix colors from that you'll need a color mixing guide and those surprisingly aren't cheap. Also surprising, most pigment sets don't have cyan and magenta which is weird. There's this antiquated idea that red, blue and yellow can mix anything which is bunk (red, green and blue can in an additive system i.e. mixing light beams). All that said, I would get a set that had at minimum the basics white, black, cyan, magenta, yellow, metallics. Then round out with commonly used paints dark flesh, light flesh, leather, earth, natural tones, and some oranges, reds, greens, blues to round it out. I prefer the little squeeze bottles with a tip. They keep better. Then the starter set of shade inks from Citadel is a great ink set.
-
Just remember these golden rules: 1) Relax, take it easy and have fun. 2) Try 1 or 2 new techniques at a time and don't be afraid to experiment. 3) There will be times when what you did doesn't work for you. It's no big deal, you can keep painting over unless it's so thick it's lost detail and then you can strip. 4) Thin your paints. 5) When in doubt see (1).
-
Simplest method: just dunk the whole mini with all areas painted flat in black ink. Some folks are quite happy with just doing this and moving on. It does turn the whole miniature darker, so you want to use lighter shades than you intend for the final. It's also called "slop and go." From your questions, I don't think this your intent, you seem curious to learn. Better slower method: layer appropriate colored ink along all the lines of shadow under crevices using a 000 brush after filling in areas. Is it essential to drybrush? A better question to ask is it essential to highlight? Highlighting areas can be done via multiple methods. Dry brushing is very destructive to a brush, but quickly gives a highlight to an area. One can also use really super thin white or near white paint to highlight an area and feather the edges. Not as destructive, but takes more effort and the results tend to look better. But not always, sometimes dry brushing texture is perfect for what you want. Try both and see how they work. I tend to do all flat paints, gradients for broad areas. Then ink. Then highlight (occasionally dry brushed). Then touch up till I'm happy. Others suggested watching some videos that walk you through a mini. Zarastro on youtube does this for a lot of common miniatures. Follow along with his instructions and do a few. You'll get the hang of it, and eventually develop a feel for just how thin is the right amount and what color works where.
-
I forgot I had this on my shelf. >Runs off to dig through shelves<
-
I really really like this sculpt.
-
All good advice above. I posted another article on Forced Shadow here, I recommend reading it for color theory of what your doing. How much you use forced shadow is a choice, but the inking in the crevices is the minimal amount. SImple painting steps: 1) Thin your paints. Not to the point that they just run out of control. Using medium matte thinner is probably the best option. Also you don't need a lot of paint this way either. Tiny drops are usually sufficient unless the area to cover is really large or doing multiple minis. 2) Start with the biggest innermost areas and work outward doing a broad pass. Detailing comes at the end. 3) For the broad areas that need gradient pick 3 colors or shades. You can even just take one shade and mix up with a bit of black and down with a bit of white. Use these colors to *quickly* paint in areas with proper shade. Don't worry about clean lines or getting 100% correct. If you did (1) above, they will blend on their own. Wait a minute or so, and see how their blending. Touch up the areas with light and dark. Maybe even keep a brush for feathering the colors together. 4) With broad areas done, paint all the details their neutral colors. 5) Now apply inks. Shade corners, cracks, all the details. Think about how shadows fall under details. Use a lot of black on metals. Also when inking, it's better to put it where you want carefully than to just slop it on. However, for a beginner slopping it on actually works out okay. You can pull ink off if you wash and dry a brush on a paper towel. The dry brush will pull ink out. Move it around till it's where you want it. A few areas will be problems of pulling too much ink in. You'll have to figure out a solution for those--usually painting back up to neutral colors. 6) Dry brush furs (or metals) and hairs with lighter color. 7) Now using really thin white and your finest brush, bring back details where needed. For your first one I recommend picking one that has broad areas and little details (i.e., not the Conan minis). Painting up a cloak or fur, or the broad skin of an ogre or troll is a great way to start. Monsters are more forgiving. Now, if you totally mess up--it's completely okay! Just soak the mini in pine sol overnight and scrub with a toothbrush and soap and boom, you can try again. Or you can just keep layering over the top--that works too. Tips for getting better. 1) Take pictures of your mini with a cell phone. Look at details. What worked? What didn't. 2) Look at professional pictures and see if you can figure out how to approach what they did. 3) Look at similar things in real life and notice the color gradients. 4) Learn basing techniques. 5) Experiment with more exotic paints (translucent and textures). 6) By ALL means have fun. It's for your enjoyment and whatever you do is yours.
-
I found these: https://paizo.com/products/btpy91ln?Pathfinder-Battles-Skull-Shackles-Shark Nice sharky. Good boy! Although these might work well for Batman. He does have that Shark repellent on hand. And yes, I'm drifting the topic so back to your regular scheduled crushing of the enemies.
-

A Podcast about Sword-and-Sorcery? Check out Rogues in the House
garbetsp replied to Matt John S's topic in News
Just finished it. It was good, thanks. That "Wildside" journal sounds interesting. If my credit card wasn't overheating from xmas buying I would subscribe today. -
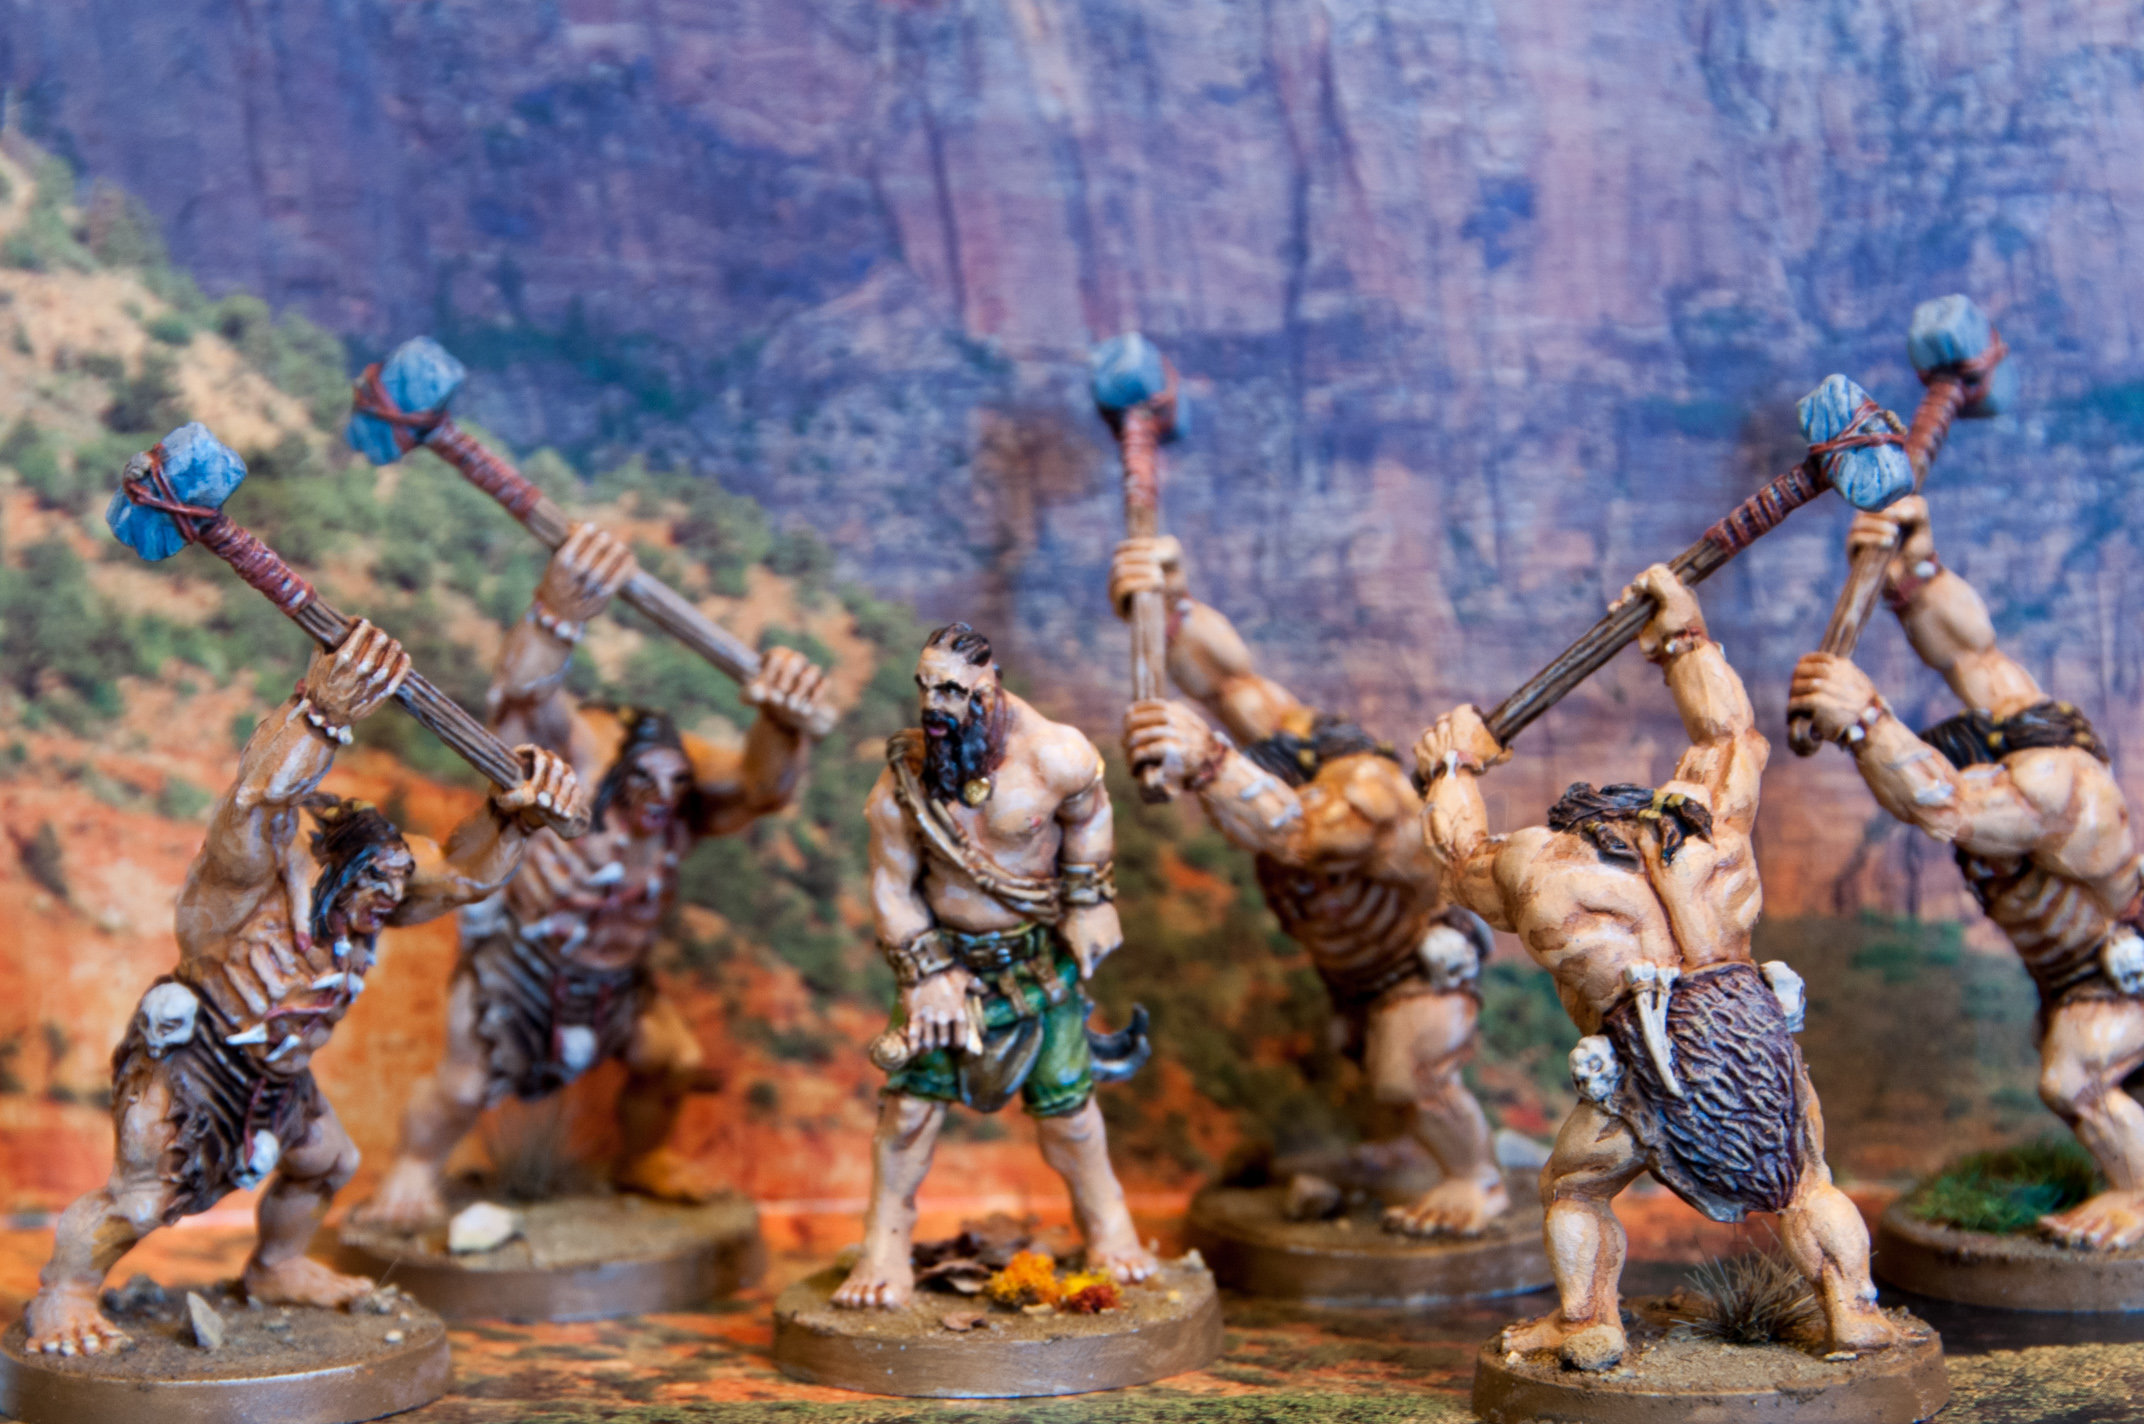
Of course, given the next Kickstarter for more Conan is some unknown time in the future this post is probably moot as most of us are painting--but if there are any stragglers just getting started this might be helpful. I've added every scenario that Monolith, Modiphius and the recent campaign published here. The order changes a bit. I love the fact that the Guards are really Conan's most consistent enemy (which is why I gave them shiny black leather jack boots in my paint job). Yogah coming early and rounding out the guards is curious. Then the pirates being his second big group of foes follows the books quite well. The Picts and snake don't start until 20 in the list--which is where most start because of the first scenario in the book. Oddly in this run Atali and the crows dropped way down. 1 'The Wrath of Anu' by painting: Conan, Bossonian.Guards, Thak 2 'Torrid Night' by painting: Valeria, Captain 3 'Yara's Trap' by painting: Yogah.of.Yag, Bossonian.Archers 4 'Infernal Pursuit 1' by painting: Shevatas, Pirates 5 'Trapped Like Rats' by painting: Hadrathus 6 'Infernal Pursuit 2' by painting: Zaporavo 7 'The Key of Kuthchemes' by painting: 8 'Camel madness' by painting: Camel 9 'The Killing Floor' by painting: Kothian.Archer 10 'Thak the simian' by painting: Grey.Man.Ape 11 'Mayhem at Sin Valent Inn' by painting: Belit, Thalis..Princess. 12 'For All of Ophir's Gold' by painting: Hyenas 13 'The Crawling Shadow' by painting: Thog 14 'Conspiracy in Khauran' by painting: Crossbowmen 15 'Yogah´s Rebirth' by painting: Kushite.Witch.Hunters 16 'The Cursed Mirrors' by painting: Belit.s.Guards 17 'The Terrible Lovers' by painting: Conan..Thief. 18 'Vaniria is the fort' by painting: Valkyrie 19 'Grudges and Secrets' by painting: N.Gora, Forest.Demon 20 'Death on the Tide' by painting: Zelata, Pict.Archers 21 'The Sleeping Serpent' by painting: Mummies, Giant.Snake 22 'Facing the Serpent-Specter' by painting: Zogar.Sag, Pict.Hunters 23 'In the Clutches of the Picts' by painting: Pict.Warriors 24 'The Final Ritual' by painting: 25 'Red Dawn' by painting: 26 'Secrets in Stone' by painting: 27 'The White Witch' by painting: Giant.Wolves 28 'The Thing From the Swamp' by painting: Tentacles 29 'Demon From the Depths' by painting: Outer.Dark.Demon 30 'Hunting the Tigress' by painting: Skulthus 31 'Of Man and Beast' by painting: Belit..Savage. 32 'Uproar in Messantia (1)' by painting: Conan..Amra. 33 'The Cursed Treasures of Khawarizm (17)' by painting: 34 'Blasphemers from the Past' by painting: Dark.Demon 35 'A Lion Among Panthers' by painting: Balthus.Slasher 36 'Behind the Barricades (15)' by painting: 37 'In The Name of Ibis' by painting: Skeletons 38 'When the Dead Walk (4)' by painting: 39 'The Mad Shaman (6)' by painting: 40 'The sails of wrath' by painting: Thaug 41 'The Caller from the Depths' by painting: Amboola 42 'Sacrificial Heroes' by painting: Pallantides 43 'The Treasure Chest (8)' by painting: Hyperborean.Primitive 44 'An Explosive Enigma (10)' by painting: 45 'The King's wolves' by painting: Conan..Wanderer. 46 'First mistake, last mistake' by painting: Crows 47 'The Woman of the Mist' by painting: Giant.Spider 48 'The sepulcher' by painting: Taurus 49 'Balthus' grief' by painting: 50 'Halls of the Scarlet Citadel' by painting: Swamp.Demon 51 'Horror of the Fens' by painting: Giant.Scorpion 52 'In the Heart of Darkness' by painting: Khosatral.Khel 53 'The Last Dagonian (19)' by painting: 54 'The Last Ditch Invocation' by painting: Pelias 55 'Death from the North' by painting: Conan..General. 56 'Attack on Fort Tuscelan' by painting: 57 'The Crook's Hideout (7)' by painting: Constantius 58 'The Inn of All Dangers (5)' by painting: Bone.Golem 59 'The Fortress of Xapur (18)' by painting: 60 'A Glimpse into the Dark' by painting: 61 'The Woman Who Never Died (9)' by painting: Akivasha 62 'Reason of state' by painting: 63 'Dreams in the Lotus House' by painting: 64 'Cimmerian Walkabout' by painting: Conan..Mercenary. 65 'The Treasure of Tranitos' by painting: Conan..Warlord. 66 'Crimson night' by painting: 67 'The Serpent's Awakening' by painting: Olgerd.Vladislav 68 'The most barbarous game' by painting: 69 'Sedition' by painting: Kerim.Shah 70 'The Curse of the Shape-shifter' by painting: Warlock 71 'The Spellbook of the Gray Man-Ape (16)' by painting: 72 'A heart to be taken' by painting: 73 'The Iron Hand' by painting: Khemsa 74 'A Terrifying Incantation (11)' by painting: 75 'Approached by the Vandal (12)' by painting: 76 'The Horror from the Abyss (13)' by painting: 77 'Run Till You Drop' by painting: Atali 78 'Damned Resurrection' by painting: Natohk 79 'The Mystical Dagger (14)' by painting: 80 'A Surprise Entrance' by painting: 81 'For the Blood of a Barbarian' by painting: Ageera 82 'An Improbable Alliance (3)' by painting: 83 'Bridge of Death' by painting: 84 'An Ape, Several Kegs and a Girl' by painting: Gitara 85 'The Unmasked Pirate (2)' by painting: 86 'Valentine day's ball' by painting: 87 'The Price of Success' by painting: Black.Dragons 88 'Where the Thunder Rumbles' by painting: Sabertooth.Tiger 89 'A Dragon on the Marches' by painting: Dragon 90 'The Zamboula Strangler' by painting: Baal.Pteor 91 'Sacrifice of the Black Ones' by painting: Black.Ones 92 'The Hammer and the Anvil' by painting: Niord, Giants 93 'A Red Sun Rises' by painting: Aesir.Warriors, Vanir.Warriors 94 'The Resurrected Horde' by painting: 95 'Dreams of Atali' by painting: Ikhmet, Shentu, Thot.Amon 96 'The Trap' by painting: Assassins 97 'Defeat or Die' by painting: Eternal.Guard 98 'The Fifth Plague of Stygia' by painting: 99 'The Lost King' by painting: Scorpion.Broodmother 100 'The Curse of the Scorpion' by painting: 101 'The Fate of Yag-Kosha' by painting: 102 'The Streets of Khemi' by painting: Shuang.Mian, Javelin.Throwers 103 'The Time for Flight is Nigh' by painting: Honor.Guards, Khitan.Guards 'A Bloody Burglary' 'Smoke Screen' 'The Remedy' 'The Magnificent Three' 'Rescue at the top' 'The Time for Flight is Nigh' 'Fight or Flight'
-
Thank you Matt. That is completely transparent and clear language.
-
Can you give specifics about a single scenario? Your request is very broad and hard to say without details. The best would be to pick a recent scenario you played, then walk through a specific fight for a round or two. Thus if it's either strategy (the scenario), or something in the immediate tactics of the fight folks can help better. Our group has gotten quite good and I'm having problems as OL keeping up with them. Last two games have come down to a single die throw in the last round.
-
Monolith if you're listening, I have a request. This Conan and Monolith fan would like a press statement that clearly says what the current plans and status for Conan in the future is. Not a commitment, just clear language about what is presently planned and maybe even what hurdles need to be cleared. Epaka's post on Kickstarter is an excellent template about what folks are trying to piece together. Personally, Conan feels a bit neglected. It was going to be after Mythic Battles, then after Batman (we all assumed you had to wait for a previous retail contract to expire so okay at least we have someone external to scorn), then after Mythic Battles 1.5, then after Claustrophobia, and now everything appears to be in some limbo status yet again. If you still have a license, then I don't care what Shinobi 7 does. In fact, I will probably not care no matter what, since they're talking about a card game then miniatures in the future. Monolith has already set the bar quite high in that regard so for them to go down that road it's going to be quite difficult--especially if you saturate the market again before they have their offering. I'm already invested heavily in the Monolith system, especially having gone all-in on Mythic Battles and the crossover, I don't think Shinobi 7 can tempt me over as i'm quite happy with what your producing.
-
Forced Shadow: Theory of Miniature Painting
garbetsp replied to garbetsp's topic in Paint and scenery
I've seen what you refer too, I think when taken too far forced shadow leads to cartoonish looking miniatures. In photography, harsh direct lighting rarely makes for a good photo (although some shots call for it). One can take the technique too far. In the end it's all personal taste. I try to go for some, but not too much, an ombra non troppo if you will.